Battery and electrical service 101
Evaluating an automotive electrical system starts with the battery, and the first step in evaluating a battery is the eye test. A battery that looks like junk most likely is. Corroded terminals can lead to deterioration of the posts, eventually killing a battery. The two most common corrosion causes are a current leak across the top of the battery and acid seepage around the posts. Dorman battery terminal protectors fit over the post and under the terminals and provide a shield that prevents current from traveling across the top of a battery. Spraying the terminals with CRC Battery Terminal Protector safeguards the terminals from the elements.
When performing a visual inspection of a battery, look for obvious leaks at the seams and around the posts. Assure that the battery isn't bulging at the sides. If the battery passes the visual inspection, perform a load test. I have an OTC model 45NU85 Handheld Digital Load Tester that provides quick, accurate, and easy-to-read results. The clamps open wide to fit over these new-style mega-terminals, and the unit doesn't get hot to the touch when used more than once in a short time.
Consider the battery's state of charge
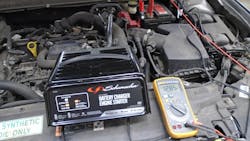
The use of electronic modules in automotive applications has made battery state of charge (SOC) a significant value. SOC is the remaining capacity available in a battery. A battery that shows an acceptable 12.5V on a voltmeter can have a low state of charge, causing the battery to perform poorly. Most electronic modules require an 80 percent SOC when performing reprograms and updates. If your scan tool shows a state of charge below 80 percent, you should charge the battery before performing an update or an electronic module diagnosis. I use a Schumacher SC1305 Battery Charger. I just retired a Schumacher battery charger I've used for about 20 years. The SC1305 has turned out to be an excellent replacement. It's inexpensive, small enough to carry to the vehicle, and offers 2A, 6A, 10A, and 50A charging modes. The 50A mode will start a vehicle with a dead battery, and the 2A charge is perfect for bringing a low SOC battery back to life.
A word on the load test. The battery SOC can compromise the results of a battery load test. A freshly charged battery with a high SOC might pass a load test that it would otherwise have failed. On the contrary, a low SOC battery might fail a load test when it only needs a good charge to bring it back to life. So consider the circumstances before condemning or passing a battery, and maybe give it a second chance at the load test.
The wire repair
Electrical diagnosis almost always leads to component replacement or wire repair. In the case of a wire repair, the diagnosis usually takes longer than the repair. This doesn't mean that the wire repair should be taken lightly. An adequate wire repair should have low resistance and high tensile strength. The old twist-and-tape method just doesn't cut it anymore.
Soldering the wires is the only way to ensure a strong, low-resistance connection. A 60/40 solder (60 percent tin, 40 percent lead) works best to connect a copper-stranded wire. If you're concerned about using lead for health reasons, they make a lead-free solder of about 99 percent tin and 1 percent copper. I've been using Kester 22 AWG Solder. I like using thin solder for wire repairs. It melts quickly and pulls evenly into the wire.
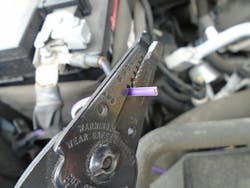
Strip away about 3/8" of insulation on each wire. I use Craftsman 82544 Wire Strippers. I don't like the automated strippers that automatically adjust to the gauge of the wire. They tend to cut too deeply or leave behind residual insulation. Cutting too deeply removes copper strands, which compromise the integrity of the wire, and not going deep enough leaves behind insulation that can melt into the wire and cause high resistance in your repair. The 82544 is made with separate cutters for numerous gauges of wire. Notice in Figure 1 the stripping options provided by the Craftsman wire stripper.
Slide a piece of shrink tube about 1" to 1.5" long over the wire. Use a shrink tube that fits close to the wire, leaving enough room for the inevitable slight bulge where the solder is applied. Push the two wires so the copper strands mesh together, creating a union that is not much thicker than the wire. Do not twist the wires together; this creates a ball of wire and solder under the shrink tube that can eventually bust through.
Before soldering, you can use rosin flux if you wish. Rosin flux is made from pine tar resin and helps to draw the solder into the wire strands. MG Chemicals Rosin Flux works well and is easy to use. MG is a liquid rosin flux that applies easily with an acid brush without clumping up, as a wax rosin flux tends to do.
Practice using a proper soldering technique
While your soldering iron is heating up, wipe the tip with a wet rag or sponge. This removes oxidation, old solder, and whatever debris is on the tip. Also, clean the tip between solders if you do more than one wire repair. A clean soldering tip makes for a clean solder. I use a Weller Electric soldering iron. Weller produces many types of soldering irons. The pencil type is most practical for automotive applications; the sleek design makes it easier to access tight spots. The trigger type fits into your hand like a small power drill. The tip heats up when pulling the trigger. The trigger type is a bit bulkier and can be cumbersome in tight spaces. I prefer the solid grip and trigger control of a trigger-operated soldering iron. The Weller D550PK is a reliable soldering iron equipped with an LED light and extra tips. The tip of the soldering iron must reach 650 degrees F. The solder must flow like water into the strands of the wire. This is why I don't use butane-powered soldering irons. I haven't found one capable of maintaining the desired heat range.
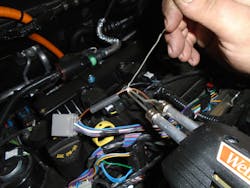
Before soldering, ensure that the wires are secured. They should be held into position so they can't pull apart when touched by the soldering iron and the solder. Touch the hot iron tip to the bottom of the wire section to be soldered. Touch the solder to the top of the wire strands, not to the soldering iron tip. The solder will cascade over the wire within seconds, pulling into the strands. Pull the soldering iron away. Knowing when to pull the heat source away is crucial. If the heat stays for too long, the solder will melt off the wire, not long enough, and you'll be left with an ugly clump of solder and a poor connection. Figure 2 shows the solder starting to melt and flow over the wire. Practice this.
Shrinking the tube
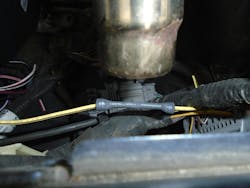
I use a Wagner heat gun to melt the shrink tube. Do not use an open flame. The flame damages the shrink tube, and you could turn the vehicle into a bonfire. Start at the center of the shrink tube and work your way to the outer edges with the heat gun. You'll see the sealant melt out of the edges of the shrink tube. In Figure 3, heat is applied first to the center of the shrink tube, working towards the outer edges. What you have here is an excellent, low resistance, high tensile strength repair.
To repair or not to repair
Use your discretion when deciding to repair a broken wire. Today's manufacturers can use some small wires in low-current applications. If you doubt the integrity of the repair, don't do it; replace the harness.
Sometimes, the point of the repair is too close to an electronic component, or maybe so many wires have been chewed through by a hungry critter that the integrity of the harness is in question. When in doubt, replace the harness.
You are the technician
Automotive technology, especially automotive electronics, leaves a lot to the foresight and wisdom of the technician. Evaluate electrical concerns with your experience as well as your equipment. A good visual inspection, performed by an experienced technician, is a priceless diagnostic tool.
Tools Used
- CRC Battery Terminal Protector
- OTC model 45NU85 Handheld Digital Load Tester
- Schumacher SC1305 Battery Charger
- Kester 22 AWG Solder
- Craftsman 82544 Wire Strippers
- MG Chemicals Rosin Flux
- Weller Electric Soldering Iron, No. D550PK
- Wagner Heat Gun
- A visual inspection
About the Author

Roy Dennis Ripple
Roy Dennis Ripple is a Ford Senior Master Technician and an ASE Master Technician with more than 30 years' experience in the automotive industry. As an automotive journalist, he is the recipient of a 2020 Azbees Award and a 2020 Tabbies Award. Ripple is currently working full-time as the shop foreman at a Ford dealership. He lives in New Jersey with his wife, three dogs, and two motorcycles. He can be reached at [email protected].