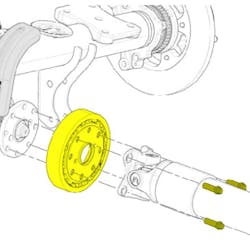
Some 2015-2020 Ford Transit vehicles equipped with rear wheel drive, single wheel only, and U-joints at the transmission flange and rear driveshaft may experience a boom/moan/hum noise from the rear while driving.
The noise is most notable at highway speeds (70-75 mph with 4.10 axle ratio; 75-80 mph with 3.73 axle ratio; 85-90 mph with 3.31 axle ratio).
The noise may also be present to a lesser degree at roughly half of the noted speeds. This may be due to a 2nd-order driveline frequency transmitted through the rear driveshaft, rear axle and into the body through the leaf springs.
1. Inspect the rear driveshaft, driveshaft joints, driveshaft center bearing(s) and slip yoke splines for damage or wear. Repair as needed.
2. If the noise has not been resolved, using the Mastertech Series MTS 4000 Driveline Balance and NVH Analyzer (Vetronix) or equivalent, analyze the noise. If this identifies the concern as a driveline vibration, refer to workshop section 205-01 to resolve the vibration and re-test.
3. If the analysis does not recognize the issue as a driveline vibration, mark the pinion flange and rear driveshaft U-joint to enable correct indexing of the driveshaft during installation. Refer to section 205-01.
4. Remove the driveshaft to axle pinion flange bolts. Clean the bolts of old Loctite with a wire wheel/solvent. With a suitable strap, support the driveshaft so that there is no undue stress applied to the driveshaft-to-transmission output flange joint or driveshaft center bearing.
5. Inspect the pinion flange to the driveshaft mating surface for any debris or excessive rust and clean as needed.
6. Install the driveshaft torsional damper P/N LK4Z-4A263-C.
7. Align the index mark on the driveshaft and rear drive pinion flange and reinstall the driveshaft. Make sure the driveshaft fits securely over the raised flange of the torsional damper. Note: The maximum articulation of any U-joint is 10 degrees. If further, damage may occur.
8. Apply Loctite 263 to each of the four cleaned bolts. Install the driveshaft attaching bolts and tighten to 85 ft-lb.
9. The torsional damper kit may come with a shield. If a shield is provided, discard it, as it is not required.
About the Author
Mike Mavrigian
Motor Age Editor
Mike Mavrigian has written thousands of automotive technical magazine articles involving a variety of specialties, from engine building to wheel alignment, and has authored more than a dozen books that crisscross the automotive spectrum. Mike operates Birchwood Automotive, an Ohio shop that builds custom engines and performs vintage vehicle restorations. The shop also features a professional photo studio to document projects and to create images for articles and books.

