Guest Blog: Guided component tests deliver potential for higher levels of efficiency, productivity, and profitability

All things in life are better when you have a good guide. A good guide can help make processes more efficient, more productive, more successful, or more profitable. That brings us to the topic of this article: guided component tests, which are designed to do just that. Those benefits happen because of the first word, guided.
There are two types of diagnostic tools – scanners and component testing. The scanner, which is like a nice compass, shows the technician which direction to look for the problem. It shows them where they need to look. Component testing is then used to pinpoint the cause of the issue.
Guided component tests on Snap-on tools take the scope and other meters that make up component testing and make it simple to use. That’s where it guides the user on how the component works, how and where to hook it up, and what it should look like. There are over 7 million guided tests available, or we should say, “over 7 million on-the-job training sessions” available, with the guide being the teacher.
In this case study, we are diagnosing a 2019 Jeep Grand Wagoneer, so in addition to performing component testing, we also need to access the Jeep’s secured gateway.
Automobile manufacturers have put in network systems to protect their vehicles from unauthorized access, including potential cyber-attacks. For those vehicles with secure systems, like Ford, Fiat Chrysler Automobiles (FCA), and others, access to certain diagnostic functions may require registration and authentication through an approved device for all aftermarket scan tools. For those who own a Snap-on tool, this is where Security Link comes into play.
Another exclusive feature of guided component tests is over 60 training classes covering topics such as basic electronic components, an ADAS class, a brushless DC motor class, an evaporative emissions class, and many more classes embedded in the tool.
Think about how convenient it is to take a class on demand and when you need it. Having it on the tool saves a great deal of time. Below is a sample of some topical classes offered out of a total of 63:

Let’s look at the basic electronic component class. It starts off with semi-conductors and diodes, and as you scroll down, it takes the class all the way to capacitors and transistors.


Let’s get to work on the 2019 Jeep Grand Cherokee with the 5.7L engine. The customer's complaint is it runs rough, especially when accelerating and the check engine light is on.

We will start with a pre-scan to point us in the right direction.

There are two codes: misfires and evap. Using ShopKey Pro repair information below shows that the leading cause of P0456 is the gas cap. Check the cap then clear the codes for that issue. We will need to do more testing for the P0300 misfire code.


If we press the diagnose button on the P0300 description bar, we go to Fast-Track Intelligent Diagnostics. It provides an efficient workflow, which helps to move us through the diagnosis and repair quickly because it filters all of the data and tests down to only what is relevant for that specific vehicle and trouble code.
A great example of this is the technical service bulletins (TSBs) below. This vehicle has 38 TSBs. None of them have any relevance to this trouble code. How much time was saved by not needing to look at 38 TSBs?
The top three repairs for this vehicle with this trouble code are:
- Replace spark plugs
- Replace ignition coil
- Replace fuel injector
Can we narrow down the problem cylinder? Fast-Track Intelligent Diagnostics shows only the relevant functional tests available as well. Jeep has a misfire counter very similar to GM. They aptly named it “which cylinder is mis-firing?”

It looks like we have a problem with cylinders three and six. To verify, go to guided component tests and test the coils and injectors on those cylinders.

Unless you are extremely familiar with this vehicle and system, I recommend letting the guide teach you about this system’s operation and connector layout. This could save a lot of time chasing down the various circuits in a wiring diagram.

After you have had a little on-the-job training on the operation of the system, the guide will show how to hook it up. We will be looking at amperage to determine the integrity of the coil. I prefer the low amp probe when possible because it is non-intrusive to the circuit and it is easier to hook up in most cases. Plus, it really shows the work being done where voltage cannot. It simply is hooked around the wire that powers the circuit as shown in the picture below.

Sometimes the component is buried and to get to it will require disassembly. Our guide comes to the rescue again by showing a tip to remove the fuse for that coil and install a fused jumper wire, then attaching the amp probe to that.
The guide has us hooked up and ready to test. I can view the meter and the guide at the same time as shown below. This allows us to compare the live pattern with the sample patterns. It guides us to what is good and bad. If both coils on the suspected cylinders look like this, then check the injectors.


Just like the coil hook up, the guide will walk through how to hook up the low amp probe. Again, it gives the fuse loop option. The green trace is the amperage reading in the screenshot below. I also used the guide to help me hook up a second channel to look at the voltage on the same injector - as shown by the yellow trace. I did that to explain the difference and to further illustrate the power of amperage.
Remember that amperage is the power that does the work. Voltage moves through the circuit carrying the amperage to the injector. To say this a different way, the voltage is the vehicle that takes the worker, (amperage) to the jobsite (injector). It is the worker that gets the job done. In this case, pull the injector open and inject fuel.
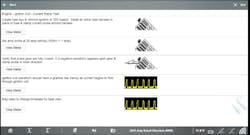
Power is always at the injector and the ground that closes the circuit is from the PCM. It also controls when and how long the injector should open - that is the yellow trace. Number one on the image below indicates when that ground is sent from the PCM, commanding the injector to turn on. Note that when the ground closes the circuit that amperage, the green trace, begins to ramp up. The amperage (the worker) is building up enough to mechanically open the injector.
Number two indicates when the injector actually opens. See where the trace bumps right there? We are seeing the work inside of the injector being done, the pintle was pulled out of its seat right there. The rest of the amperage ramp is the workers holding the injector open.
Number three is where the PCM opens the circuit and closes the injector. When looking at pulse width on the scan tool, it is not true pulse width. It is commanded pulse width, between numbers one and three.
True pulse width is between two and three.

To get back to finishing the Jeep, let’s slap a set of plugs in it and let it go. I know in the real world we would have done that to begin with, right?
After repairs, check for any necessary resets, clear codes, and run a post-scan for the customer. Skipping the final steps could result in a comeback. The only necessary reset on this Jeep for a misfire is to reset all adaptive memory shown below.

I hope that this article has shown you the power of a good guide. It sure beats winging it doesn’t it? Also, I hope you have seen how guided component tests may help you achieve higher levels of efficiency, productivity, and profitability.
About the Author

Keith Wray
With over 45 years of experience in the automotive industry, Keith Wray started his career as a technician/automotive machinist and worked his way up to a service manager for an OEM dealership. He currently serves as the national training manager for Snap-on Diagnostics where he co-develops training materials as well as conducts technical courses for franchisees, employees, end-users, and vocational students.