The top 10 brake service mistakes - See anything familiar?
If a car won't go, it's an inconvenience to your customer. But if a car won't stop, your customer can suffer physical injury, even death. So why do we treat the service and repair of one of the most important systems on the car so nonchalantly? I can tell you why - because we do the job so often it becomes routine. And in the process, we start to skip important steps that can make the difference between a job that performs as well as the original or one that, at the least, will result in a comeback due to noise or pulsation. So, let's take a look at the top 10 most common brake service mistakes and let's see if you recognize yourself in any of them.
1. Brake fluid inspection
When it comes to inspection, there are actually 2 common mistakes made. The first is adding fluid to a master cylinder that is low without determining the cause of the fluid loss. Brake systems are closed systems, and the only reason for the fluid to go down is either a leak in the system or brake pad wear. When the fluid reaches a minimum level, a warning light on the instrument panel illuminates to warn the driver of the need for a brake system inspection and service. If we add fluid without correcting the problem, we are setting up our customer for some serious problems like metal-to-metal contact or even a loss of brake system function!
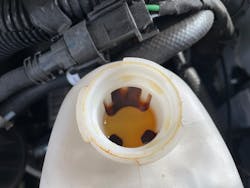
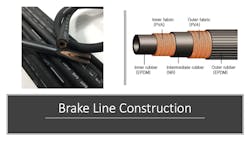
The second of the two is judging the need for brake fluid service simply by the color of the fluid. While normally clear or amber in color, brake fluid can easily turn dark even while sitting on the dealer's lot! A few reasons for this are the lubricants used in the manufacturing process and discoloration caused by the EPDM brake hoses. The only acceptable way to check brake fluid currently is by measuring the amount of copper in the fluid. The copper contamination is caused by the early process of internal corrosion eating away at the copper brazing used in the steel brake lines. Test strips are available for this purpose.
2. Failing to put an electric parking brake into service mode
Another common, and potentially hazardous, mistake is failing to put the brake system into Service Mode prior to disassembly. On some systems, it is possible for the system to cycle through a self-test and if this occurs while the caliper is off of the car...well, you fill in the rest yourself.
3. Hanging the caliper by the hose
I'm willing to bet that you've at least seen this happen if you haven't done it yourself. The caliper is removed and then shoved into some crevice on the lower control arm, in the hopes it will stay where we put it. Ah - but shortly after, it slips, and you come back to see it dangling by the hose! This can cause internal damage to the hose which can act as a check valve when the brakes are applied - allowing fluid through but not back again - keeping the brakes applied, even after the driver has lifted their foot off of the pedal.
4. Improper rotor service
Like brake fluid inspection, this general mistake actually covers several under one heading. Improper rotor service can be any of the following:
- Failure to verify existing rotor is serviceable and using it anyway
- The need to resurface if using an existing rotor. (New pads almost always require a fresh rotor surface so the pads can deposit a thin layer of friction material to increase braking performance. If old deposits of the previous material are on the rotor, it can contaminate the new pad and lead to performance and noise issues.)
- Proper measurement and assessment of rotor
- Proper surfacing and cleaning of machined rotor
This also leads to the need to discuss what kind of braking system your customer's vehicle uses. And I don't mean disc or drum. I mean "abrasive friction" or "adhesive friction".
Today, OEs are moving over to ceramic or NAO – that is, Non Asbestos Organic – brake pads that use layering technologies to stop the vehicle by adherent friction.
What is the difference between abrasive and adherent friction?
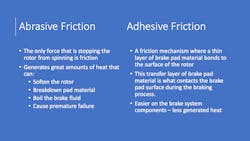
Simply put, abrasive friction is what happens when the brake pads are pressed against the rotor. It’s called abrasive because the only force that is stopping the rotor from spinning is friction. And when two brake pads are pressed against both sides of the rotor, the friction becomes great enough that it stops the rotor. But this also generates great amounts of heat that can soften the rotor, break down the particles of the brake pad, and cause premature failure.
Adherent friction is a friction mechanism where a thin layer of brake pad material actually bonds to the surface of the rotor. This transfer layer of brake pad material, once evenly established on the rotor, is what comes into contact with the brake pad surface during the braking process. Adherent friction is not as hard on the brake pads and rotors as abrasive friction is.
What that means for your customer is a braking system that stops more effectively, with less wear on the pads and rotors.
But mixing layers from the old pad with the new is going to result in problems later on and the only way to avoid this issue is to resurface or replace the rotor.
5. Not servicing the caliper assembly
For disc brake systems to work efficiently, the brake pads need to be in perfect alignment with the rotor and pressed equally into the rotor. Any variation impacts braking distance, brake noise, and eventual pedal pulsation. For example, do you:.
- Inspect the caliper piston boot for damage? Even small nicks in the boot can allow moisture and debris in that will lead to corrosion of the caliper piston and damage to the caliper piston seal. This seal is critical to releasing the pads from contact with the rotor as well as sealing in the fluid behind the piston
- Inspect the floating caliper guide pins and boots for damage?
- Replace abutment clips and “squealers” AND clean the caliper mounting bracket before you do?
Failure to service the guide pins is the leading source of uneven pad wear.
6. Installing the brake pads backwards
Don't laugh! This happens more often than you might think. And while most brake pad sets do not specify inner and outer placement, some do and failure to follow these important instructions can have a dramatic effect on how the system works.
7. Not lubricating the caliper slide pins
Use a lubricant specifically made for this purpose. And be sure to check the wear of the caliper slide pin bores and bushings. If in doubt, replace the assembly to ensure the caliper body can move freely.
8. Installing the caliper upside down
A common mistake made by new, less experienced technicians. In conjunction with this is not paying attention to the hose routing when reinstalling the caliper assembly.
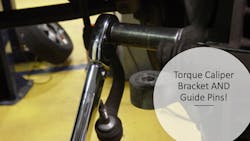
9. Not torquing critical fasteners
Fasteners have torque specs for a reason - so always use a torque wrench on these critical fasteners. Failure to do so will have a huge impact on pad wear and braking effectiveness. Remember, for the system to work as effectively as possible, the pads must be in alignment with the rotor and free to move so they can apply equal pressure to the rotor.
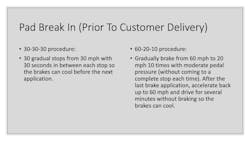
10. Failure to seat the new pads
This is a leading cause of noise complaints and should be a part of your repair verification process whenever brake work is done.
Tire and brake service are at the top of the list when it comes to services that must be done right to ensure the safety of the driver and their families. And even though it's a job you've probably performed a hundred times, remember some of these common mistakes and make your next job your best job!
About the Author

Pete Meier
Former Creative Director, Technical | Vehicle Repair Group
Pete Meier is the former creative director, technical, for the Vehicle Repair Group with Endeavor Business Media. He is an ASE certified Master Technician with over 35 years of practical experience as a technician and educator, covering a wide variety of makes and models. He began writing for Motor Age as a contributor in 2006 and joined the magazine full-time as technical editor in 2010. Pete grew the Motor Age YouTube channel to more than 100,000 subscribers by delivering essential training videos for technicians at all levels.
Connect with Pete on LinkedIn.