Brakes are kind of like offensive linemen; they don't get noticed until they do something wrong. All it usually takes is a strange noise or an unfamiliar feel in the brake pedal to bring a responsible driver straight to your shop for a diagnosis.
Verify the concern, then check the car over
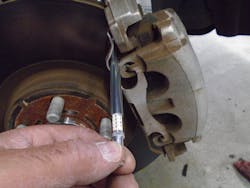
When diagnosing a brake concern, the critical first steps are the road test and the visual inspection, as with all diagnoses. The visual inspection is the most valuable diagnostic tool in your toolbox. Looking over the entire car, not just the system you're diagnosing, allows you to get a feel for the vehicle. You're never just repairing a system; you're repairing a vehicle.You should always record the thickness of the brake linings first. OTC makes a real nice brake pad thickness gauge that allows you to get an accurate reading of the inboard and outboard pads without removing the caliper, and in some cases, the wheel. Press the tip of the pen-size tool against the brake rotor and pull the gauge finger against the brake pad backing (Figure 1). The results are easy to read and displayed in plain view.
Pinpoint the cause of squeaky brakes
When diagnosing a brake squeak, pay close attention to the surface of the rotors. Look for a sign that the pads might be hitting the ridges on the outer edges of the rotor. As a brake pad wears, sometimes the friction material will mushroom out from the sides of the pad and contact the ridge. A shiny ridge is a sign that this could be happening. Examine the contact surface of the rotors. Any grooves that you see on the rotor that have transferred to the brake pads will cause a squeal. If the brake linings pass, you can resurface the rotor and clean up the brake pads with some 100 grit sandpaper; this should stop this type of brake noise.
I highly recommend using an on-car brake lathe when resurfacing rotors. Spinning the rotor on its axle or hub bearing makes for a much tighter cut. We use the Pro-Cut PFM 9.2 DRO. It's simple to hook-up, easy to move around the shop, and always produces a nice cut. On-car brake lathes save the time of having to remove frozen or labor-intensive rotors. They also allow the technician to stay in his bay rather than carry rotors across the shop to the brake lathe.
Apply the correct products to prevent brake noise
High-quality silicone-based caliper slide grease should be applied to every place on a brake caliper where metal touches metal. This means caliper slide pins, anti-rattle clips, and the edges of the brake pad backings. Wheel bearing grease is too thick, and white grease is too thin. Using the correct lubricant will prevent a high percentage of brake noise complaints. Permatex Silicone Ceramic Extreme brake parts lubricant applies evenly without running or wadding up. This makes it possible to apply the grease only where you need it to be without it migrating onto the friction material.
Most quality brake pads come with a noise suppressing material adhered to the back of the pads. This is to prevent movement between the brake pads and the caliper, dampen vibration, and absorb noise during braking. This small amount of friction can create a loud brake noise. Products are available that can be applied to the back of the pads if they don't come with the pre-applied sticky stuff. Aftermarket noise dampening products are available as an aerosol spray or as a paste in a bottle or a tube. CRC Disc Brake Quiet aerosol spray works well because it sprays on evenly and dries quickly. It's crucial that the spray dries completely before installing the pads. Whichever product you choose to use, it's important not to install a brake pad with a bare metal back.
Alternatively, if you're diagnosing a low or drifting brake pedal, first check for an external leak. Not all brake fluid leaks present themselves as puddles in the driveway. Sometimes wetness around a caliper piston or brake fluid behind the master cylinder is enough to cause an issue at the pedal. Don't forget to pull back wheel cylinder boots and check for fluid that has bypassed the cup seals.
After determining there are no leaks, watch the calipers operate while an assistant activates the brake pedal. Look for a piston that might be traveling too far before it contacts the inboard brake pad and the rotor. This is a common problem on rear calipers with an integral parking brake.
Check for excessive movement in the brake pedal before the pushrod contacts the master cylinder. I recently serviced a vehicle that was missing the nose that screws into the end of the master cylinder pushrod. This caused over two inches of excessive movement at the pedal.
Use blockers to diagnose a pressure loss
If your preliminary inspection shows no external leaks or mechanical failures, you're most likely facing an internal pressure loss in a component. The best way to diagnose this issue is by using blockers to isolate hydraulic components (Figure 2).Start by removing both outlet lines at the master cylinder and replacing them with blockers. You must use a set of good-quality blockers. The smallest leak at a blocker will cause an erroneous result that could lead to the replacement of the wrong parts. I've been using a set of Thexton blockers for years. They stand up well to the brake fluid without corrosion, and they seal perfectly. The brake pedal should be rock hard with both master cylinder ports blocked. If the pedal moves, the master cylinder is either losing pressure internally or is harboring trapped air.
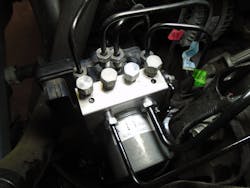
If the master cylinder passes, block off the outlet ports at the hydraulic control unit (HCU). The pedal should be hard with the ports blocked. If an outlet valve is stuck open, you'll know it by how far the pedal travels. A hard pedal during this step means that the master cylinder and the HCU are not the cause of the low brake pedal, which means that the problem is at one of the wheels.
Remove one blocker at a time, reinstalling the line on the HCU. Whichever circuit causes the pedal to sink is the bad guy.
We had a Ford Escape in the shop with a low brake pedal concern. The pedal was up high and hard when blocking off the ports on the master cylinder and the HCU. We removed the HCU blockers one at a time and discovered that the pressure loss was in the circuit feeding the left rear wheel. We then removed the rubber brake line from the caliper and blocked it. The pedal was still mushy. We removed the steel line from the rubber hose and blocked it. The pedal came right up to solid. The causal part was the rubber brake hose. Under close examination, we found a soft spot in the hose that was ballooning under the pressure of brake activation. Maybe we should have found this during the visual inspection, but using the blockers took us straight to the problem.
The outlet lines on a HCU are usually very close together and hard to get a wrench on. Consider using a flare nut crowfoot set to remove the lines. A crowfoot enables the removal of a single line without having to remove others to gain access. The Sunex 9710M is a nice affordable 3/8 drive crowfoot set. They're small enough to fit between the lines, leaving enough room to get a good turn on the fitting. Use a pressure bleeder as a diagnostic tool.
A stuck-open outlet valve isn't the only way that a HCU can affect brake pedal feel. A stuck closed inlet valve will produce a brake pressure differential concern causing a hard pedal and a possible brake pull. The best piece of equipment to diagnose a brake pressure differential concern is a good brake pressure bleeder. A brake pressure bleeder keeps consistent, adjustable pressure on the brake system. This enables you to check pressures at the wheels, knowing that pressure at the master cylinder is persistent. A pressure bleeder allows you to open a bleeder valve and just let it flow. This is great when replacing brake lines. You can push all the air out of a line with just one turn of the bleeder valve.There's no need to purchase an expensive electric or pneumatic pressure bleeder. I've been using the Mityvac MV6840 hand-pumped pressure bleeder. The unit keeps a constant 30 psi on the system. It comes with adapters for most master cylinders, including a universal adapter that easily attaches with a chain. Leaky adapters can hinder your diagnosis and make a mess on your shop floor. I haven't had any issues with these adapters leaking.
You'll have no pressure at the wheel most of the time when an inlet valve is stuck in the closed position. I have seen fluid sneak past a stuck valve. So reduced pressure at the wheel could also be due to a stuck closed inlet valve in the HCU. Use the right equipment to bench bleed a master cylinder
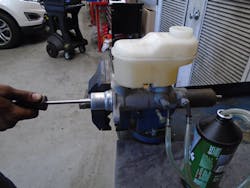
Since we're talking about bleeding brakes, I'd like to emphasize the importance of using the correct equipment to bench bleed a master cylinder. One-way check valves are the gadgets that separate a good master cylinder bleeder kit from a bad one. We all know the basic master cylinder bench bleeding drill. Hoses are attached to the outlet ports with a threaded fitting, and the opposite ends of the hoses are submerged in brake fluid. As the piston is applied, fluid and air exit the master cylinder, fluid is sucked back in when the piston is slowly released. The problem is that air is also pulled back into the master cylinder bore during the backstroke.
The one-way check valves are placed in line between the threaded fittings and the hoses. They allow fluid and air to exit through the hoses while stopping anything from returning. The clear hoses allow you to see when the air bubbles stop, and only fluid is leaving the master cylinder. Thexton makes a variety of good master cylinder bleeding kits. The right kit for you depends on which adapters you need for the models you service. They all come with check valves and tough clear hoses. Be careful that you don't run the reservoir dry when using check valves. Keep in mind that no fluid is getting pulled in to replace what you pushed out.
Buy equipment you can trust
The steadfast rule in all automotive diagnoses is if you can't trust the equipment, you can't trust the results. Take the extra time and spend the extra money to get the tools you know you can count on. You'll surely see a high return on investment.
Tools used:
• OTC Brake Pad Thickness Gauge
• Pro-Cut PFM 9.2 DRO on-car brake lathe
• Permatex Silicone Ceramic Extreme Brake Parts Lubricant
• CRC Disc Brake Quiet Aerosol Spray
• Thexton Brake Line Blockers
• Sunex 9710M Flare Nut Crowfoot Socket Set
• Mityvac MV6840 Hand-pumped Pressure Bleeder
• Thexton Master Cylinder Bench Bleeding Kit
About the Author
Roy Dennis Ripple
Roy Dennis Ripple is a Ford Senior Master Technician and an ASE Master Technician with more than 30 years' experience in the automotive industry. As an automotive journalist, he is the recipient of a 2020 Azbees Award and a 2020 Tabbies Award. Ripple is currently working full-time as the shop foreman at a Ford dealership. He lives in New Jersey with his wife, three dogs, and two motorcycles. He can be reached at [email protected].


