ADAS repair and calibrations: Test the waters or jump straight in?
Content brought to you by PTEN. To subscribe, click here.
What you'll learn:
- ADAS basics and terminology
- Importance of service information
- Basic tooling needs
- Importance of comprehensive and complete repairs
ADAS (advanced driver assistance systems) is a term more and more shops and consumers are hearing as vehicle technology moves forward. For many shops, it may be old hat at this point as they jumped in feet first and have been repairing and calibrating systems for years now. Others may be just becoming familiar with the systems and are confused as to whether they want to tackle the systems, and if so, how to get started doing so.
There are no absolutes in ADAS, so we will focus on the general concepts to help interested shops and technicians dip their toes into the waters of calibrations.
Getting involved in ADAS is certainly not the most inexpensive move in the world. While there are some tools and targets that can be utilized across various years, makes, and models, there is certainly quite a bit more specialization of tooling to properly perform calibrations. This is something that must be factored into any tooling purchases to best serve your customer base by investing in the proper tooling for your needs, which may mean focusing on a few select manufacturers instead of continuing to use all makes/models mentality.
There are a few different schools of thought when it comes to ADAS system repair and calibration. Some utilize only OEM tooling and diagnostic tools, some mix OE and aftermarket solutions to handle various scenarios, and others opt for a sole aftermarket solution. The scope of this article is not going to delve into these points as each OEM has its statements regarding the usage of tools and procedures for ensuring the proper operation of ADAS systems. These statements can be found within their service information (SI) systems.
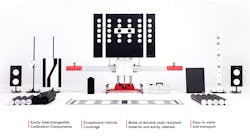
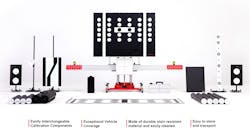
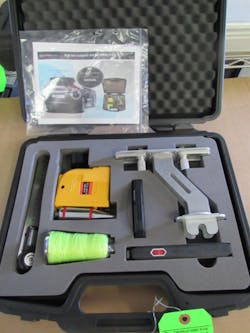
Purchasing ADAS tooling (Figure 1) can be done through two main channels: The dealer or the aftermarket. One could start buying every specialty tool mentioned in SI without factoring in how often it will be used in their shop environment, or whether it is simply a different name for a tool already owned. A solution for that seems to be purchasing one of the “complete” systems from any one of the various aftermarket companies offering calibration systems.
As with most things in life, it is almost impossible to have a turn-key complete system when there is such a variety of systems that are constantly being updated or changed. It also doesn’t make good financial or storage sense to purchase tools that may never be used. The best advice is to take the time to evaluate the vehicles coming through your shop, as well as the market in your area to begin deciding where to invest your hard-earned dollars.
Educating ourselves, customers, and other shops?
As with all my articles, let’s start with what is possibly the most important building block for this segment, and honestly, most segments of the repair industry: Education. Education is not focused entirely on the individual tech or shop-owner being up to date but also focusing on educating your customer base, especially other repair facilities if you are a shop that performs sublet work. ADAS calibrations should be treated the same as proper assembly and torque specifications: You should always check to ensure that you have the proper specifications and procedures to ensure the vehicle is leaving operating correctly.
There are calibrations needed with the replacement of ADAS components and after performing four-wheel alignments, but there is also quite a bit of carry-over that shops may not realize. Replacing an air conditioning condenser on a late model vehicle with front radar in the grille may very well require performing calibrations after the repair due to the removal and re-installation of the grille. Replacing a steering rack on some vehicles not only requires programming the module but also lane-keep assist or other calibrations, so that all systems are working as intended.
So, how do we know when calibration is needed? The overly simplified answer is to consult your SI for proper repair procedures. The best source for the most up-to-date information is directly from the OEM service information system utilizing a service subscription.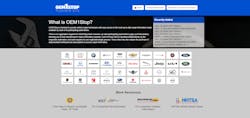
For those not familiar with accessing the OEM side, the website oem1stop.com (Figure 2) is a great starting point that will get you started with using OEM websites to their full potential.
There are various aftermarket information systems available, such as ALLDATA (Figures 3A and 3B), Mitchell, and Motologic, and most have introduced some type of quick link to access ADAS information and charts illustrating when a calibration should be performed, as well as the type of calibration. These lists are not comprehensive and should be used only as a means of getting a basic understanding of calibration requirements; fully reading each step of service procedures is truly the only way to ensure that everything in the vehicle is restored to proper operating conditions after a repair. Even a simple battery replacement requires various re-sets afterward, other repairs are no different. Now more than ever, reading and comprehension skills must be honed to ensure efficient and effective repairs.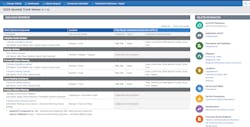

The basics: Static vs. dynamic calibrations
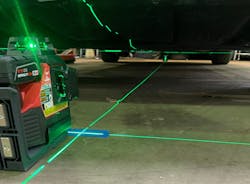
What are static or dynamic calibrations? Put simply, a static calibration is a stationary calibration that requires measurements to be taken while the vehicle is parked. This starts with finding the vehicle thrust line, usually with a plumb bob (Figure 4A) and laser. Systems like the Milwaukee Tool three-plane laser (Figure 4B) make taking this measurement quick and easy while following the OEM procedures for setting up your calibration system.
Whether you are utilizing OEM tooling and targets or aftermarket, the calibration stands and targets must be set up at the proper heights and distances, as well as having the correct back-drop (usually neutral colors and devoid of shop equipment, lifts, and other vehicles) to calibrate the sensors. The calibration process is then initiated using a capable scan tool, be it through the OEM diagnostic tool or an aftermarket tool equipped with ADAS capable software.
A dynamic calibration can also be referred to as driving or on-road calibration, which allows cameras, radars, or other sensors to properly calibrate. Just like static calibrations, dynamic calibrations usually require connecting a capable scan tool with up-to-date software and initiating the calibration process. Based on the vehicle and system, the tool will then instruct you on the required driving cycle to complete the calibration. This drive cycle usually consists of driving down straight roads with clear lane markings, as well as other vehicles, signposts, fences, trees, or other objects.
Static and dynamic calibrations are not mutually exclusive. Some vehicle systems may only require one or the other while some require a static calibration followed by a dynamic calibration to complete the calibration. Once again, referring to SI will give the technician the needed information to complete the job.
Basic tooling: You may have more than you think
It's no secret that to perform static calibrations, you will need a scan tool, a calibration frame, and the appropriate targets, reflectors, and accessories depending on the vehicle and system being calibrated. These are too numerous to go into detail in this article. These tools will be purchased based on the level of work being performed. No one will ever argue that you can perform all calibrations properly with just a small tool kit bought from the local hardware store, but you may have the foundation of an ADAS calibration kit already in your toolbox.
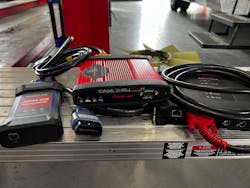
Every shop that is keeping up to date with technological advances will have a capable and updated scan tool, which is a solid entry into performing some dynamic calibrations such as Ford lane keep assist (LKA) calibrations on certain models after alignment. These calibrations are capable of being performed through the use of a factory vehicle communication interface (VCI), J2534 device and OEM software (Figure 5), or aftermarket tools such as the Autel Ultra, Snap-on Verus Edge, or equivalent tools.
That covers basic dynamic calibrations but are there tools for static calibrations that you already have? A plumb bob is an inexpensive tool that many likely have stashed away in their toolbox at work or home. A combination square with a spirit level is a common tool for those who may do some machining or fabrication work and allows one to perform jobs such as the CCM (cruise control module) radar alignment on a 2018 Ford Explorer in conjunction with a capable scan tool.
Depending on the vehicle type entering your shop, investing in certain calibration tools is far from cost-prohibitive. For instance, many Toyota/Lexus Millimeter Wave Radar systems can be calibrated correctly utilizing a few things: A properly sized bay with approximately 20" by 17" clear space in front of the vehicle, a capable scan tool, a spirit level, a plumb bob, and special tools 09870-60040-02 (reflector assembly) and 09870-60000 (reflector stand). The additional tooling investment is relatively small and opens up a profitable revenue stream for the shop while getting the technicians comfortable with best practices and procedures for ensuring proper set-up, measurements, and repair verification.
Personally, late model Toyota/Lexus vehicles equipped with Millimeter Wave radar, account for 10 percent of our total vehicle count, so a sub $1,000 investment to keep repairs in-house just makes good financial sense. The profits from these calibration jobs can then be re-directed into investments in more equipment, thus increasing the shop’s calibration capabilities as needed.
One blind spot leads to blind spot radar woes
I got a call from a body shop asking if I had the “right scanner” to clear some codes on a 2020 Hyundai Venue as their scanner “couldn’t make the codes go away”. I spent a few minutes explaining that there is generally a reason that a fault won’t go away and asked them to bring the car by, so I could evaluate the situation.
When the vehicle was dropped off, a brief history was given. The vehicle had received a light “tap” in the left rear and even though there was no damage to the left rear blind spot radar, it had been replaced at the same time as the rear bumper cover. With this information in mind, I performed a full system DTC scan utilizing the Autel Ultra.
I found two current faults within the RCR (rear corner radar) module:
- C1702:55 – Variant coding error
- C2702:54 – Control module missing calibration
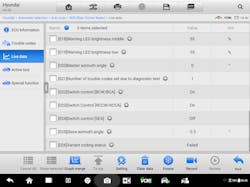
Referencing SI shows the C1702:55 fault occurs when the regional setting has not been set. Under the main heading for the fault, a step dictates that a “Variant coding” procedure must be performed after module replacement using GDS. Live data PIDs (Figure 6) were checked to confirm this and in this case, the Autel was also able to perform the variant coding function, which simply asked whether the vehicle was an automatic or manual transmission. This cleared the first fault.
With the variant coding data PID switching to complete, it was time to tackle the missing calibration fault.
The DTC description for C2702:54 says. “C2702:54 is set when the installation angle of the BCW (LH) exceeds the permitted value during auto calibration. It turns off the BCW switch LED and inhibits the system operation.”
Performing more research on the system led me to the installation and blind spot radar unit angle correction procedures. The procedure walks the technician through the utilization of a plumb bob and string line to mark the vehicle centerline and installing and using the blind spot radar unit fixing adaptor (special tool: 09958-3T080) on the blind spot radar unit and the level laser (special tool: 09958-3T070).
A digital protractor (Figure 7) is then used to measure the angle between the center line, and the laser beam projected from the blind spot radar. This horizontal angle measurement must be within 3 degrees of 54 degrees with an allowance for use of a washer behind the mounting tabs of the module to correct the measured value.
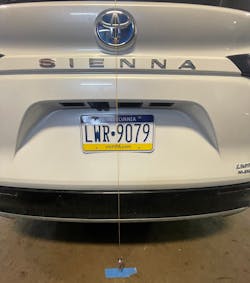
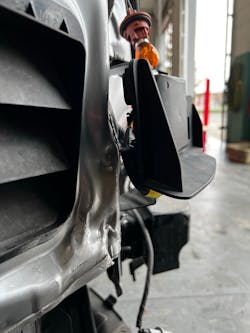
The string line was laid out in preparation for the measurements, and the rear bumper cover was removed. Upon removal, a preliminary visual inspection was performed, and the cause of the fault was quite clear; the repairing technician had a blind spot of their own when it came to evaluating the level of damage. The vehicle had suffered a bit more than a light tap, and there was damage to the mounting location (Figure 8) for the radar that placed the radar far out of specification and would need to be fixed before calibration could continue.
The vehicle was returned to the body shop for repair and then properly calibrated and road tested to ensure the correct operation of the blind-spot system.
Putting it all together
ADAS service is not a simple process and continuing education, and investments are needed to stay up to date and ensure you are fully and correctly returning vehicles to proper operation before returning them to customers. That doesn’t mean, however, that it can’t be a profitable service if performed correctly. For those who aren’t ready to jump in feet first, there are still some calibrations that can be completed with minimal tooling investment to get acquainted and comfortable before deciding to move into more calibrations as the need dictates.
When quoting jobs on late-model vehicles, be sure to perform the needed research to ensure that you are able to complete the job in-house or plan accordingly to sublet the calibrations to a capable company, so there are no unexpected faults or additional costs associated with the repairs. This keeps your business profitable, and your customers safe and happy.
The take away from all this is that ADAS and calibrations, while complex, should not be scary. Utilizing the service information, proper tooling, and properly trained technicians following best practices will allow shops to learn and grow with ADAS and any new systems integrated into vehicles (conventional or autonomous) and continue to succeed.
After all, you’ve had years of quality repairs and satisfied customers. Don’t allow complacency or new technology to prevent you from continuing to provide your customers with a vehicle that operates exactly as it should.
Tools used:
- Service information
- Capable scan tool
- Plumb bob
- Spirit level
- Laser level
- Specialty targets and calibration frames
About the Author

Christopher Groff
Chris Groff is a technician with Lykon Automotive in Pennsylvania and runs the Science of Diagnostics channel on YouTube. Groff began in the industry 15 years ago with an independent repair shop before attending the Pennsylvania College of Technology for Caterpillar diesel. After working with heavy duty trucks and John Deere equipment, he was drawn back to the automotive repair segment by ADAS and the continued advancement of technology.