Vehicle diagnostics: A step-by-step guide with expert insights on mastering ADAS tech recalibration
As new vehicle innovations, including ADAS technology, become more prevalent, so too will the need for diagnostic scan tools with advanced capabilities. The importance of performing a diagnostic scan cannot be understated and is excellent for establishing a baseline of the vehicle’s condition and identifying the problem areas that need to be diagnosed and repaired.
In this article, we’ll walk through the step-by-step process of performing a diagnostic scan and leading into a dynamic recalibration of an ADAS system. These actions can be performed entirely on both Bosch 625 and ADS 325 scan tools.
Step 1: Connecting to the vehicle
Let’s set the stage and say that a customer comes into the shop saying the lane-keeping assist on their 2019 Chevrolet Equinox isn’t working properly and would like your shop to take a look at fixing the issue.
At first glance, this may seem like a standard job since this Equinox will most likely need a dynamic recalibration to repair the issue. However, it’s important to perform a pre-scan to be thorough and check for any other issues that may be hiding in the vehicle.
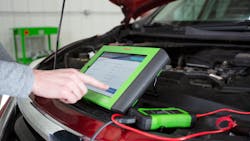
To start, the technician will need to connect to the wireless vehicle communication interface (VCI) into the vehicle’s OBD-II connection port. The VCI will show the technician that the power is on, the quality of the connection to the vehicle, and the wireless connection to the scan tool. A wireless VCI is important to allow the technician to have mobility throughout the shop and work comfortably.
At this point, you will only need to turn on the vehicle electronics and leave the engine off until a later point in the scanning process.
Step 2: Identifying the vehicle
Once the VCI is plugged into the vehicle and wirelessly connected to the scan tool, simply select “Auto ID” to quickly identify the vehicle by make, model, and year.
Auto-ID works on vehicles newer than 2005-2006 model years, which have mode 9 pre-installed on the vehicle’s onboard computer system.
Simply put, mode 9 identifies the vehicle by VIN number and sends that information to the scan tool. If a technician is working on a vehicle older than 2005, or a specially built vehicle (police cars, cabs, etc.), they can identify the vehicle by manually entering the vehicle’s information.
Step 3: Pre-scan and identifying codes
A pre-scan is the first step in actually diagnosing the vehicle’s issues, and it should be run on all modules to ensure all issues in the vehicle can be properly identified.
This process, while seeming unnecessary on the surface given we’re only fixing the lane-keeping assist, is important to make sure all the modules exist on the vehicle and are communicating. Too often, technicians will run into a problem while diagnosing an issue with ADAS technology simply because that technology does not exist on the car. On the ADS series, once the scan is complete, the technician will see either a green icon, meaning the module has been scanned and there are no codes, a yellow icon that shows no communication of the module, or a red icon, which indicates the existence of codes.
This stoplight-esque design was purposefully made to ensure the technician can easily understand and identify the existence of codes in a vehicle. By simplifying this process, the scan tool allows the technician to focus on their expertise without needing to worry about analyzing data and making high-level calculations. Fast and efficient diagnostic scans lead to efficient repairs – which is especially helpful considering many owners are struggling to fully staff their shops.
In the case of the 2019 Chevrolet Equinox, the only module that’s coming back with DTC codes is related to the lane-keeping assist, informing the technician that a recalibration will need to be done.
Step 4 – Dynamic recalibration
The Bosch ADS series scan tools include dynamic recalibration in their software, making it easy to transition to a recalibration once the codes have been identified. A dynamic recalibration, or moving recalibration, is performed on most domestic vehicles and will require the technician to follow manufacturer-specific directions which can be found on their scan tool.
The first step in dynamic recalibration with a Bosch ADS series scan tool is to put the vehicle into a learn mode and take it for a test drive. Depending on the manufacturer, the scan tool will instruct the technician to seek out specific road characteristics including lane markings, guard rails, and more. From there, the AI system in the scan tool will take all of those inputs into account and calibrate the lane-keeping assist.
Step 5 – The post-scan
Once the recalibration is complete and all systems are working correctly, the technician should run a post-scan of all systems to ensure any issues with the vehicle have been addressed. Not only does this help the technician further show their work, but it also gives them and their customers peace of mind in knowing the vehicle is back to 100 percent of the OE specifications.
Things to remember
Most technicians only use up to 25 percent of a scan tool's capabilities and completely ignore features that may help them improve their quality of work. For instance, the screenshot, external camera, and screen record functions can provide tremendous value yet are often overlooked.
Utilizing all three of these features ultimately shows the work a technician has put in — showing how the vehicle and data looked before and after the repair. These images prove useful when billing an insurance company and building a trusted relationship with a customer.
Of course, in an age of ever-advancing technology, the mechanical components of the vehicle should not be overlooked. In the case of the lane-keeping assist, sometimes the issue is simply due to the vehicle being out of alignment. For instance, technicians should check out the vehicle alignment if they’re replacing a component due to damage.
In conclusion, as the automotive industry continues to evolve and embrace cutting-edge technologies, the need for advanced diagnostic scan tools becomes increasingly evident. These tools can empower technicians to confidently identify a vehicle’s status and resolve issues efficiently. As vehicles become more complex and interconnected, the ability to perform accurate and thorough diagnostic scans will remain a cornerstone of effective maintenance and repair practices, ensuring both vehicle safety and customer satisfaction in an ever-changing automotive landscape.
About the Author

Scott McKinney
Senior Product Manager, Bosch Automotive Aftermarket
Scott McKinney is a senior product manager at Bosch Automotive Aftermarket in the ADAS and diagnostics division. Before joining Bosch in Aug. 2019, McKinney held similar sales and business development roles at Amphenol RF, Song Chuan USA Inc, and Panasonic Electric Works Corp. of America. McKinney received an MBA from Michigan State University in 2020 and a BBA in Marketing Management from Walsh College in 2012.

Duane "Doc" Watson
Duane "Doc" Watson, technical trainer at Bosch Automotive Aftermarket, is an auto industry veteran with more than 44 years of experience. As a technician, he earned many industry awards including Chevrolet Technician of the Year and Buick Service Master of the Year. Since the mid-'90s, he's trained thousands of technicians in new techniques, tools, and technologies.