Issue With Ram Diesel Injector Circuit
This bulletin applies to 2011 RAM 2500/3500/4500/5500 vehicles equipped with a 6.7L Cummins turbo diesel engine built between 3-1-2011 and 3-11-2011. The vehicle may intermittently set diagnostic trouble code (DTC) P0201 (fuel injector 1 circuit open/closed).
1. Open the hood and isolate both battery’s negative cables.
2. Disconnect the powertrain control module (PCM) C1 connector.
3. Remove the connector cover.
4. Remove the red locking tab that locks the terminals into the connector.
5. Locate the wire that operates injector number 1 and terminates in the PCM C1 connector cavity number 26. Injector number 1 circuit is a tan wire with a yellow tracer.
6. Using a wire terminal removal tool, remove wire terminal number 26 from the connector.
7. Remove one-half inch of insulation from the harness end of the wire.
8. Remove all but 2-1/2 inches of wire from the terminal repair kit wire (P/N 68148035AA) and remove one-half inch of insulation from that wire.
9. Place a piece of adhesive-lined heat shrink tubing on the wire from the repair kit.
10. Place the wire strands overlapping each other inside of the splice band P/N 05018527AA).
11. Using a crimping tool, crimp the splice clip and wires together.
12. Solder the connection together using rosin core type solder only.
13. Center the heat shrink tubing over the joint and heat using a heat gun. Heat the joint until the tubing is tightly sealed and sealant comes out of both ends of the tubing.
14. Insert the new terminal into cavity 26 of the PCM connector.
15. Slightly tug on the wire to ensure that the terminal is securely locked into place.
16. Reinstall the red terminal locking tab.
17. Reinstall the PCM cover onto the connector. Ensure that the black and red locking slides are out of the way and the gray lever is in the correct position (about 45-degree angle).
18. Reinstall the connector onto the PCM.
19. Reconnect the battery negative cables and start the engine and monitor the check engine lamp to verify the repair.
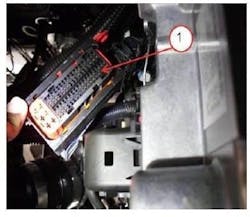
PCM connector cover (1) removed from PCM C1 connector (2).
Red terminal lock (1).
Fuel injector one control wire removal (tan wire with yellow tracer).
About the Author
Information courtesy of Mitchell 1
Information for Technical Service Bulletins comes from ProDemand, Mitchell 1's auto repair information software for domestic and import vehicles. Headquartered in San Diego, Mitchell 1 has provided quality repair information solutions to the automotive industry since 1918.
Mike Mavrigian
Motor Age Editor
Mike Mavrigian has written thousands of automotive technical magazine articles involving a variety of specialties, from engine building to wheel alignment, and has authored more than a dozen books that crisscross the automotive spectrum. Mike operates Birchwood Automotive, an Ohio shop that builds custom engines and performs vintage vehicle restorations. The shop also features a professional photo studio to document projects and to create images for articles and books.

