Adjusting the Ford Escape Cam Caps
Some 2010 Ford Escape vehicles equipped with a 3.0L engine and built on or before May 31, 2010, may exhibit an intermittent knocking or thumping noise from the left cylinder head.
After the engine temperature reaches 210-220 degrees Fahrenheit, the noise is typically heard from the rear of the engine as the vehicle comes to a stop. An example would be coming to a stop at the end of a highway exit ramp. The noise will continue for 45-60 seconds and then diminish. The noise will occur again once the engine temperature reaches 210-220 degrees Fahrenheit and the vehicle comes to another stop.
1. Is the noise a 45-60 second knock/thump from a hot engine as the vehicle comes to a stop?
a. Yes: Go to Step 2.
b. No: This procedure does not apply. Proceed with normal diagnostics.
2. Using chassis ears, listen to the cylinder 4 and 6 valve cover fasteners (6 is near the coolant pump). Is there a significant difference in transmitted noise between the cylinder 4 and cylinder 6 fasteners when the noise is present?
a. Yes: Go to Step 3.
b. No: This bulletin does not apply.
3. Remove the left hand valve cover.
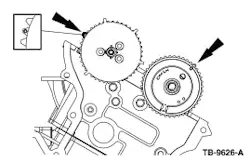
4. Rotate the engine clockwise until cylinder number 6 exhaust cam lobes are pointing up and the valves are fully closed. The exhaust camshaft needs to be left in this position for all caps in Step 5.
5. On the LH exhaust camshaft only, starting at the front of the engine with the thrust bearing cap, perform the following on all 5 camshaft bearing caps:
a. Loosen both bolts.
b. Remove the cap.
c. Install the cap and push the cap toward the intake camshaft while tightening the bolts, except for the thrust bearing cap.
d. Torque the cap bolts to 89 in-lb starting with the bolt closest to the intake camshaft.
e. Proceed to the next cap.
Note: Each cap must be completely removed and installed before proceeding to the next cap or engine damage may occur. Keep each cap in its original location.
6. Install the LH valve cover. A new valve cover gasket is available as P/N 9L8Z-6584-B.
About the Author

Mike Mavrigian
Motor Age Editor
Mike Mavrigian has written thousands of automotive technical magazine articles involving a variety of specialties, from engine building to wheel alignment, and has authored more than a dozen books that crisscross the automotive spectrum. Mike operates Birchwood Automotive, an Ohio shop that builds custom engines and performs vintage vehicle restorations. The shop also features a professional photo studio to document projects and to create images for articles and books.
Information courtesy of Mitchell 1
Information for Technical Service Bulletins comes from ProDemand, Mitchell 1's auto repair information software for domestic and import vehicles. Headquartered in San Diego, Mitchell 1 has provided quality repair information solutions to the automotive industry since 1918.