Popping jack points
This TSB applies to 2009-2011 Acura TSX and 2012 TSX. A popping or clicking from the left or right rear of the vehicle may be heard when driving over bumps or through dips. As the body flexes, burrs from spot welds in the rear jacking points may contact adjacent sheet metal, causing this popping or clicking sound.
The corrective action involves installing a wedge between the sheet metal panels (in the inner side sill) that provides the jack point.
REQUIRED MATERIALS/TOOLS
3M Super Weatherstrip and Gasket Adhesive, P/N 3M-08008
Body Wedge Installation Tool Kit, T/N 07AAD-TL2A140
Body Wedge, P/N 07AAK-TL2A120 (pack of four)
REPAIR PROCEDURE
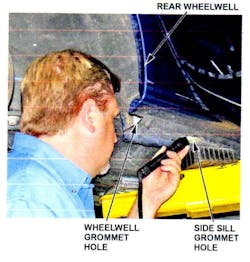
- On the affected side, remove the grommet from the wheelwell, and the grommet from the bottom of the side sill. Shine a light through the side sill grommet hole to provide a view inside, through the wheelwell grommet hole.
- Looking through the grommet hole, you will see the sheet metal panels that make up the jack point.
- Using an acid brush and extension (from the tool kit), apply the adhesive through the wheelwell grommet hole and between the sheet metal at the insertion point (the insertion point should be as far outboard as possible). Allow the adhesive to become tacky.
- Mount the wedge onto the end of the installation tool, and apply a generous amount of adhesive to both sides. Allow the adhesive to become tacky before installation.
- Insert the wedge through the wheelwell hole and into the insertion point by hand. Make sure that the stop on the installation tool is pointing down, and that the wedge is positioned as far outboard as possible.
- Use a hammer to drive the wedge securely into the insertion point until you feel the stop come into contact with the sheet metal.
- Gently twist and wiggle the tool from side to side to release the wedge.
- Reinstall the grommets and apply commercially available undercoat to the grommets.
