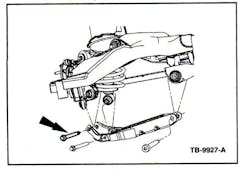
Correcting Mercury rear camber
Some Mercury 2005-2007 Five Hundred, Freestyle, Montego and 2008-2009 Taurus X, Taurus and Sable front wheel drive vehicles may exhibit inner edge tire wear caused by excessive negative rear camber.
Inspect the vehicle undercarriage for any indication of body or suspension damage. If body or suspension damage is found, discontinue this procedure and follow normal workshop manual diagnostics. If no body or suspension damage is found, proceed to Step 2.
- Measure vehicle ride height and wheel alignment. If rear wheel camber is within specification, discontinue this procedure and follow normal workshop manual diagnostics. If rear wheel camber is out of specification, proceed to Step 3.
- Raise the vehicle on a hoist and remove the rear wheel from the side which the camber reading is out of specification.
- Unbolt the rear stabilizer bar brackets and position the stabilizer bar aside. Discard the fasteners.
- Unbolt and separate the trailing arm from the wheel knuckle and place aside. Discard the fastener.
- Unbolt and separate the lower arm from the wheel knuckle. Discard the fastener.
- Remove the welded nut from the lower arm-to-wheel knuckle using a cutting/grinding wheel. The nut is located on the opposite side of the bolt.
- Enlarge both bolt holes in the lower arm to ¾-inch (19mm) using a step drill or equivalent.
- Measure the distance from each hole to the outer and bottom edge of the arm. If the distance is equal to or greater than 13/64-inch (5mm), proceed to Step 10. If the distance is less than 13/64-inch, replace the lower arm.
- Repaint any bare metal surfaces.
- Assemble the lower arm to the wheel knuckle with a new bolt and nut.
- Push inward on the lower wheel knuckle while tightening the new bolt and nut to a value of 96 lb-ft (130 Nm).
- Assemble the trailing arm, stabilizer bar and wheel(s) using new fasteners. Note: All final fastener torques should be made with the suspension at curb height!
- Check the rear wheel camber to ensure it is within specification. Adjust rear wheel toe to specification.
Bolt…..W712743-S439
Nut……W707243-S441
RH lower arm (built on or before 5-1-06)…5F9Z-5A649-TR
LH lower arm (built on or before 5-1-06)….5F9Z-5A649-TL
RH lower arm (built on or after 5-1-06)….7F9Z5A649-TR
LH lower arm (built on or after 5-1-06)….7F9Z-5A649-TL
