Land Rover fuel gauge glitch
This TSB refers to 2010-2011 Land Rover LR4 (VIN AA510742-BA563825) and Range Rover Sport (LS), VIN AA212147-BA277582. Problems may include an erratic fuel gauge, inoperative fuel gauge, fluctuating fuel gauge and/or the fuel gauge switching ON/OFF intermittently.
These issues may be caused by a poor harness connection or backed-out terminals inside the fuel tank, fuel pump module or flange assembly.
If the fault is intermittent and cannot be verified during diagnosis, all of the checks detailed in this bulletin should be carried out and repaired as required. If a failure in the harness or individual fuel sender unit cannot be verified at any point during the diagnostic stage, both fuel level senders and the fuel pump module assembly should be replaced to avoid the possibility of a repeat repair.
In the event of a customer concern to the repair procedure outlined below for diagnosis and repair information.
PARTS TO BE USED ONLY IF NO WIRING FAULT IS FOUND
CN100509 Clip
LR000966 Gasket
LR028456 Flange
LR014999 Rear (active) float sender – LR4
LR015940 Front (passive) float sender – LR4
LR015377 Front (passive) float sender – Range Rover Sport
LR021911 Rear (active) float sender – Range Rover Sport
TOOLS
IDS with latest IDS-DVD and calibration file
Land Rover-approved Midtronics Vehicle Power Supply
Refer to workshop manual for any required special tools
REPAIR PROCEDURE
1. Refer to workshop manual, section 310-01: Fuel Tank and Lines. Using a suitable transmission jack, lower the fuel tank only enough to access the top of the tank.
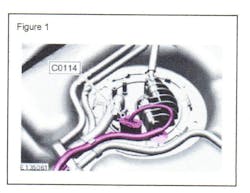
2. Pull the flange/harness connector (C0114) upwards.
3. Turn the ignition switch ON and observe fuel gauge operation.
If the fuel gauge drops to “0” (empty), turn the ignition OFF, remove the connector and verify pin connections.
4. After repairing the harness/connector pins, perform Steps 2-3 again.
If the concern is verified to be in the flange area and all connections are secure, replace the flange assembly.
After replacing the flange assembly, perform Steps 2-3 again.
If no fault is found, continue to Fuel Tank Diagnosis and Testing.
FUEL TANK DIAGNOSIS AND TESTING
Refer to the workshop manual, section 310-01: Fuel Tank and Lines, and perform the appropriate diagnostic and repair procedure(s).
