Mastering ADAS recalibration
Advanced driver assistance systems (ADAS) are now standard across modern vehicles, delivering critical safety features such as adaptive cruise control, lane departure warning and automatic emergency braking. For independent shops, this rapid growth presents both opportunity and challenge. Every component replacement, alignment or windshield repair has the potential to affect a vehicle’s ADAS performance, making recalibration an essential part of today’s service and repair process.
This article explores why ADAS recalibration matters, the different types of calibration required and how Snap-on diagnostic platforms equip technicians with the service information, guided workflows and exclusive features to complete these complex jobs with accuracy and confidence.
Why ADAS recalibration matters
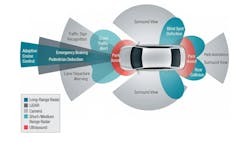
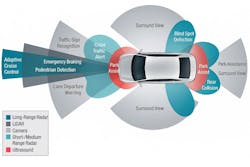
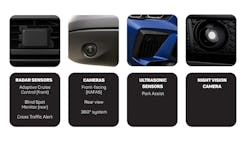
ADAS technologies depend on a precise network of cameras, radar, lidar and ultrasonic sensors. Even a millimeter of misalignment can compromise performance. For example, a forward-facing radar mounted slightly off-center may cause adaptive cruise control to brake late or fail to detect obstacles accurately. Similarly, misaligned cameras can disrupt lane-keeping systems or blind spot monitoring.
Recalibration restores the system to manufacturer specifications, ensuring safety features operate as intended. It also provides garages with a vital revenue opportunity. With ADAS present in most vehicles built since 2016, demand for recalibration services will only increase. Customers expect not just a repair, but the reassurance that their vehicle’s safety systems are fully functional after work is completed.
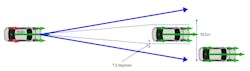
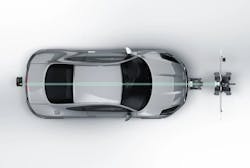
Consider a front-facing camera with a 7-degree field of view, covering about 60' at a 500' distance. A road lane is around 12' wide; a small misalignment of 1/2 an inch can significantly affect the camera’s ability to correctly interpret lane markings or obstacles.
Even minor misalignments can cause hazards. Recalibration ensures systems function correctly. Each manufacturer has unique recalibration steps. Snap-on tools simplify this by delivering OEM-specific guidance tailored to the vehicle systems, reducing errors and saving time.
Types of ADAS recalibration
Snap-on diagnostic tools support the full range of manufacturer-specified recalibration methods, with built-in step-by-step workflows:
- Static recalibration: uses physical targets or patterns in a controlled workshop environment. The tool communicates with the vehicle to verify sensor accuracy.
- Dynamic recalibration: performed on the road under specific speed, distance, and traffic conditions. The tool provides live prompts and confirmation.
- Initialization: required after new component installation, setting baseline system parameters to restore function.
Building a consistent diagnostic workflow
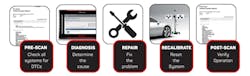
The recalibration process fits into a broader workflow:
- Pre-scan: identify fitted systems and fault codes
- Repair: replace or adjust components
- Recalibrate: perform required procedures with the Snap-on platform and ADAS recalibration equipment
- Post-scan: after completing the repair, performa a post-scan to confirm it was fixed properly
This process applies whether addressing a single ADAS fault or a multi-system repair after a collision.
Accurate recalibration requires the right workshop setup:
- Space: clear area for targets and access
- Lighting: consistent for sensor recognition
- Level floor: to ensure accurate vehicle and target alignment
- Clear line of sight: no obstructions between sensors and targets
Wheel alignment accuracy matters
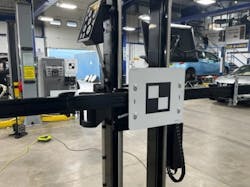
Many OEMs require wheel alignment checks before calibration can begin. A thrust angle error, incorrect ride height, or faulty steering angle sensor will all distort ADAS performance. That’s why Snap-on software often includes steering angle resets within recalibration workflows, ensuring accuracy at every step. For physical target placement, equipment such as the John Bean Tru-Point or EZ-ADAS supports OEM-compliant procedures with laser and camera precision.


The importance of service and repair information for ADAS
Successful ADAS recalibration goes beyond simply connecting a diagnostic tool. Technicians need up-to-date, vehicle-specific service and repair information to guide every step of the process. This includes:
- OEM calibration procedures for each ADAS feature
- Precise target placement measurements and environmental requirements
- Torque settings, wiring diagrams, and component locations
- Pre- and post-scan functions quickly identify all codes for every system. Reports are automatically saved to the Snap-on Cloud and can be easily shared with customers or insurance companies
Without this information, the risk of incomplete or inaccurate calibration increases — potentially leaving safety-critical systems unreliable.
Snap-on diagnostic platforms integrate this essential knowledge directly into the workflow. With ShopKey Pro and exclusive SureTrack Real Fixes, technicians gain access to repair information, verified solutions, and community-driven insights alongside live diagnostics. This integration ensures recalibration is not just possible, but consistently accurate, efficient, and profitable for independent shops.
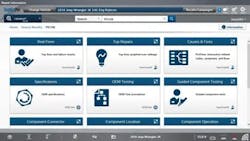

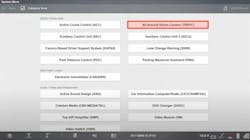
Image Caption: Featuring a VIN-specific ADAS section, ShopKey Pro shows which systems are present, if targets are needed, and which components are involved.

Clicking on a component provides valuable supporting information, including its function, location, and related procedures—enabling more accurate diagnostics and confident repairs.
Case study: An overview of BMW ADAS systems
The 2017 BMW X5 is fitted with multiple ADAS components that can be diagnosed and recalibrated with Snap-on diagnostic software:

Example procedures for a 2017 BMW X5 using your Snap-on Diagnostic tool:
- Front Camera Calibration (KAFAS): This service function is required after camera replacement or replacement of the windshield. The calibration process of the KAFAS is not complete until the vehicle has been driven in traffic at a speed of 70km/h for 5 minutes. You should also advise customers that some driver assistance systems maybe temporarily available after vehicle pickup.

From the Service Resets and Relearns Menu, select:
- ADAS> Camera Based Driver Support System (KAFAS)
- Functional Tests> Special Functions> Camera Calibration > Follow the onscreen instructions
- Front RADAR Initialization: This function is required after RADAR replacement.

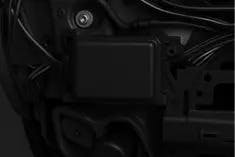
BMW Front Radar
A static ADAS recalibration procedure is required for this function. If you have a ShopKey Pro subscription, link directly to repair information from within the tool.
From the Service Resets and Relearns Menu, select:
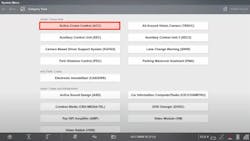
- ADAS/Driver AIDS > Active Cruise Control ACC
- Select either:
- ACC Sensor: Start-up
- Actuation of the Randome Heater
- Follow the on-screen instructions
- Select either:
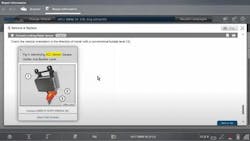
The tool will prompt you with a series of notes and checks to complete prior to starting the procedure which are absolutely necessary for the correct function of the active cruise control system, including ensuring that the ACC sensor is not hidden or obstructed by a license plate, if the vehicle is fitted with air suspension, the control unit for the self-levelling must be trouble-free and adjusted. To continue, start the engine and wait until the air suspension is set, to ensure the control function of the air suspension is set as expected ensure the vehicle doors are closed, then switch off the engine and continue start-up of the ACC sensor.
2017 BMW X5 Front RADAR remove and replace procedure, requires a ShopKey Pro subscription, to access repair information from within the tool.
- Rear RADAR (Lane Change Warning): No targets are required for this procedure.
BMW Rear RADAR Location
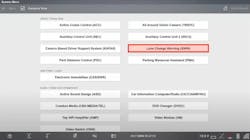
From the Service Resets and Relearns Menu, select:
- ADAS/Driver AIDS > Lane Change Warning (SSW) > SWW Initialization > Follow the onscreen instructions
- The sensor system of the SWW control unit and of the SWW slave must be adjusted on the following cases:
- Replacing of the control unit or slave
- Bodywork repair in the area of the control unit or slave
- The SWW control unit and SWW slave must be adjusted independently, and the correction angle in the sensor is reset during the adjustment
360° Camera
BMW 360 Camera
The All-Around Vision Camera (TRSVC) has a series of test and calibration procedure you can complete including:
- Test image of all cameras: the system will take a snapshot from all cameras and display on the infotainment display after 20 seconds
- Force Camera Calibration on Next Drive Cycle: no targets are required, the camera will auto calibrate when the vehicle is next driven
Park Assist

BMW Park-Assist Sensor
Here you can access codes and data for the sensor. No functional testing is needed for this component.

Night Vision Camera: Requires Static calibration using targets.
BMW 2-Series Adaptive Cruise Control Recalibration
Adaptive Cruise Control enhances conventional cruise control by automatically adjusting vehicle speed based on surrounding traffic. When the road ahead is clear, ACC maintains the driver’s chosen speed. If a slower vehicle is detected, the system modulates speed to maintain a safe following distance, reducing the need for constant manual adjustments.
ACC relies on a forward-facing radar sensor to monitor traffic and detect obstacles. Depending on conditions, it can reduce engine torque or apply the brakes to maintain safe stopping distances. In vehicles with stop/start functionality, the system can bring the car to a complete stop and resume movement when traffic allows. Driver input via the accelerator or brake overrides ACC instantly, placing the system in standby until normal operation is resumed.
The ACC module communicates with the engine control and brake control modules over the high-speed Controller Area Network (CAN) databus. This ensures critical safety messages are prioritised, enabling real-time coordination between systems.
Step-by-step FRS recalibration on the BMW 2-Series
Recalibration of the front radar sensor (FRS) is required whenever the sensor is removed, refitted, or replaced. The following procedure demonstrates this function on a BMW 2-Series using a Snap-on Diagnostic Tool with the latest software.
Operational steps:
- From the Vehicle Systems Menu, select Engine
- Choose Adaptive Cruise Control (ACC)
- Navigate to Functional Tests > Special Functions
- Select Front Radar Sensor: Start-up
- Follow the on-screen instructions to complete the procedure
Conclusion
ADAS recalibration is no longer a specialist job — it’s an everyday requirement for modern vehicles. With Snap-on diagnostic software, technicians have everything they need in one platform: OEM-specific guidance, recalibration workflows, functional tests and integrated reporting.
To learn more about the latest software coverage, click here.