Push-button parking: electronic parking brake operation and diagnosis
Content brought to you by Motor Age. To subscribe, click here.
What You Will Learn:
• Electronic parking brake systems have evolved over time
• The systems are very basic, but instructions must be followed during service to prevent damage and/or injury
• Preparing the EPB system for service means the system must be disabled
Way back in the dark ages, automotive brakes were strictly mechanical. Long metal rods turned backing plate-mounted cams, which applied brittle brake shoes to steel drums. Two Hail Marys and a "Whoa, that was close!" later would hopefully bring that 1937 coupe to a stop. One small technological leap from the Flintstones feet first braking system. Until recently, parking brakes used pretty much the same technology. It was time for a change. Enter the electronic parking brake (EPB).
The birth of EPB
In the infancy of EPB, manufacturers used a single electric motor that tugged on conventional parking brake cables that engaged the rear brakes. This system neglects to address the main problem with parking brakes: seized cables. New technology meets horse and buggy—like writing a computer program with a typewriter.
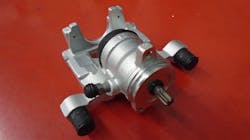
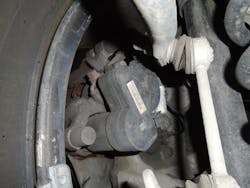
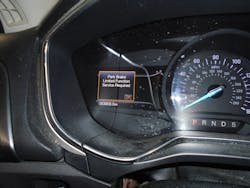
Today's most common EPB system uses two switch-activated motors to apply and release the rear brake calipers (Figure 1). Most manufacturers use the anti-lock brake system (ABS) module to monitor and control the parking brake system. A diagnostic trouble code (DTC) is stored in the ABS module when a fault is detected, illuminating the parking brake warning indicator or a warning message in the instrument panel cluster or IPC (Figure 2). The EPB indicator also illuminates when the parking brakes are applied and when they are released.
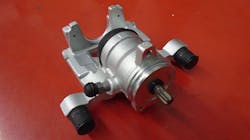
The parking brake actuator motors are single-speed reversible electric motors mounted on and splined to the rear brake calipers (Figure 3). In most cases, the motors can be serviced separately from the calipers.
Here's a generic version of the sequence of events when the EPB is commanded to engage:
- A reference voltage is sent back to the ABS module when the driver moves the parking brake switch to the APPLY position.
- The ABS module assures that conditions are correct for EPB actuation, then sends power and ground to the parking brake actuator motors.
- Once the parking brakes are fully applied, the ABS module sends a message to the IPC, which illuminates either the red BRAKE warning indicator or an EPB-specific warning indicator.
- When the driver moves the parking brake switch to the RELEASE position, the reference voltage is sent back to the ABS module, indicating a RELEASE request.
- The ABS module assures that conditions are correct for the EPB release, then sends reverse polarity current and ground to the parking brake actuator motors.
- Once the parking brakes are fully released, the ABS module sends a message to the IPC, which turns off the EPB warning indicator.
The ABS module looks to the network to ensure that all conditions are correct before allowing the EPB to engage. The service brake needs to be applied, the throttle position sensor (TPS) needs to report that the throttle is closed, and the transmission must be in PARK. The latter is vital because a reported transmission gear position other than PARK can keep the EPB from disengaging.
Suppose the transmission range sensor reports a different gear position to the powertrain control module (PCM) than the gear shifter (whether it's a gear shift module (GSM) or a mechanical shifter). In that case, the EPB will engage and stay there. It will not disengage until it sees the same value from both sources. When faced with an EPB that will not disengage, this should be the first thing you check.
Most manufacturers design the EPB to disengage under certain circumstances. With the driver door closed, the engine running, and the transmission in any forward gear or REVERSE, the EPB will release when the TPS reports a throttle tip-in. The EPB on a manual transmission vehicle will automatically release when the driver door is closed, the engine is running, and the clutch pedal is pressed. A vehicle driving away up an incline requires more accelerator pedal input to disengage the EPB than a vehicle driving away on level ground.
Precautionary measures
A rear brake caliper fitted with an EPB motor can be dangerous if the proper precautions aren't taken before servicing. The piston moves out of the caliper hard and fast, and it doesn't stop until something stops it, whatever it may be.
The parking brake system must be placed in service mode, also known as maintenance mode, to service the rear brake pads or when removing any rear brake components for servicing. The EPB system can be placed in service mode using a diagnostic scan tool or following a series of steps that can be executed from the driver's seat. For example, a 2019 Ford Fusion will enter service mode by turning the ignition switch ON, depressing the accelerator pedal to the floor and the EPB switch to the release position. You'll then have to cycle the ignition switch to finalize the procedure.
The IPC will indicate that the system is in service mode. The only way to reactivate the parking brake system is by correctly exiting service mode. Besides the possible damage to your valuable fingers, the caliper can be damaged if the piston fully extends during a non-commanded EPB actuation event when the caliper is detached from the vehicle.
The emergency brake feature hasn't been lost on the EPB system. Applying the electronic parking brake while moving will engage the anti-lock braking system, slowing down or stopping the vehicle. The ABS module will continue to run the pump and apply the rear brakes as long as the driver is engaging the EPB switch.
EPB diagnosis usually begins with an illuminated warning indicator. Some manufacturers use the same indicator to report a service brake issue as they do to report an EPB issue. Pull the DTCs and service any ABS or service brake concerns before diagnosing an EPB failure. The ABS module will set a DTC and turn on the warning indicator if it sees a circuit, a calibration, or a parameter memory issue with the EPB system. This means that the position of the EPB actuator motors is not what the module expects to see, or the position values are not available. It doesn't take much for the ABS module to set a DTC and turn on a warning indicator if it doesn't like what it sees.
Real-world example
We diagnosed a 2017 Ford Fusion with an illuminated EPB warning indicator and DTC C2005:74 (the clamp request from the ABS module takes longer than 8 seconds to perform) stored in the ABS module. The DTC applied to the right rear actuator motor.
Since there were no circuit DTCs, and the actuator motor was eventually applying, we could assume that the wires between the ABS module and the actuator motor were a complete circuit, not shorted to ground, not shorted to voltage, and not shorted to each other. This is a performance DTC, which means that the ABS module didn't like what it saw when it activated the EPB.
A visual inspection revealed that the thickness of the rear brake pads was about 7mm. Extremely worn brake pads would set this DTC, but that is not the case here. This meant that we had either a sluggish actuator motor or a sticking rear caliper.
We removed the actuator motors from both rear calipers so we could compare the applying effort of the suspect caliper to a known good component. After turning the ball screw on both calipers, it was evident that much more torque was needed to extend the right-side caliper piston than was needed to extend the left-side caliper piston. The actuator motor was doing its job, and the ABS module was seeing the extra time it took for the actuator motor to reach the end of its travel. We replaced the caliper, cleared the DTC, and all was fine.
Finding the root cause of the concern
Road conditions can cause havoc with the EPB actuator motors. Ice, snow, mud, and basic road debris can contaminate the actuator motor harness connector and the actuator motor itself. It's no big secret that the visual inspection is the most critical step in all diagnostic procedures, and it should be the first step when diagnosing an EPB concern.
Check for contamination in the harness connector and cracks in the actuator motor housing. If the heads of the screws that attach the actuator motor to the caliper are badly rusted, so is the actuator motor.
Newly replaced rear brake pads can be a clue when diagnosing an EPB concern. The caliper could have been damaged if the installer did not correctly enter service mode before disassembly. Metal dust from metal-to-metal brake pads could have severely damaged the caliper or the actuator motor. New parts should always raise a red flag.
If multiple DTCs are stored in the ABS module, always service the ABS DTCs before attempting to diagnose an EPB DTC. Sometimes a DTC represents the result of an issue, not the cause.
A little logic goes a long way
Here’s something that happens way too often: A vehicle gets towed into your shop with no power and an engaged EPB. You jump the battery, no go, no power. You need the vehicle pushed into the shop, but if the locked-up rear wheels aren't rolling, the vehicle isn't rolling.
The manufacturer's solution to this issue is to remove the actuator motor from the caliper and turn the ball screw with a pair of pliers to disengage the parking brake. The problem is that there's always one screw tucked behind a shock absorber or a spring shackle, which makes removing the actuator motor (while lying under the vehicle in the parking lot) a frustrating task. It's much easier to reverse the actuator motor using a jump box, two jumper leads, and a couple of flex probes.
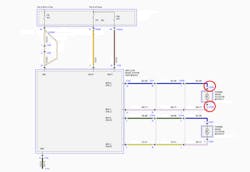
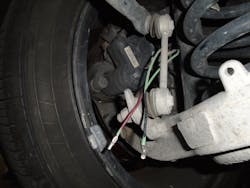
The wire schematic is referenced to determine the polarity needed to reverse the motor and retract the caliper piston (Figure 4). It takes less time and eliminates the possibility of damaging an actuator motor during disassembly. I've made up a couple of harness connector pigtails for the types of actuator motors I see most commonly. This way, I can disconnect the vehicle harness connector, plug in my pigtail, and connect the jumper box (Figure 5). You can hear the motor retract when applying power and ground. Ensure the vehicle is secure before releasing the actuator motors; it will start to roll.
We haven't talked much about EPB systems that utilize a central actuator motor and parking brake cables. In these systems, the actuator motor is tucked up under the body, which keeps it safe from road debris issues for the most part. Seized cables are the actuator motor killers on these systems. The tighter the cable becomes, the harder the motor must work.
In most cases, the cables come with the actuator motor when replacing the component. Check the operation of the calipers before replacing the motor and cables. A seized cable can eventually lead to a seized caliper, damaging a new actuator motor.
EPB systems really aren't that complex. The ABS module only outputs voltage and ground to the actuator motors and warning lamp info to the IPC. The switch is a one-trick pony that sends a voltage signal to the ABS module when it's moved in either direction, and the actuator motors are just that, DC motors.
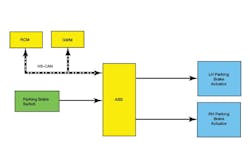
The ABS module receives inputs from the brake switch, accelerator pedal, clutch pedal, door-ajar switch, engine RPM, transmission range, and the airbag module to determine vehicle attitude. Some of this information will detour through other modules via the network (Figure 6). Note how the gateway module (GWM) is used to deliver inputs to the ABS module.
You'll find that most EPB issues are mechanical rather than electrical. Don't forget to enter service mode before disassembly; save the digits.
About the Author
Roy Dennis Ripple
Roy Dennis Ripple is a Ford Senior Master Technician and an ASE Master Technician with more than 30 years' experience in the automotive industry. As an automotive journalist, he is the recipient of a 2020 Azbees Award and a 2020 Tabbies Award. Ripple is currently working full-time as the shop foreman at a Ford dealership. He lives in New Jersey with his wife, three dogs, and two motorcycles. He can be reached at [email protected].
