Troubleshooting electronic throttle body concerns
Your customer comes in with a “poor idle” concern. The check engine light is also illuminated. Could this be a problem with the electronic throttle body?
While there are other potential causes for these customer concerns, today we’re going to focus on testing and, if needed, replacing the electronic throttle body. But before we begin to troubleshoot, let’s get a basic idea of how the system works.
Electronic throttle bodies work hand-in-hand with the accelerator position sensors. As the driver changes the position of the pedal, inputs are sent from these sensors to the engine control module (ECM). The ECM now knows what the driver wants to do – decelerate, accelerate or maintain a steady speed.
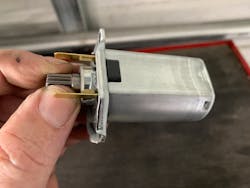
Based on that input, the ECM uses a small DC motor to alter the position of the throttle plate as required. The reduction gears connecting the motor to the actual throttle shaft allow for precise control – and that improves drivability and overall performance.
But the ECM needs to know that its commands were carried out. That’s the purpose of the redundant throttle position sensors contained in the throttle body assembly.
The ECM also knows that problems in the inputs or in the operation of the throttle body itself can result in some hairy moments for the driver! So it keeps an eye on the inputs and the motor – and if it detects any problems it will alert the driver and turn on the check engine light. It may also place the vehicle in “limp” mode – allowing the vehicle to be started but limiting engine speed.
First steps
The first step in diagnosing the throttle body is to connect a scan tool and see if any diagnostic trouble codes, or DTCs, are stored relating to its operation. If any are found, you can start your diagnosis there, using the OEM flow chart as a guide. If not, move on to a visual inspection.
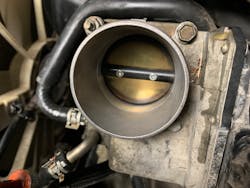
Remove the intake air duct in order to access the throttle body. Visually inspect the bore of the throttle body and the throttle plate. It’s not unusual to see deposits building near and on the throttle plate. As these deposits build, it reduces airflow past the throttle body.
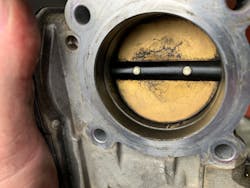
The ECM can only compensate but so much for these deposits. To avoid drivability issues for your customer, recommend periodic cleaning – about every 50,000 miles or as listed in the OEM maintenance schedule. Just remember, that when you do clean the deposits away, you are restoring the original flow and the throttle body position for a correct idle speed will have to be relearned by the ECM, using the relearn procedures outlined by the OEM.
These deposits can also work their way into the throttle plate shaft bushings, restricting the movement of the throttle plate. This, too, can cause drivability issues for your customer.
Check the operation of the throttle plate following the OE procedure. Some OEs advise against manually operating the throttle plate and certainly not while installed on the vehicle. If the OE permits a manual check, remove the throttle body and see if you can move the throttle plate easily with your finger. There should be little to no resistance to movement. If you feel any while moving the throttle plate through its range of motion, replace the throttle body.
Electrical checks
Now on to inspecting the electrical side of the throttle body.
While some of these tests can be done with a voltmeter, a scope is more likely to catch any dropouts in the throttle body’s operation – much like how we used to test throttle position sensors. We’ll start with the ECM’s ability to operate the throttle body motor.
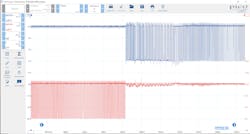
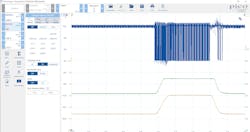
You can check the motor using an ohmmeter and measuring its static resistance, but I prefer to see components “in action” so I’ll connect my scope leads to the two pins at the throttle body connector for the motor – one channel for the positive pin and one for the negative pin. The ECM controls the throttle plate by sending a pulse-width modulated signal to the motor. The pulse width should increase and decrease smoothly as the pedal is depressed and release. Do not try to move the throttle plate by hand while the key is on – damage to the throttle body or to your fingers could occur!
Listen closely to the motor as the pedal is moved for any abnormal noise as well. Noisy motors are a sign of bad ones.
If there are any issues noted, be sure the APP sensors are sending smooth signals to the ECM. The ECM can only act on what it is told, so if the incoming signals are glitchy or dropping out, the signals to the motor will be affected.
With the motor operation inspected, we can move on to the sensors that provide the feedback to the ECM – that is, the sensors that let the ECM know the throttle plate is moving the way it wants it to. These are the Throttle Position Sensors and can be tested by watching the signal return to the ECM. As the throttle plate is moved, the voltage should increase and decrease smoothly. Any dropouts in the signal indicate a failing sensor, requiring the replacement of the assembly.
Replacement notes
When choosing a replacement part, you can choose OE or select a part from the aftermarket. Just be careful – not all aftermarket parts are the same. Be sure that the aftermarket part you select is made to the same OE standards – or better - for a dependable, quality repair. Anything less can result in poor performance and customer comebacks.
To change out the throttle body, follow the OEM procedures for removal.
Most designs use a plastic manifold and a rubber gasket. It is important to remove any fluids from the gasket’s groove – to ensure that the gasket doesn’t try to shift when it’s compressed. Install the gasket and then carefully place the throttle body in position.
Start the mounting bolts to hold it in place and tighten just enough to lightly seat the throttle body. Use a torque wrench to complete the tightening sequence, following the order and torque specifications set forth by the manufacturer. Reinstall any coolant or vacuum lines, then the wiring connector and finally, reinstall the air intake assembly.
But we’re not quite done yet.
Most vehicles require that the new (or even freshly cleaned) throttle body be “relearned” by the ECM. The procedure for the relearn will vary from OEM to OEM, even from one model to another. Some may even require a scan tool to complete. Always refer to the published service information and familiarize yourself with the process before attempting the relearn.
After the relearn has been successfully completed, and to avoid an unexpected comeback, always verify your repair before returning the vehicle to the owner.