Ultrasonic Inspection for Wall Thickness
Key Highlights
- Measuring cylinder wall thickness is crucial before overboring to avoid weakening the engine block or damaging water jackets.
- Ultrasonic testing provides accurate, non-destructive measurements of casting wall thickness, accounting for core shifts and manufacturing variations.
- Knowing the minimum safe wall thickness (typically around 0.125 inches in critical areas) helps determine if a block is salvageable or needs replacement.
- Proper calibration and technique are essential for reliable ultrasonic measurements, including cleaning bores and applying appropriate grease.
- Assessing all cylinders and multiple areas within each bore ensures comprehensive understanding of casting integrity and guides machining decisions.
If a customer's engine requires a rebuild that may involve a cylinder bore over-sizing (overbore), inspection of existing cylinder wall thickness is always a good idea to determine if oversizing is possible or practical. Depending on the specific engine block design and the extent of cylinder wall damage to be corrected, isolated areas of the cylinder walls may be very close to the water jackets. If enough material is removed, this can weaken the cylinder wall and/or open the cylinder to water.
Since many repair shops may not be equipped to perform engine block reconditioning in-house, such work would likely be farmed out to a local engine machine shop. It's preferable that the machine shop of choice can measure existing cylinder wall thickness. While this may not be necessary with all engine blocks, being able to verify that the amount of material to be removed serves as a safeguard before the work. Knowing how much wall thickness is available up front can determine if the block is salvageable
.
Core Shifts and Thickness Variations
Wall thicknesses in newer engines are thinner than in the past, and checking castings before boring oversize or removing major amounts of metal is sometimes advised. Besides basic thickness, castings are subject to variations in manufacturing called "core shifts." That is, sand cores forming the interior of hollow castings shift in position during the pouring of the casting, resulting in walls that are thick in some spots but thin in others.
Core shifts make themselves known in various ways. First, engine failures result from cracks in thin cylinders. Machinists may break into water jackets while boring. The most common difficulty encountered in obtaining roundness during cylinder honing. In this last instance, cylinders flex and allow the cylinder hone to pass by without removing the normal amount of material. While not all engines have these problems, they've become sufficiently common to cause machinists to find ways of inspecting casting thickness.
How Ultrasonic Testing Works
Ultrasonic testing is the accepted way of precisely measuring wall thicknesses. The tester transmits a sound wave through the casting wall, and the time required to pass through the wall translates into a measurement of thickness. This is possible because the sound waves don't travel through the air on the other side of the wall. For example, where core shifts are involved, instead of a consistent 0.160” wall thickness, thicknesses may range from as thin as 0.060” to 0.260” (1.5 to 6.6 mm).
A sonic tester is an electronic thickness gauge. The tester (after being calibrated for the type of material being tested) features a remote probe. The probe is placed against the material to be measured. The probe sends a sonar-type signal through the metal. When the signal reaches the backside of the material, the signal wave bounces back, electronically registering the material thickness. This is the accepted method of accurately measuring the thickness of an engine block's cylinder walls.
Determining Safe Minimum Thickness
Knowing how thick the cylinder walls are (at all height and radius locations within the bore) gives you an informed picture of how much material can be removed until you get too thin or hit a water jacket. For example, on a Gen V or Gen VI 454 or 502 Chevy block (water jackets run around each cylinder), minimum wall thickness is 0.090" (in the top 1" of the bore area, where thickness is most critical due to cylinder pressures). This 0.090" is a ballpark minimum. To be safe, a minimum of 0.125" in the top 1" of the bore is a much more acceptable minimum. Once you travel lower in the bore, cylinder pressures diminish considerably, and wall thickness becomes slightly less of a concern. Unless the cylinder walls have been cast incorrectly, you should have plenty of material in the upper portion of the bore.
If you plan to overbore the cylinders, using a sonic tester can verify that you have enough material to work with, or it can tell you that you have a thin spot that makes overboring impractical. It's good to know this beforehand to avoid boring a block that can't take the necessary wall thickness removal.
Assuming that your shop farms out this level of engine rebuilding, if your local machine shop doesn't have access to a sonic tester, it's a really good idea to bring the block to another shop that has a tester just to get the wall thicknesses gauged before you go any further in terms of time and your customer's money.
Using a Sonic Tester: Step by Step
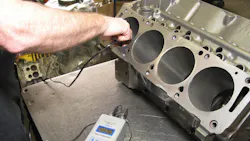
Using a sonic tester is fairly simple.
- First, the unit is calibrated using a precision stepped calibration tool (this is a precision-milled piece of steel that has been milled to 0.200", 0.300", 0.400", and 0.500" thicknesses).
- The probe is plugged into the unit, the unit is turned on, and a small dab of lithium grease is applied to the face of the probe (the grease helps to gain better contact for a more accurate reading).
- While applying moderate pressure against the probe (pressing the probe and calibration metal together) at the 0.200" thick area of the calibration piece, adjust the "low cal" knob until the reading reveals exactly 0.200".
- Finally, place the probe against the 0.500" thick area of the calibration piece and adjust the "hi-cal" knob until the reading shows exactly 0.500".
This procedure should be repeated several times until the readings are stable. The sonic tester is then ready for use.
Measuring Your Cylinder Walls
Clean the cylinder bore with a clean rag. Place a fresh dab or smear of lithium grease onto the probe face, and place the probe against the cylinder wall in the area you want to measure (apply moderate pressure against the probe). For best results, the probe should be placed at a 90-degree angle from the length of the cylinder.
Measure all cylinder areas, starting at the top (measure all the way around the bore diameter, in phases from top to bottom), noting and recording the wall thickness as you go. Since castings (especially OE castings) commonly feature some variation from bore to bore (in terms of thickness), it's best to measure all eight bores. If you find a thin section, it's better to know this now rather than after performing hours of expensive machining time.
About the Author

Mike Mavrigian
Motor Age Editor
Mike Mavrigian has written thousands of automotive technical magazine articles involving a variety of specialties, from engine building to wheel alignment, and has authored more than a dozen books that crisscross the automotive spectrum. Mike operates Birchwood Automotive, an Ohio shop that builds custom engines and performs vintage vehicle restorations. The shop also features a professional photo studio to document projects and to create images for articles and books.