
“Breaking in” an engine refers to precautions involving brand-new or rebuilt engines. Severe damage can occur if proper break-in procedures are ignored. In addition, properly lubricating the engine before it’s installed in the vehicle not only makes the task easier (due to better access) but also verifies oil pressure and allows you to check for fuel, oil, or water leaks. If the oil pressure is not adequate, addressing the concern is vastly easier with the engine out of the vehicle. Of course, a fresh engine may be fired for the first time while installed in the vehicle, but firing prior to installation verifies the condition prior to the arduous task of installation. If a problem arises, issues are more easily addressed with the engine out of the vehicle.
Whether firing the engine in or out of the vehicle, never start a fresh engine without first circulating oil through the oil galleys to provide oil to the bearings and valvetrain. Even if the engine has been recently built or rebuilt, we need to ensure that oil is being delivered to all critical areas to avoid a potentially damaging dry-start.
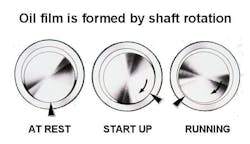
Never assume that the engine’s oil pump will distribute oil through the engine’s oil circuit during cranking quickly enough to protect the bearings. For older engines that feature a distributor, it wasn’t uncommon to disconnect the coil wire, followed by cranking the engine, in order for the oil pump to build pressure. In theory, this practice pulls oil from the sump and delivers oil, but it’s risky because oil may not be delivered quickly enough to protect the bearings. It will take even longer for oil to arrive at the rocker arms priming the oil system is absolutely critical prior to starting the engine. This means sending oil to the main bearings, rod bearings, and to the entire valvetrain. Depending on engine design, this can be accomplished in one of two ways. If you’re dealing with an older generation engine featuring a distributor wherein the distributor engages the mechanical oil pump, you can remove the distributor and drive the oil pump using a drill and an adapter to drive the oil pump shaft. A heavy-duty drill (electric or pneumatic) can be used to turn the oil pump while you monitor a temporary oil pressure gauge. However, a preferred alternative involves the use of a pressurized oil tank, which can be used for any engine (distributor or distributorless). For engines that feature a crankshaft-driven/front-mounted oil pump (common today), using a pressurized pre-oiler is both convenient and efficient.
Pre-Oil Pump
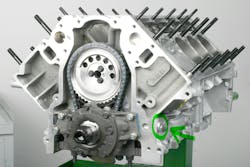
First, prepare the engine for pre-oiling. Add oil to the sump (a dedicated break-in oil is an excellent choice). Remove all spark plugs and remove the valve cover(s). Remove the oil pressure sensor and install a temporary oil pressure gauge. Locate an appropriate oil port for the connection of oil input from the pressure tank. Using the GM LS engine family as an example, there is an oil port on the block’s left side behind the front of the engine that is open to the oil pump. Also, select a wrench that allows you to manually turn the crankshaft.
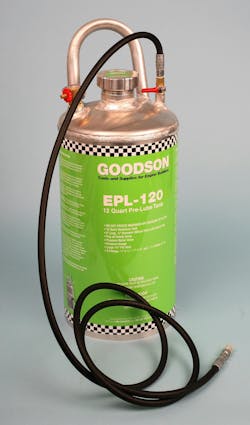
Pre-Oiler Tankers
An engine pre-oiler system involves a portable pressure tank and a hose that connects the tank to the engine’s oil port. Add fresh oil to the tank, replace the tank’s fill cap, and pressurize the tank using shop air. When the tank’s valve is open, pressurized oil is forced into the engine via a connection hose between the tank and engine block. This is the easiest and by far the most efficient method of pressurizing the engine’s oil circuit.
Be aware that tanks are available in either steel or aluminum construction. Steel tanks are essentially the same type as those used for propane. If not stored properly with clean oil, rust can form inside the tank, which can lead to potential oil contamination. Steel or aluminum tanks will do the job, but aluminum tanks eliminate this concern.
How to Use a Pre-Oiler Tank
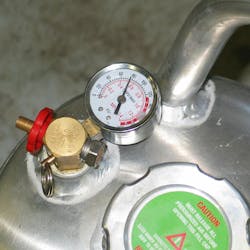
Hoses provided with these tanks are generally about eight feet long, allowing you to place the tank securely on the shop floor or on a nearby bench. Remove the oil reservoir cap from the tank and add fresh, clean engine oil to the tank’s oil reservoir. Depending on the make/model of the pressure oiler, capacity can range from 4 to 12 quarts (generally, a minimum of about a 4-quart tank capacity will be enough to provide sufficient pre-oiling). Install the oil reservoir’s cap. Make sure that the pressure oil tank’s flow control valve is in the closed position.
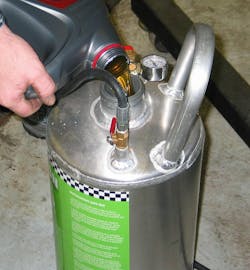
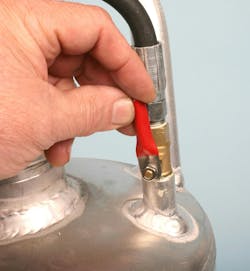
Connect the tank’s outlet hose to the engine block. Make sure that the connection is secure. Lightly coating the adapter’s threads with Teflon sealant paste on the adapter threads is recommended to prevent potential leakage. Do not use Teflon tape, as loose “threads” of Teflon tape can potentially break loose and enter the system!).
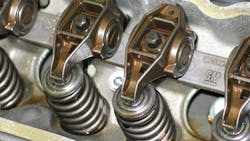
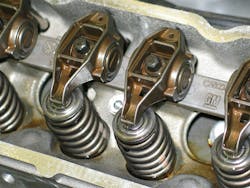
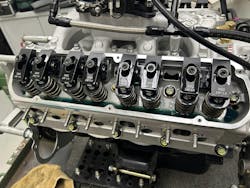
Using shop compressed air, charge the tank, and then disconnect the shop air. Once charged, connection to the shop air hose is no longer needed, making the tank portable. With the hose connected to the engine block, open the pressure oiler’s flow control valve to introduce oil into the engine. A “gurgle” noise will be heard as the pressurized oil begins to displace air. Pay attention to the rockers/cam followers and verify that all rocker locations are receiving oil. Depending on the application, this may take as little as a few seconds to several minutes. Make sure that all rockers are receiving oil.
During the oil charge, slowly rotate the crankshaft at least 360 degrees. This provides a better opportunity for oil to push through the main bearing oil passages as journal oil holes pass by the bearing oil holes. Note that the crankshaft requires a supporting oil wedge between bearings and journals when running. Fully pre-oiling the bearings/journals provides added insurance.
Once you’re satisfied that oil has been thoroughly distributed, close the tank’s valve, remove the hose from the block, remove the pressure gauge, and install the pressure sensor. Since you’ve injected oil into the system during pre-oiling, chances are good that the sump may be overfilled. Check the oil level and drain any excess oil. Depending on the engine application, you may wish to drain the oil sump and refill it with the oil intended for actual running.
Always use new spark plugs and verify that gaps are correct according to the engine maker’s specifications. Apply a thin coat of anti-seize to the spark plug threads and torque to specification.
Tips
- It’s best to pre-oil the engine shortly prior to engine startup. In general, pre-oiling should take place no more than one or two days before firing
- For pre-oiling purposes, avoid heavy viscosities. You need to deliver oil efficiently. Generally speaking, avoid anything heavier than 10W-30.
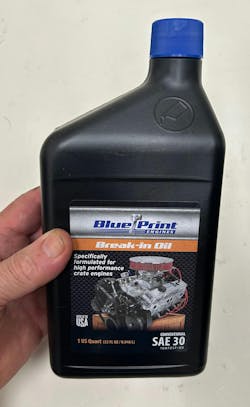
- If the engine is newly built, consider avoiding the use of a full-synthetic oil for break-in, as this may prevent the piston rings from properly bedding against the cylinder walls. In many cases, it’s best to use a dedicated break-in oil for initial firing (an oil designed with the appropriate level of zinc phosphate).
- If the engine features a flat tappet camshaft (solid or hydraulic), you must run an oil with adequate high-pressure lubricant that contains sufficient zinc phosphate to avoid cam lobe and lifter damage. Specialty “high zinc” engine oils are readily available today that are specifically designed to provide the needed protection for flat tappet lifters/camshafts.
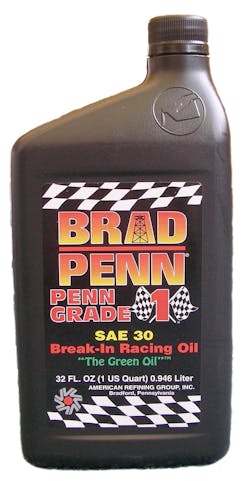
- High-pressure oil is also recommended if the engine features a roller cam coupled with high valve spring pressure, as higher valve spring pressures can promote wear on the rocker and valve tips. Most of today’s off-the-shelf engine oils feature greatly reduced levels of high-pressure zinc additives, so it’s important to select an oil that retains a high level of zinc phosphate. These specialty oils are now readily available from firms such as Brad Penn, Joe Gibbs, Lucas, Blueprint Engines, Royal Purple, Comp Cams and others. If the engine is a non-altered production type with a roller cam, these specialty oils won’t be necessary.
- Especially when starting off with a new or freshly rebuilt engine, it makes no sense to rely on used ignition components. Unless you’re certain about the condition, it’s advisable to install new coils, coil wires, and distributor caps/rotors (where applicable).
- If the engine is carbureted, use only a “known good” carburetor for break-in, even if it’s not the carburetor you intend to finally install. This reduces the potential for having to fuss with richment settings, float levels, etc.
- If the engine features fuel injection, make sure that the injectors are working properly. If used injectors are to be installed, it’s recommended to first bench test.
- On engines that feature distributor ignition, pay careful attention to initial timing to avoid crank/no-start issues.
- Check all vacuum ports to make sure that all are connected appropriately.
- Make sure that the fuel tank has adequate fuel to avoid an unexpected engine shut-off.
- For distributor-equipped engines, make further timing adjustments as needed.
Flat Tappet Cams Caution
Granted, you’ll only encounter engines equipped with a flat tappet camshaft in “older” engines (mostly pre-1980s), but it’s wise to understand the required break-in procedures. Breaking in an engine equipped with a flat tappet camshaft requires added precautions to allow the lifters to properly mate with the camshaft lobes. Failure to follow these precautions can and will damage the cam and lifters. During break-in (which should last about 20 minutes), do not allow the engine to idle at low rpm. Make sure that the fuel supply and ignition are immediately ready for firing to avoid extended cranking. As soon as the engine fires, run at approximately 2400 rpm for about 15 minutes, varying engine speed during the break-in period.
Note that even if the engine features a roller camshaft, running the engine at varying speeds for a few minutes will help to promote piston ring seating. There is no lifter-to-cam break-in concern when dealing with roller camshafts and roller lifters, as long as oil is being delivered to the lifters.
During the first firing, carefully monitor engine oil pressure and temperature. When breaking in a flat tappet cam, it’s important that the engine is not stopped at any point during the procedure.
If you opt to fire the engine before vehicle installation, there are two basic options. A portable live-fire test stand or on an engine dynamometer. A test stand should be equipped with a method to bolt the engine to the stand (at motor mount locations and at the rear of the block. The stand should be equipped with a radiator, a fuel cell, a battery, an ignition switch, and a minimum of critical gauges, including oil pressure, water temperature, and engine rpm. Install the appropriate starter. The flywheel or flexplate must be installed, especially if the crankshaft features internal balance. Exhaust will include an exhaust manifold (or tubular headers) and exhaust tubing that extends for at least 36 inches. Test stands may be fabricated or purchased as a complete kit. If you’re planning to run the engine on a test stand, be sure to provide adequate airflow via a large electric fan mounted to the radiator and a large floor fan. Avoiding the potential for an overheating condition is critical.
Whether you plan to run the engine on a test stand or in the vehicle, plan ahead for potential problems by having at least one fire extinguisher handy, as well as heat-resistant gloves, eye protection, and a face mask. Avoid performing the job alone. A minimum of two technicians should be available: one to operate the controls and one to monitor gauges and check for leaks or other issues.
An alternative, though more costly, is to fire the engine on an engine dyno. Since your shop likely is not equipped with this, the work can be farmed out to a local performance engine builder. A dyno session cost will vary, but should be in the range of $1,000 or so. Engine dynos are commonly used to verify engine operation in addition to horsepower and torque (and tuning). While seemingly overkill, a dyno can be used for basic break-in and to verify condition.
With that said, if you wish to keep everything in-house and avoid the use of a test stand, it’s certainly acceptable to perform the initial firing with the engine in the vehicle, provided that you have previously oil-primed the engine.
After-Run Engine Checks
Once the initial break-in has been accomplished, immediately drain the engine oil into a clean plastic drain pan and remove the oil filter, but do not discard the filter. On a workbench, cut the filter apart (dedicated oil filter cutters are readily available), remove the filter element, and inspect all filter surfaces/pleats. Evidence of notable metal debris found in the filter is cause for alarm, as this may indicate bearing damage.
Run a clean magnet through the oil drain pan, checking for slivers/debris. If the oil and filter checks confirm no issues, refill the sump with oil of choice and install a new filter.
Depending on the application, it is advised to drive the vehicle for about 100 to 500 miles before the next oil and filter change. At least for the first 100 miles or so, avoid constant highway speeds, opting for varying engine speeds. This can further promote proper piston ring seating and “seasoning” of the new valve springs. Routinely check coolant levels after each engine stop and complete cool-down. Note that if MLS (multi-layer steel) head gaskets are installed, in some cases, you might witness very slight external water weeping between the heads and block. This may be normal. Once the factory-applied gasket’s sealant cures, this weeping will stop (usually within about 20 minutes from first firing, if it occurs at all). Also, routinely inspect for potential external oil leaks.
Engine Pre-Oiler Tank Sources
Goodson Tools
156 Galewski Dr.
Winona, Minnesota 55987
800-533-8010
goodson.com
EPL-120
- 12-quart capacity
- Lightweight aluminum construction (eliminates potential rust inside the tank)
- 8¼-foot hose with swivel end
- Pop-off safety valve
- Pressure gauge
- Two standard fittings and one LS fitting
Melling Select Performance
P.O. Box 1188
Jackson, Mississippi 49204
517-787-8172
melling.com
MPL-101
- 4-quart capacity
- Dipstick
- Steel construction
- Optional oil pressure gauge
- 8-foot hose
Silverseal Products
800-521-2936
silver-seal.com
EL05
- 5-quart capacity
- Dipstick
- Steel construction
- 8-foot hose
About the Author

Mike Mavrigian
Motor Age Editor
Mike Mavrigian has written thousands of automotive technical magazine articles involving a variety of specialties, from engine building to wheel alignment, and has authored more than a dozen books that crisscross the automotive spectrum. Mike operates Birchwood Automotive, an Ohio shop that builds custom engines and performs vintage vehicle restorations. The shop also features a professional photo studio to document projects and to create images for articles and books.