xEV diagnostics and 3-phase motor testing
Key Highlights for Technicians
- Follow a structured diagnostic checklist: vehicle preparation, verification, visual inspection, and research on recalls or TSBs.
- Understand the differences between motor types (permanent magnet vs. induction) and their diagnostic methods.
- Use specific testing techniques such as bulb testers, scope analysis, milliohm measurements, and insulation testing for motor diagnosis.
- Engage with vehicle owners to gather comprehensive history and foster trust, enhancing diagnostic accuracy and customer satisfaction.

Theory is a must, but it will never replace experience. You need both. xEV is a new term that includes all types of high voltage vehicles. Mastery of this highly skilled profession is never ending. We are no longer a “trade.” Reaching the top of your career happens when your ability to analyze data and arrive at a diagnosis fixes the root problem.
Van Batenburg’s Garage was started by me at age 26. I hired many high school and college students and graduates. ACDC — my current business — still does today. Those years have allowed me to observe many new technicians. The ability to use critical thinking is paramount. That can be fostered in schools, if the instructor incorporates critical thinking into their method of instruction. Sometimes the best advice to a technical question, when you are troubleshooting a difficult problem, is to “figure it out”. Once you can figure it out, after the scan tool and flow charts have failed you, the mastery of the systems used in xEVs will be yours. Think it through, using logic and reason. Stay at it, but take a break when you get frustrated. If you are getting nowhere, make sure you have done a thorough job at the basics. This is the most challenging part of your job and also the most rewarding. Don’t quit.
Getting Off to a Good Start
Your brain is a computer of sorts. It stores information, retrieves it later on, calculates basic math, and helps form words so you can speak. Your brain can analyze data and make decisions. Brains exist in all mammals, but there is one thing we can do that other mammals cannot do, and that is pause and think things over. Other creatures work by instinct, and humans can also do that, and at times it works. Analyzing, making a diagnosis, and repairing an xEV is a process that cannot be done by instinct or guessing. You may look something up on the internet and try replacing a part and get lucky in that it fixes the xEV. But will it stay fixed? Did you get to the root cause or did you merely relieve a symptom, only to have the problem return? To get to a level of mastery in this world of high voltage vehicles, you will need to keep learning forever. If you are not a lifelong learner, the technology will pass you by. If the codes are accurate, to the degree that the software engineers were able to program the xEV, and the scan tool doesn’t get you to the fix, more study and a deeper look are needed.
To start any diagnostic procedure (excluding the managerial part of getting the customer to pay for the time), here is a checklist in the order ACDC feels it should be done. Note: The order may be slightly different in some shops.
1.Have the customer prepare the xEV for service. Here is a checklist for the car owner
- Unless the fuel tank is leaking, the vehicle needs to have at least a half tank of fuel and/or ensure the xEV has a sufficient charge in the HV pack for road testing and diagnosis.
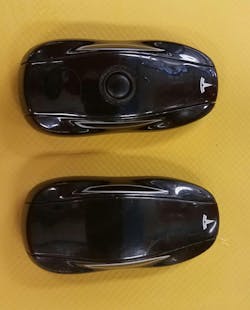
- The driver has given you the key fob he or she normally uses. (Figure 1).
- The driver left the special “lug nut“ socket on the passenger seat.
- If there are “aftermarket electrical devices” installed on the xEV, you are aware of them.
- You have a history of the xEV, and know if it's a flood damage vehicle, was totaled in a crash, was in an accident and repaired at a body shop, etc.
- The owner has removed all personal items from the vehicle, including the frunk and trunk.
- The owner brought the xEV in free of trash and excessive dirt.
2. You have read the repair order carefully so you understand the complaint.
3. Verify the complaint. This may require a road test.
4. Do a thorough visual inspection.
5. Request copies of previous repair orders related to that issue, or issues, if there is more than one complaint.
6. Before getting too far into the diagnostics, research online for any recalls, technical service bulletins (TSBs), software updates needed, etc.
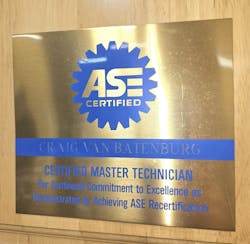
I assume you are or will be a Master Technician (Figure 2) on conventional vehicles and have been trained and/or are being trained concurrently on electric vehicles.
If an xEV has been worked on by anyone who was not properly educated to work on the vehicle you have in front of you, or if it has been rebuilt from a wreck, has been involved with a flood or has been modified, the odds of a successful repair will be much less than a vehicle where you are the first one to attempt the repair.

Techs Interacting With the Customer
As an independent shop owner for over 25 years (1977 to 2004), I learned that the car owner is an important part of the process. Interviewing the driver/owner is required to discover the repair history, type of driving, and environment that the xEV was subjected to. Technicians at Van Batenburg’s Garage (Figure 3) (my former independent Honda/Toyota shop) engaged with the vehicle owners when the description they gave us did not match the vehicle's symptoms. If the money part of the repair process was taken care of, the tech would call the customer to ask questions we failed to ask, or did not know to ask, at the time the vehicle was dropped off for repair.
A technician named Jeff, who I know well, confided in me that if a vehicle came in and it was one he wasn’t that familiar with, he studied the systems the night before. He felt guilty that he wasn’t available every night as he is a father and husband for his family. I explained that this extra study is how he got so good at his job and bought a house. It takes a lot to excel in this profession, but the rewards are there. The road to a successful diagnosis and repair can take many turns.
A few lessons to learn early on are:
- Don’t guess at what is wrong — test, test, test.
- Know how to read a wiring diagram.
- Master your equipment.
- Study the systems.
- Never stop learning.
- Take a break when you get stressed on a job.
- Include others when you need a second opinion.
- Take care of your tools and equipment.
- Work at a well-equipped shop.
- Avoid rushing a diagnostic job. Logic and reason always win over swapping parts and guessing.
Diagnostics Methods for Electric Motors
The inverter manipulates the high voltage DC battery to power the AC motors on xEVs. Each (motor/generator) has its own inverter. Think of an inverter as a motor controller. If the motor cannot work as a generator, then it is just a motor, like a high voltage air conditioning compressor. AC motors do not use brushes, as do some DC motors, except for the new Nissan EV motors of late. Having no brushes means less maintenance and cost. It is easier to control rpm on an AC motor, simply because the frequency applied is easier to control. Less frequency, less speed. Remember, Honda refers to their older integrated motor assist (IMA) as a brushless DC motor. It should be noted that all xEV motors operate with three-phase alternating current, and direct voltage, at the same time. (I hope you followed all that!)
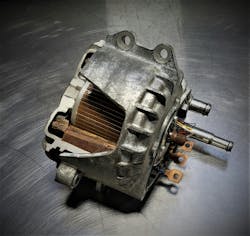
If the motor is a permanent magnet motor, either interior or exterior magnet design, the possibility of a magnet breaking into pieces is next to zero, so cross that off your list. The probability of a magnet losing its strength is extremely low, and if it did, it would take a very high temperature to demagnetize these strong magnets. The heat required would most certainly melt coil winding insulation, plastic connectors, and such. What about the bearings wearing out that support the rotor? That possibility is low, but it could happen. A dial indicator would be an appropriate tool there. At ACDC we've seen a few bad rotor bearings. If you are testing an induction motor (Tesla and GM eAssist for example), the rotor has no magnets. It also rarely fails (Figure 4). The only thing that may happen is the rotor would scrape the stator if the support bearings failed. This would produce aluminum and copper dust. In turn, that will short the AC to the chassis and the system will set a fault code for a HV leak. Game over. That leaves the stator as a suspect. The stator can be damaged with heat, poorly constructed, attacked by acids in old transmission fluid (the stator is often cooled that way), magnetic vibration issues, and loose connections (more heat). The stator is not visible without a lot of disassembly in most cases, so how do we test for a problem there? If it is a PM motor and you can figure out a way to rotate the rotor, it can be easy.
Here are four tests to try:
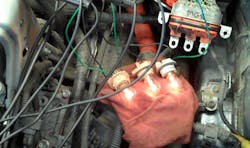
Test 1: Make a three-bulb tester. You will need three old fashioned filament bulbs (for example No. 1587). Using the bulb socket holder, attach two alligator clips to each wire so you have three light bulbs that are the same. Once the three-phase cables have been removed from the inverter, connect the bulbs to the three cables (Figure 5) and rotate the rotor. The bulbs should all light up and be the same intensity. If one is dim, verify that the connections are good by changing the positions of the bulbs. A dim bulb indicates low output on one phase.
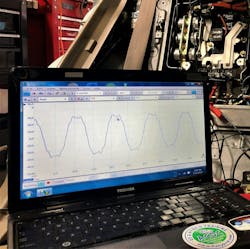
Test 2: While the bulbs are attached to the inverter, connect a lab scope to the orange cables and watch the amplitude. The bulbs will still light up, but now you can see a wave form. The three phases should all look the same (Figure 6).

Test 3: Using a milliohm meter, make the same connections to the three-phase cables. You may need to look up a specification if the test shows an out of balance stator phase. Once you have learned how to use your milliohm meter, make sure the three phases are all equal in ohms. This test will help us discover shorted stator windings that short to each other in the same phase, short to ground, short to the temperature sensor (if it has one) or shorts to another phase (Figure 7). If the test shows a failure, take the motor apart enough to remove the orange cables from the system and test again at the stator itself. It is possible to a have a high resistance connection or a bad orange cable and the stator may be OK.
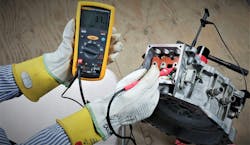
Test 4: This test will make use of your insulation tester (like a Fluke 1587). You are now adding high voltage (with very low current) to the stator and attaching the meters ground lead to the stator's case. You are looking for an isolation issue that will show you bad insulation on the coil windings of the stator (Figure 8).
The four tests can all be done in under 30 minutes once you know your equipment and have access to the orange cables that feed the AC to the stator. There are only two tests for induction motors, tests 3 and 4, as there are no magnets. Once you have determined the stator is defective, it must be replaced. There are companies that can rewind a stator, but typically it is replaced with a new one. Some OEMs have designed this for easy removal and other OEMs will have you replace the entire assembly.
There is always new equipment and more to learn. A new era is here.
About the Author

Craig Van Batenburg
Craig Van Batenburg is the CEO of ACDC, a hybrid and plug-in training company based in Worcester, Mass. ACDC has been offering high voltage classes since 2000, when the Honda Insight came to the USA. When EVs were introduced in 2011, ACDC added them to their classes. Reach Craig via email at [email protected] or call him at (508) 826-4546. Find ACDC at www.FIXHYBRID.com.