Proper main and rod bearing oil clearance
Key Highlights: Technicians Need to Know
- Always measure crankshaft journals, main bores, and big ends before selecting bearings; do not rely solely on standard sizes.
- Main bearing oil clearance typically ranges from 0.0017" to 0.0025", with performance engines requiring slightly greater clearance.
- Use a micrometer and bore gauge for accurate clearance measurement; Plastigage provides an approximate check but is less precise.
- Bearings are designed with slight eccentricity to accommodate bore distortion and dynamic loads, enhancing engine longevity.
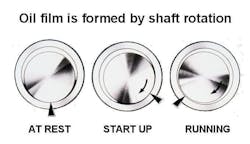
The importance of obtaining proper oil clearance between bearings and rotating main and rod journal surfaces cannot be over-emphasized. Insufficient oil clearance reduces or eliminates the crucial oil wedge that the journals need during operation and excessive clearance can reduce oil pressure and can cause cavitation that creates aeration that can damage bearings. Crankshaft main and rod journals should never come into direct contact with their respective bearings. Rather, an oil wedge must be generated as the crank turns, allowing the journals to always ride on a supportive film of oil.
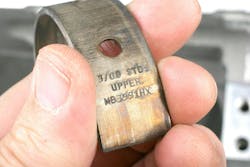
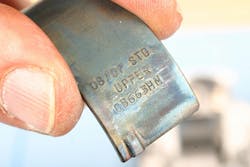
When checking for bearing oil clearance on main and rod bearing locations, do not blindly assume that “standard” replacement bearings will suffice. Due to potential stack-up tolerances between main bores, crankshaft journals and connecting rod big ends, do not blindly assume that “standard” thickness bearings will always suffice. Also the crankshaft journals may have been previously re-ground to recondition the crank (if the crank has been re-ground, the front face of the front counterweight should be stamped accordingly (i.e. 0.010, 0.020, etc., indicating that journals have been ground to an undersize. If both main and rod journals have been reground, the first number should refer to main journals, with the second number referring to rod journals.)
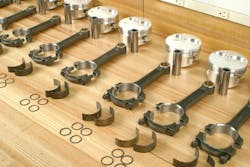
Replacement bearings are offered in a range of thicknesses to allow the builder to achieve proper oil clearance. The crankshaft’s main and rod journals must be measured first, as these journals may or may not precisely meet the OE specifications.
In addition, the block’s main bore should be checked for size and alignment. If the engine has been rebuilt at some point, it is possible that the main caps have been ground to produce an out of round condition, followed by main bore align honing to return to the specified OE diameter. If the align honing process was performed poorly, you may have a main bore that is a tad too tight or too loose. A potential stack-up of tolerances (main bore size and crank journal size) can easily result in inadequate oil clearance or excessive clearance. The same concern involves connecting rod big ends. Check rod big ends for out-of-round and for assembled diameter, especially if the rods have previously been resized. By merely assuming that main and rod bores and crank journals are correct, simply obtaining “standard” size bearings may lead to serious issues. Always measure first.
In general terms, main bearing oil clearance should be 0.001-inch for every 1-inch of main journal diameter. For instance, if the main journals measure 2-inch in diameter, bearing oil clearance should be 0.002”. If main journals measure 2.749”, bearing clearance should be in the 0.00275” range. However, specific recommended clearances may vary depending on engine type and application. Engines intended for performance/racing use will typically require slightly greater oil clearance due to higher engine speed and load. Speaking in very general terms, a high performance engine’s main bearing clearance requirement might require an additional 0.0005” of clearance (for a 2” main journal, clearance would be approximately 0.0025”).
Again, depending on the engine application, main bearing oil clearance may vary from about 0.0017” to 0.0025”, with the tighter clearance sometimes specified for many late model engine designs. Even though crankshaft rod journals are smaller than the mains, rod bearing oil clearance is generally in the 0.002” to 0.0025” range. It bears repeating: always refer to the specific engine maker’s specifications.
Keep in mind that today’s passenger vehicle engines typically run thinner viscosity oils and tighter tolerances.
In some cases, in order to achieve proper rod bearing oil clearance, upper and lower bearing shells of different thickness may be paired. This is a common practice among performance or race engine builders. This allows you to “fine tune” oil clearance to gain or lose, for example, a 0.0005” clearance loss or gain (depending if the different thickness bearing set is for an oversized or undersized application). For instance, if your rod bearing clearance is, 0.0020” but you want 0.0025”, in addition to a standard-size bearing set, you would purchase a set of 1X rod bearings. If you use the 1X bearings at upper and lower positions, you would gain 0.001” of clearance. But if you use a standard bearing at the lower (cap) location and a 1X bearing shell at the upper (rod saddle) location, you gain an additional 0.0005”.
If rod bearing halves are mixed in order to achieve desired oil clearance, traditional school of thought is to install the thicker bearing half in the upper location, with the thinner half in the rod cap. Installing the thicker (for instance “standard”) in the upper location is better suited to handle the higher loading side. On the other hand, many builders feel that this is not necessary, as long as the orientation of thicker/thinner bearing halves are installed consistently from rod to rod (for example, thicker upper and thinner lower on all rods, or thinner upper and thicker lower on all rods). Caution: Never mix bearings with more than 0.001” thickness difference.

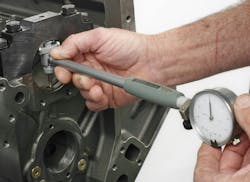
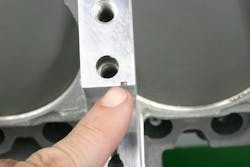
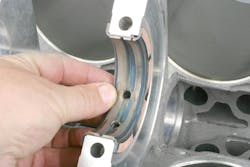
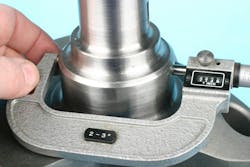
When checking for bearing clearance, perform test fitting to confirm clearances prior to final assembly. Do not install the crankshaft at this time. For main bearings, install an upper main bearing shells in the block’s upper saddles. Make sure that the saddles are clean and dry. Install the upper bearings. Do not apply any lubrication to the bearings at this time. Install the lower bearings to the main caps and install the main caps. Tighten all main cap bolts to specification and follow the correct tightening sequence outlined in the service manual. Using a micrometer, measure the crankshaft main journal diameters. (Measure each main journal and record the results.)
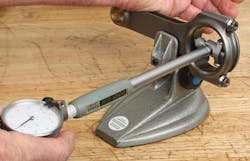
Set up a bore gauge to match the crank journal size and zero the gauge. Then use the bore gauge to check the inside diameter of the installed main bearings. The difference observed on the gauge indicates the amount of clearance. Perform the check at the 12 o’clock and 6 o’clock bearing locations. Do not measure at or near the bearing parting lines. Bearing shells feature a slight taper approaching the parting lines, which aids in allowing the creation of the all-important hydrodynamic oil wedge required for supporting the journals to avoid direct bearing-to-journal contact.
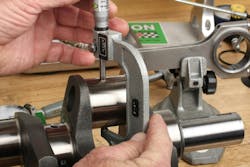
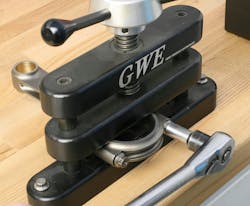
Perform the same check on connecting rods. Install new bearings to the rod upper saddle and the rod cap. Install the rod cap and tighten the bolts to specification while the rod is clamped to a dedicated rod vise. Use a micrometer to measure the crankshaft’s rod journals and set up a bore gauge to that size and zero the gauge dial. Use the bore gauge to measure the installed rod bearings (again, at the 12 o’clock and 6 o’clock positions) and record the measurement. The difference between the measured rod journal and installed bearings indicates the amount of oil clearance. Once checks have been performed, place the rod in the rod vise and remove the rod cap.
Tighter oil clearance is generally required for small crankshaft journals, the use of lower viscosity oil, near-perfect crank and block geometry, higher engine operating temperatures and perfectly balanced crankshafts. Larger/looser oil clearances accommodate larger crank journals, higher viscosity oil, imperfect crank/block geometry, lower engine operating temperature due to increased oil flow, and weaker housing bores that have a tendency to slightly distort at high engine speeds.
In general, bearings should operate with the least amount of oil clearance as the application permits. Tighter oil clearance produces less bearing peak loading, reducing the potential for less-than-smooth engine running. Again, pay attention to the engine maker’s clearance specs.
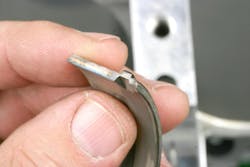
In order to measure individual bearing shell thickness, use a quality micrometer with a ball tip mandrel. Never use micrometers with flat-faced anvils.
Before measuring, index the micrometer with a standard to insure accuracy and micrometer calibration.
Measure bearing thickness at the mid-point — at the radius, not near the parting line.
Always use the same micrometer for all measurements, as differences in calibration can affect accuracy.
When measuring installed bearing diameter, the rod bolts must be fully torqued to specification (and/or using rod bolt stretch method).
Maintain the same rod bolts per rod, and do not change bolt location.
Maintain the same brand of bearing. Never mix one brand with another.
Both upper and lower bearing halves must be from the same maker, and feature the same surface treatment. Do not mix coated with uncoated halves on the same rod.
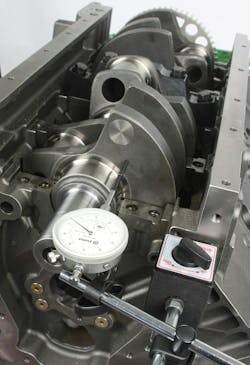
Main and rod bearing clearance can be performed with the crankshaft in place, using Plastigage wire. This approach, while commonly used by non-professional engine builders, is a viable alternative but is much less accurate. Plastigage is a compressible plastic wire. Install the upper main bearings into the block’s saddles (dry). Place the crankshaft onto the upper bearings.
Lay a short piece of Plastigage onto the exposed journal, with the wire placed parallel to the crank (wire ends face front and rear). Simply lay the wire onto the journal — do not press down on the wire. Install a lower bearing to the main cap and apply a very light smear of oil to the center of the lower bearing (this prevents the crushed Plastigage from sticking to the lower bearing and pulling off of the journal). Install the main cap and tighten bolts to spec. Do not rotate the crank at any time during this check. Carefully remove the main cap. Using the Plastigage packing slip (which features a series of measuring width markings), compare the markings to the now-crushed Plastigage wire. The closest match indicates approximate oil clearance. Perform the same task with each installed connecting rod. Prior to each individual check, rotate the crank to place the rod journal at bottom-dead center. (With the block upside down, bring the rod journal up, closest to you, for easy access.) Record each clearance in an organized manner, and record your findings. Once done, clean the Plastigage from the journals. Your findings will dictate the use of standard bearings, or will indicate the need for slightly under or over sized bearings. Again, the use of Plastigage, while better than nothing, may provide an approximate measurement, but for highest accuracy, performing your measurements with a micrometer and bore gauge is always preferred.
Bearing Design Insight
A variety of bearing designs (and dimensions) have been developed to properly suit any specific engine application. Before we delve into selecting and installing main and rod bearings, we first need to understand bearing design.
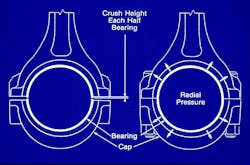
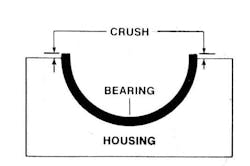
Main and rod bearings geometry provides an interference fit, or “crush”. Each bearing shell (upper and lower) is made with a length that results in slightly more than a true half-circle. The ends of the bearing shell, when installed into a housing, protrude slightly beyond the parting line of the housing. When the cap is installed and the cap bolts are tightened, these protruding ends of the bearing shells squeeze against each other and push the bearings against the housing, compressing together like a spring. The outward force of the bearings, as they squeeze into place, causes a slight change in the size and shape of the housing. This is referred to as bore distortion. As you might expect, different housing materials (such as steel vs. aluminum) provide different levels of bore distortion.
Many engine assemblers may not be aware that bore distortion may occur during assembly. Compensating for this bore distortion is the tricky part, since a multitude of variables can directly affect housing bore shape (main bores and connecting rod big ends).
One of the variables directly relates to the shape of the bearing housing mass. Blocks and rods feature irregular shapes that surround the housing bore. For example, connecting rods feature a beam at the top of the bore, notches for bolt heads and/or nuts at each side of the hosing bore, thin or thick ribs at the bottom of the cap, etc.
In addition, dynamic loads (when the engine runs at various speeds and loads) change in both magnitude and direction. All of these factors (design shape and reinforcement of the housing and dynamic loading) combine to cause the bearing housings to realize an out-of-round state under various operating conditions. Depending on the surrounding metal shape and mass, some housings will go out-of-round in the horizontal plane or the vertical plane.
Bearings are not simply perfectly round liners that take up space between the housings and the crank journals. Bearing design is a very complex issue, a factor which most engine assemblers don’t fully appreciate.
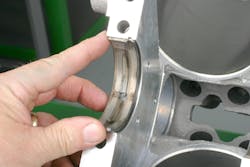
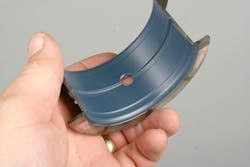
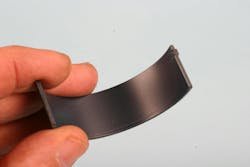
Because of bore shape variables, the most desirable bearing shape is provided with a slightly oval bearing inside diameter. As a result, bearings are manufactured with an eccentric wall. In most cases, the bearing wall thickness is greatest at the top and bottom (90 degrees from the parting line). The bearing ID tapers slightly at the parting line area.
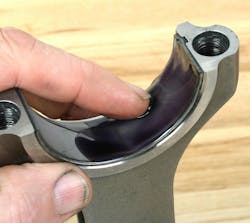
Connecting rods are especially subjected to high inertia loads at the top of the exhaust stroke, when the weight of the piston, rings, wrist pin and rod small end effectively pulls at the rod big end, in an attempt to stretch the rod. This dynamic force also tries to pull the rod big end out-of-round, which will cause the bearing housing bore to become tighter at the parting line area. In order to address this, a slight eccentricity is designed into the bearings, with the bearings thinner at the parting line area. This prevents the bearing from contacting the crank journal when bore distortion occurs.
About the Author

Mike Mavrigian
Motor Age Editor
Mike Mavrigian has written thousands of automotive technical magazine articles involving a variety of specialties, from engine building to wheel alignment, and has authored more than a dozen books that crisscross the automotive spectrum. Mike operates Birchwood Automotive, an Ohio shop that builds custom engines and performs vintage vehicle restorations. The shop also features a professional photo studio to document projects and to create images for articles and books.