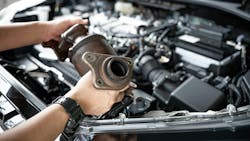
What's really wrong when a catalytic converter 'fails'
When a catalytic converter “fails,” many are quick to blame the issue on the converter, though the problem may not be caused by the converter itself. Rather, the root cause might involve upstream components such as an oxygen sensor, fuel injector, spark plug, EGR valve system, exhausts manifold, vacuum hose and/or MAF sensor. Similar to a “blown” head gasket, the root cause lies elsewhere, as the gasket can be considered the “fuse” that indicates an issue that caused the fuse to blow. We can view the catalytic converter in a similar manner.
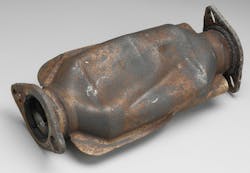
The cost of new replacement catalytic converters (OE and aftermarket) can range from a few hundred dollars for an aftermarket universal converter to well over $2,500 (plus labor), depending on brand, type and vehicle application. Obviously, this can pose a challenge to most customers.
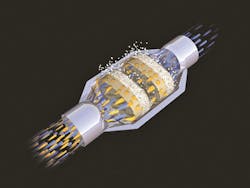
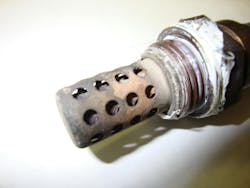
The catalytic converter’s job is to reduce harmful emissions by converting nitrogen oxide, carbon monoxide and hydrocarbons into less-harmful elements such as carbon dioxide. Converter substrates are coated with expensive elements such as platinum, rhodium or palladium to carry out the conversion process.
Today’s three way converters (TWC) can withstand short exposures to 2,000 degrees Fahrenheit. However, some operating conditions can result in thermal problems if failed or out-of-tolerance parts elevate exhaust temperatures above the converter’s designed operating limit. Examples include overly-rich fuel conditions and exhaust leaks prior to the catalytic converter. Excessive, greater than normal temperatures can result in cause matting erosion, leading to melting the converter coatings to the point of the ceramic substrate melting and causing converter clogging.

Silicone-based materials can result in converter contamination. If silicone non-converter-safe sealing products are used to seal any part of the exhaust system including the exhaust manifold and gaskets, oxygen sensors, and exhaust tubing, contamination can easily result at converter coatings and at the oxygen sensor(s). Even the highest rated RTV may only be able to handle 700 degrees Fahrenheit. If silicone is subjected to exhaust temperatures of 1,200 degrees Fahrenheit, the RTV can out-gas, in which case a contaminate coating can foul the oxygen sensor or converter wash coating. This can easily create out-of-operating conditions issues and can adversely affect catalytic efficiency. If an RTV is to be used, it must be of the “sensor-safe” variety. Also avoid the use of Teflon-based sealants on connections that can potentially route to the exhaust system.

Aside from the potential issues caused by exposure to certain RTVs that contain silicone, engine antifreeze or oil that enters the exhaust stream can also have detrimental effects to catalytic converter efficiency. Root causes of converter fouling may include leaking cylinder head gaskets, use of improper fuel such as E85 (for engines not designed for E85) or the use of diesel fuel in a gasoline engine, blowby caused by worn/leaking piston rings, worn cylinder walls, and worn/leaking valve stem guides/seals. Premature converter damage can also be caused by improper “break-in” of a new converter.
As you can see, converter failure can be traced back to factors that caused the issue — so do not immediately blame the converter itself.
Converter-related issues can present themselves by a sulfur smell when the engine warms up to operating temperature, poor acceleration, abnormal fuel mileage, misfires, etc.
A common DTC relating to catalytic converter issues is P0420: Catalyst System Efficiency Below Threshold (Bank 1). This code can store when a failed converter is detected, but can also be generated by a variety of engine problems not directly related to the converter.
DTC P0420 may be present due to intake manifold air leaks, leaking fuel injectors, incorrect spark plugs, ignition timing issues, EGR problems, a defective catalytic converter. oil or antifreeze entering the exhaust stream, oxygen sensor problem, converter issues caused by road damage/impacts, or exhaust contamination caused by silicone products.

As noted earlier, the majority of catalytic converter failures are caused by a problem or malfunction somewhere in the emission system ahead of the converter. The goal is to determine what caused the converter to fail and to remedy the problem to avoid a repeat of converter damage.
There are several approaches to catalytic converter testing: a vacuum test, a backpressure test and a temperature test.
In order to perform a vacuum test, connect a vacuum gauge to the vacuum on the intake manifold, carburetor, or throttle body. Note the reading at idle. Then raise and hold engine speed at 3,000 rpm. The needle will drop when you first open the throttle, but should then rise and level off. If the vacuum reading starts to drop, pressure may be backing up in the exhaust system indicating a blockage somewhere in the exhaust system.
Backpressure testing allows you to determine if an exhaust restriction exists. Remove the oxygen sensor and take your reading at its port in the manifold or head pipe. A reading of more than 1.25 psi at idle or more than 3 psi at 2,000 rpm indicates an exhaust stream restriction. You can also check for restriction by disconnecting the check valve from the distribution manifold and connecting a low pressure gauge.
Conducting a temperature test involves comparing exhaust inlet temperature to exhaust outlet temperature. However, checking exhaust temperature pre-converter to post-converter at idle and at about 2,500 rpm may not provide accurate diagnosis with regard to converter performance. Previously, a generally accepted rule of thumb was to expect about a 100 degree Fahrenheit difference
However, with today’s highly efficient fuel injection systems, the combustion process has become very efficient, and exhaust temperature difference at converter inlet and outlet might be only about 50 degrees. At idle, the converter in many late-model vehicles may cool down so much that there's almost no measurable difference between the front and back temperatures.
Diagnosis can be aided by paying attention to fuel trims. The vehicle’s computer system uses fuel trim to help maintain the ideal air/fuel ratio for complete combustion (stoichiometry: 14.7 parts air to 1 part fuel). Three-way catalytic converters need the mixture to be constantly driven rich/lean around this ratio in order to work at maximum efficiency. Fuel trims can compensate for other vehicle issues. That’s why fuel trims are so useful. They can provide an overall picture of what is causing the problem such as an intake manifold vacuum leak (positive fuel trim — lean) or a stuck open fuel injector (negative fuel trim — rich).
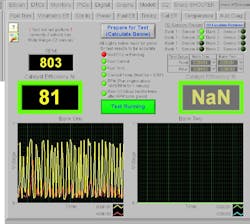
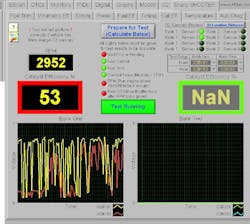
If you suspect a vacuum leak, observe the fuel trims at idle and increase engine speed to 2,500 rpm and hold. If the short term fuel trim immediately decreases and moves to acceptable levels and the long term fuel trim slowly starts to come back down, this is evidence of a vacuum leak. After repairing the vacuum leak, reset the KAM (Keep Alive Memory) and start the engine. Monitor the fuel trims to make sure they are within the normal ranges. Achieving an accurate LTFT reading may require as much as 10 miles of driving.
Short term fuel trims (STFT/STFT corrections) represent the current engine run cycle and react very quickly to oxygen sensor input. For example, if a large vacuum leak at idle is created by disconnecting the PCV hose, the ECM would immediately add positive fuel trim to balance the mixture. Short term fuel trim is not stored in KAM after shut-down and automatically resets to zero for the next start/run cycle.

Long Term Fuel Trim (LTFT1 and LTFT2) is adaptively learned over a period of engine operating time while in closed loop operation. It is stored in the KAM and also used for open loop fuel calculations (like start up and wide open throttle). LTFT is a wider adjustment and also works to keep STFT within specification.
Fuel trims should be evaluated both at engine idle and at 2,500 rpm. Observing engine fuel trims can prove useful in diagnosis, especially when there are no other trouble codes present. Finding out if an engine is running too rich or too lean will help narrow down your diagnosis. Fuel trims that differ greatly from one cylinder bank to the other will also point you in the right direction.
If the engine is running rich showing high negative fuel trim corrections, this can be caused by MAF sensor problems, high fuel pressure, leaking fuel pressure regulator diaphragm, faulty evaporative emissions components, leaking injectors, defective oxygen sensors, exhaust leaks/pinholes before the oxygen sensor, coolant temp sensor problems, and base engine issues such as low compression and incorrect camshaft timing.
If the engine is running with a lean condition showing high positive fuel corrections, this may be due to exhaust restrictions such as a clogged catalytic converter, and/or MAF and oxygen sensor faults, vacuum leaks from intake gaskets/hoses, un-metered air (such as an intake snorkel leak), clogged or dirty fuel injectors, and/or insufficient fuel delivery issues.
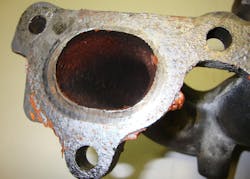
A clogged catalytic converter can result in a too-rich fuel mixture, unburnt fuel in the converter and excessive exhaust system backpressure. A badly clogged converter can result in the engine dying shortly after startup. If the converter case shows a bluish coloration, this is a sign that the converter has experienced excessive heat levels.
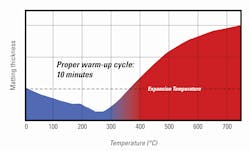
Akin to breaking in a fresh engine or a set of new brakes, a new replacement converter requires and will benefit from a proper break-in or seasoning procedure. This involves a controlled warm-up of the converter to avoid potential long-term damage to the converter substrate. If a new converter is installed and the vehicle is immediately driven off by the customer, damage to the converter may occur if the customer immediately drives non-stop for a long distance or allows the engine to idle for an excessive amount of time. As a result, the converter’s matting (which secures the substrate) may not expand properly. This can result in the substrate loosening.
Physical damage to a converter can be caused by corrosion, thermal shocks, metal fatigue/stress fractures, flex pipe failures or air-gap pipe failures.
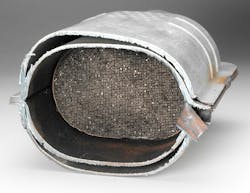
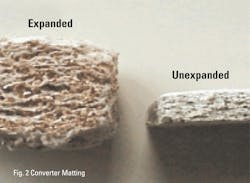
A catalytic converter’s ceramic substrate is a filler/binder called matting. This features a mineral called vermiculite, which is mated together by a fiber mat and an organic binder. The matting captures the converter’s ceramic brick. When the converter is built, the matting is in an unexpanded state. When the engine is first started and warms up to operating temperature, the fiber matting and binder burn off, making the matting looser, prior to expanding to fill the converter cavity to hold the ceramic brick in place. If the break-in “warm-up” is not performed properly, the ceramic brick can become loose, resulting in ceramic brick damage. If you hear a rattling noise in the catalytic converter, this will indicate a loose ceramic brick. By performing the proper heating cycle upon installation of a new converter, this promotes the much-needed expansion of the matting.
In order to properly “break in” the new catalytic converter, start the engine but do not rev the engine. Allow the engine to idle, allowing the engine to slowly warm up to operating temperature. After about five minutes of idle time, smoothly increase the engine speed to 2,500 rpm and hold the engine at 2,500 rpm for two minutes. Bring the engine back to idle and shut the engine off, and allow the engine to cool down to ambient temperature. Then road test the vehicle to confirm.
About the Author

Mike Mavrigian
Motor Age Editor
Mike Mavrigian has written thousands of automotive technical magazine articles involving a variety of specialties, from engine building to wheel alignment, and has authored more than a dozen books that crisscross the automotive spectrum. Mike operates Birchwood Automotive, an Ohio shop that builds custom engines and performs vintage vehicle restorations. The shop also features a professional photo studio to document projects and to create images for articles and books.