Torque wrench and threaded fastener tips
Properly tightening various threaded fasteners requires adhering to specified torque values and/or torque-plus angle for the application at hand. Understanding proper use of a torque wrench is important in order to obtain the clamping loads needed for any given application.
A torque wrench is a precision tool that allows you to monitor and reach a specific torque value (rotational force) when tightening a threaded fastener. Variations and different models of torque wrenches are designed to monitor torque value in foot-pounds (ft-lb), inch-pounds (in-lb), and/or Newton meters (Nm), mKg (meter kilograms) or centimeter kilograms (cmKg). Versions are available that handle all English and metric scales, as well as versions dedicated to either format.
Terminology
While it’s common for either term to be used, strictly speaking, when discussing rotational torque value applied to turn a threaded fastener, the term “foot pound” (ft-lb) is correct. Pound-foot, on the other hand, is a unit of work. In automotive applications, pound-foot refers to the amount of torque produced by an engine (the work done by one pound of force acting through a distance of one foot per second). While the two terms refer to two distinct applications, we often take the liberty of using either term when discussing torque value. Again, the force used to tighten a threaded fastener is foot-pound (ft-lb). When referring to engine torque output, the term pound-foot (lb-ft) is correct.
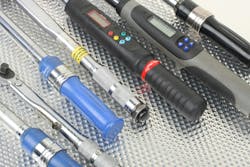
Types of Torque Wrenches
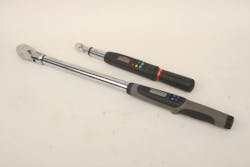
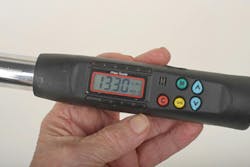
Currently there are four basic types of torque wrenches commonly used for automotive applications. These include the beam-type (a mechanical needle sweeps through a printed scale), the dial indicator that features a round gauge similar to that found on a dial indicator), micrometer style that features an adjustment scale at the tool handle and provides a “click” when the selected value is reached, and modern digital types.
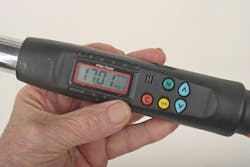
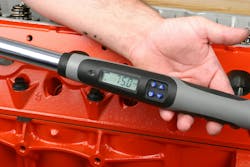
As precision tools evolve, we now have access to battery-powered digital torque wrenches that offer distinct advantages in terms of ease of use and versatility. The desired torque value is selected by pushing a button to scroll to the desired value. Digital wrenches that offer both ft-lb and in-lb as well as metric values allow switching from English to metric modes. Depending on the model, when the selected value is reached, the tool provides an audible (beep) or vibration alert or a combination of both alerts.
Torque Wrench Tips
When you’re finished with the wrench, don’t blindly place it back in your tool chest. Before storing, any mechanically adjustable micrometer “click” type ratcheting torque wrench should always be set to the lowest value prior to tool storage. If you leave the wrench at it’s previously-used high-torque setting, this can allow the internal spring inside the tool to “set,” which will result in potential calibration issues. When you’re done with torquing, adjust the wrench to the low (zero) setting before placing the wrench back in your tool chest. This removes stress and relaxes the internal mechanism.
Keep in mind that all torque wrenches are precision instruments, so handling and care is important. Avoid using a torque wrench as an “every day” wrench — only use it when tightening a fastener to a specified value.
Again, torque wrenches must be treated as precision instruments that require proper care and handling. When tightening a fastener using a torque wrench, take care to avoid tightening past the release point/specified value. Do not operate the torque wrench in a fast manner — use a smooth and steady pull and avoid any jerking motion. Smooth and deliberate movement is necessary to most precisely achieve the desired value.
If you are using a flex bar or dial indicator type torque wrench, use care to monitor/read the pointer or dial indicator needle 90-degrees to the working surface (allowing for a “straight-on” view). If you try to view the indicator at an angle, this can easily result in misreading the value.
Here's a tip that you might not be aware of. Not all micrometer ratcheting style torque wrenches are designed to be operated in both right or left (clockwise or counterclockwise) directions. Granted, while a beam type wrench can be used in right or left turn operation, the internal design of micrometer ratcheting style torque wrenches may be designed for right-turn only or right/left bidirectional operation. If the wrench is designed for right-turn only operation, applying counterclockwise operation may damage the internals and alter calibration. Torque wrenches that are intended for clockwise use only will likely (and should) feature a warning label indicating this.
If a torque wrench becomes dirty, carefully clean by hand. Never immerse a dial or micrometer torque wrench in solvent. Function and calibration will be affected if the internal lubricants are washed away.
If a high level of torque is required, the operator obviously needs to apply more effort. In order to make the job easier, you may be tempted to add a “cheater” bar to the grip of a torque wrench to gain more leverage. Never do this! This will result in potential tool damage, and will result in inaccurate values. If the required effort to tighten a series of bolts to, say 150 ft-lb is difficult for you, you have two options: visit the gym, strengthen your arms and deal with it, or select a longer torque wrench that is more appropriate for the task at hand.
Always keep the torque wrench 90-degrees to the fastener. Avoid the use of socket universal joints, as this will affect the applied torque value.
Do not attempt to use a torque wrench beyond its established adjustment range. For example, if the tool features a maximum of 100 ft-lb, do not try to “guess” by continuing to tighten to a higher value.
Recalibration
Because a torque wrench is a precision instrument that features wear- and stress-sensitive internal parts (the exception being the beam type), you need to be aware that micrometer- and ratcheting-type torque wrenches should be recalibrated from time to time in order to maintain accuracy.
A general rule of thumb is to have recalibration performed every 5,000 to 10,000 cycles. Depending on use, you may consider having this done at least once per year. Since a shop likely has multiple torque wrenches, consider establishing a rotating schedule to avoid being without a torque wrench at any given point. Recalibration and repair services are available, either from the wrench manufacturer or from independent service locations.
Fastener Elastic Range
Threaded fasteners, especially those responsible for critical applications such as cylinder head, main cap or connecting rod service, slightly stretch when full torque value is applied. This slight stretch allows achieving the required clamping load. Similar in nature to a rubber band, when specified torque is applied, the bolt shank begins to stretch. When the bolt is loosened, the shank returns to its static length. This “elasticity” is critical for the bolt to provide the needed clamping load and to maintain that load. If the bolt is tightened beyond its elastic range, the bolt can enter its yield point and weaken, making it no longer able to provide the necessary load.
By the same token, if the bolt is undertightened, and does not enter its elastic range, it won’t provide enough clamping force.
In reality, about 85% of the torque applied during tightening is used to simply overcome friction — friction at the threads and between the underside of the bolt head (or nut) and the parent material of the object being installed. For this reason, it’s important to follow any instructions that call for a specific thread lubricant (in those cases where a lube is required).
- Both male and female threads must be clean and free of burrs.
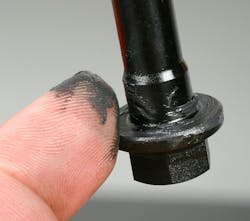
- When specified, apply the required lubricant to the threads before assembly. This may involve engine oil, molybdenum disulphide, an anti-seize compound, or an anaerobic thread locking compound, depending on the situation.
- Whenever tightening a thread fastener, avoid excessive tightening speed. Installing or tightening too quickly tends to generate excess friction, which can affect the final value accuracy.
- Avoid jerky motions when using the torque wrench. Use slow and deliberate motions as you approach the desired value. Tightening too quickly can result in slight overtightening as you continue bolt rotation beyond the “click”or desired torque value. Be sure to distribute the clamping load evenly in the specified tightening sequence, being careful to apply an equal level of load to each fastener. This is especially important for critical engine, transmission, suspension and brake components.
Torque Wrench Selection
One torque wrench does not fit all applications. In addition to having access to torque wrenches that apply to ft-lb and in-lb and metric formats, keep in mind that you should always use a torque wrench that provides applied values in the middle of the wrench’s calibrated range. By that we mean that the torque wrench should never be used only at or near its adjustment range. For instance, if you need to tighten fasteners to 95 ft-lb, the best selection would not be a wrench that features a limit of 100 ft-lb. A better choice would be a wrench that offers a high range of 250 ft-lb. In general terms, a torque wrench will provide greater accuracy when the target value is somewhere in the middle of its range. If you need to apply in-lb values, a torque wrench that reads in in-lb is needed. If you only have access to a ft-lb wrench, you may be tempted to adjust the wrench to suit. For instance, if you need 80 in-lb, you might adjust the ft-lb wrench to 6 or 7 ft-lb, but this will not be accurate.
In many of today’s applications (primarily engine/drivetrain work), you may encounter tightening specifications that call for torque-plus-angle, in which case you need a combination torque wrench that allows you to achieve both specs. These are yet more reasons to maintain a selection of torque wrenches for various ranges of torque values.
Torque Wrench Extension
You may encounter situations where you simply do not have easy access to a bolt head or nut where you cannot attach the torque wrench’s socket wrench. Rather than giving up and employing an open or box wrench and tightening by hand and guessing torque value, you may be able to use a torque wrench extension. As opposed to a straight extension that increases the length from the torque wrench head to the fastener, this type of extension increases the overall length of the torque wrench, providing a box wrench for fastener engagement.
While using a torque wrench extension may provide fastener access, you need to be aware that by altering the overall torque wrench length, you now increase leverage, which affects the applied torque value. If you do not compensate for the extension, you will overtighten the fastener. When you add the extension, you must reduce the torque wrench setting to a slightly lower value. The following is a simple formula to achieve this.
TW = L DIVIDED BY L+E X TE
EXPLANATION OF TERMS
TW= Torque wrench setting
TE = Actual applied torque
L = Length of the torque wrench (center of grip to center of drive head)
E = Length of the wrench extension
EXAMPLE
Let’s say that the torque wrench length (drive head to center of the tool grip) is 18 inches and the extension to be used is 2-inches long (where L=18 and E=2)
We then divide 18 by 20 (in this case 0.9).
Multiply this by our desired torque value, so 0.9 times our desired value of 40, which equals 36.
So in this case, in order to achieve 40 ft-lb, we adjust our torque wrench to 36 ft-lb. This compensates for the increased leverage of the torque wrench with extension.
Caution: When you add a torque wrench extension, you must keep the extension straight and in line with the wrench body. If the extension is cocked at an off-angle, this will result in an inaccurate value.
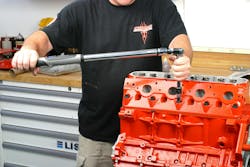
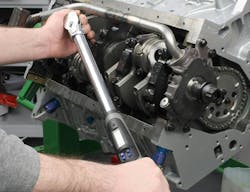
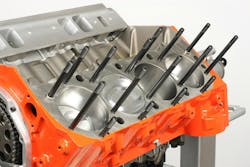
Cylinder Head Tips
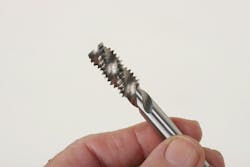
Cylinder head installation on any engine requires attention to detail to avoid comeback issues. Naturally, preparation is critical. Block and head decks must be clean and free of any contaminants. Make sure that all female bolt holes in the block are clean and dry, free of burrs and the threads are in good condition. It’s a good idea to dress female threads to make sure that the threads are acceptable by running a dedicated chaser tap, followed by cleaning. Never use a traditional cutting tap to clean threads, which will remove metal and potentially weaken the threads. A chaser tap is designed to clean and form the threads without removing metal. These taps are available in all common inch and metric sizes.
Check block and head gasket surfaces for flatness with a machinist straightedge and feller gauges. If warpage is evident that is beyond specification, decks must be milled or the block/head may need to be replaced.
With the proper head gasket and head in place, prepare the head bolts as required (using the lubricant specified to threads and bolt head undersides). Tighten head bolts in multiple steps and in the proper sequence, following automaker service manual guidelines. Never fully tighten each bolt in one step. Aluminum heads require hardened washers under the bolt heads to prevent the bolt heads from digging into the aluminum. Be sure to apply the required lube to both sides of the washers.
Generically speaking, cylinder head fasteners will be tightened in a spiral pattern, starting at the center and gradually working outboard. Again, always follow the manufacturer’s tightening sequence, as certain cylinder heads may require a unique sequence.

Torque-to-Yield Head Bolts
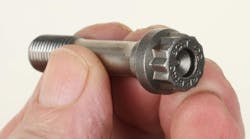
Torque-to-yield (TTY) bolts are intended to obtain the required clamping load on initial tightening, without the need to re-torque. They also address maintaining clamping load on bi-metal engines that feature an iron block and aluminum head, where thermal expansion rates differ. TTY bolt torque values allow tightening to within a fairly narrow stretch value, just short of the bolt’s yield point. These bolts are designed as one-time use bolts and should not be re-used. This is especially true if the bolts have been previously replaced and you are not sure if the previous installer tightened them properly. While some automakers may state that a TTY bolt may be reused, don’t risk it if you are not certain of the bolt’s installation history.
Be aware that many TTY cylinder head bolts may require a torque-plus-angle spec (applying an initial torque value, followed by additional bolt head rotation by a specified number of degrees). Do not assume — always follow the automaker or head gasket maker instructions.
Tightening by Torque-Plus-Angle
A great deal of applied torque is required to simply overcome bolt thread and underhead friction. Depending on how much applied torque is “wasted” due to this frictional factor, the final clamping load may or may not be as desired. In order to obtain more accurate clamping load, the OEMs developed torque-plus-angle tightening. This involves tightening the bolt to a specified initial level of torque application, followed by a critical number of degrees of additional bolt head rotation. As a result of design engineering, the automaker determined that a more accurate clamping load can be achieved by this multi-step process instead of relying on applied torque alone, ignoring the issue of frictional losses.
For example, the bolt tightening spec may dictate that the bolt is to be initially torqued to 35 ft-lbs., then tightened further by an additional bolt head rotation of 65 degrees. Some applications may call for an initial torque followed by several additional rotations (for example, 60 degrees followed by 80 degrees, etc.).
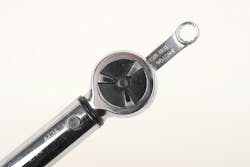
Once a torque wrench has been used to obtain initial torque value, there are several methods that can be used to achieve the required additional bolt head rotation.
You can apply a paint dot on the bolt head and a matching mark adjacent to the head. As you continue to tighten, you can monitor the degree of movement by observing the relationship of the dots. However, this is not an accurate approach. Another option is to use a separate angle gauge. The gauge is connected to a wrench. The gauge is secured to the bolt head and the meter’s needle is zeroed. Continue to tighten, observing the movement of the indicator needle on the incremented gauge face.
Thanks to innovations in today’s digital torque wrench market, sophisticated digital torque wrenches are available that allow both torque and angle tightening with the same tool. This eliminates the need to keep swapping tools, and provides a greater degree of accuracy in achieving the final results.
Using an electronic digital torque/angle wrench is very simple and straightforward. Set the initial torque value and tighten the bolt to that value. Then press a button and switch to the angle mode. Continue to tighten until the desired angle is displayed on the viewing screen. (The tool will provide an audible/tactile alert.) This allows finishing the job with only one tool, with no need to disengage the wrench from the bolt.
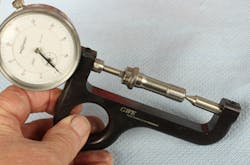
Measuring Rod Bolt Stretch
If you are dealing with aftermarket connecting rods, these will feature aftermarket performance rod bolts. While OEM rod bolts may call for a torque or torque/angle approach, performance aftermarket bolts will specify a torque value alone (no angle). However, in addition, the rod and/or bolt maker will provide bolt stretch information that indicates a maximum stretch value. Instead of relying on a torque value alone, this allows the installer to monitor and verify how much the bolt is being stretched within its elastic range.
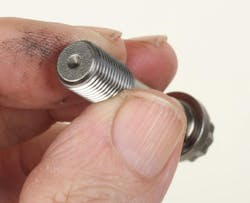
As an example, a specific rod bolt for a given application may call for a torque value of 70 ft-lb. The maximum allowable stretch for that bolt may be 0.005-inch. After applying the specified torque, the installer can use a bolt stretch gauge to check bolt length to make sure that the bolt has not been stretched beyond its elastic point.
Using a bolt stretch gauge is rather simple but does require additional labor time. The bolt is first set up on the gauge and the gauge dial indicator is then set at zero. This provides a reference of the relaxed static bolt length. The bolt will typically feature a female dimple at each end that engages onto the anvils of the gauge. The bolt is then removed from the gauge, without disturbing the zero set. The bolt is then lubed and installed to the rod and torqued to recommended value. Next, the gauge is attached to the bolt again. The indicator needle will show how much the bolt has stretched. If not stretched, additional torque will be needed. If the stretch did not exceed maximum, that rod bolt installation is done. This procedure must be repeated with each individual bolt, starting with adjusting the stretch gauge indicator to zero with the bolt relaxed. Do not assume that all bolts, even though new, are exactly the same free length. Due to manufacturing tolerances, each bolt may deviate a few thousandths of an inch.
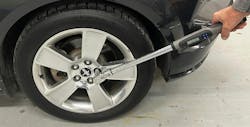
Wheel Fastener Torque
While the use of pneumatic or cordless impact wrenches is common practice for wheel service, the proper approach is to use a torque wrench. Yes, this takes more time, and many shops are unwilling to follow this recommendation, but using a torque wrench is the only way to properly install wheels to avoid potential under- or over-tightening. Especially when dealing with alloy wheels, achieving the specified wheel fastener clamping load is even more important. In addition to the clamping force concern, it is imperative that all fasteners are tightened evenly — that is, to the same value. Uneven tightening can easily result in brake rotor distortion.
While the use of an impact wrench may be suitable for wheel fastener removal, care must be taken when dealing with alloy wheels. Make sure that the socket wrench properly fits and does not contact wheel fastener well/recess to avoid scuffing or galling the alloy material. Also, make sure to use the proper style of socket wrench. (Don’t use a 12-point socket for a 6-point nut to avoid marring and burring the fastener hex).
At the very least, if you insist on using an impact wrench to tighten, use a torque stick. These are available in all common hex sizes and are stamped and color-coded for torque value. When the designed torque is achieved, the torque stick beam will twist slightly (much like a torsion bar), to prevent over-tightening. This is not as accurate as a torque wrench, but the results will usually be close enough to be acceptable.
When installing wheels, whether steel or alloy, always employ a torque wrench to properly achieve the recommended torque value. Over-tightening and/or uneven tightening can potentially compress the wheel fastener well/pocket. Over-tightening and/or uneven tightening can easily result in brake rotor distortion, which in turn can lead to brake pedal bounce and pulsation.
Before wheel installation, verify that both male and female threads are clean and in good condition. Don’t assume that all threads are viable. If in doubt, replace them. Bear in mind that most wheel fastener torque values are based on the use of dry threads. However, assumptions can lead to problems. If in doubt check the service manual. Also be aware that some “exotic” performance vehicles may feature alloy wheel nuts, which may require lubrication to prevent thread galling. Again, if in doubt, check the service manual.
In order to tighten the fasteners to full torque value, either have a helper hold the brakes while you tighten, or initially snug the fasteners to fully mate the wheel to the hub, then lower the vehicle until the tires just kiss the floor — to prevent the wheels from turning while you tighten — and apply full torque.
Always tighten the fasteners in a criss-cross pattern in order to evenly distribute the clamping load. This reduces the chance of distorting the brake rotors.
About the Author

Mike Mavrigian
Motor Age Editor
Mike Mavrigian has written thousands of automotive technical magazine articles involving a variety of specialties, from engine building to wheel alignment, and has authored more than a dozen books that crisscross the automotive spectrum. Mike operates Birchwood Automotive, an Ohio shop that builds custom engines and performs vintage vehicle restorations. The shop also features a professional photo studio to document projects and to create images for articles and books.