Performing diagnostics is something many of us do each day, without much thought, but most seasoned technicians have a detailed diagnostic approach that they employ. They have an action plan — a diagnostic checklist — that they follow from start to finish with remarkable success. Without an action plan the diagnostics of any vehicle system can be a challenge, often leading to misdiagnoses, dead ends and frustration.
The manufacturers want their technicians to do this, and they have spent a lot of time developing diagnostic strategies, learning courses, classes and checklists for their technicians to follow. They want technicians to be efficient and effective when diagnosing. Most of the factory-supplied diagnostic strategies are detail oriented, step-by-step, and tailored to the manufacturer’s needs. But there is one common aspect across almost all the manufacturer-developed diagnostic strategies — the scan tool isn’t involved until a few steps into the diagnostic.
Why is this? Because manufacturers want the technician to verify the customer’s concern first. If the problem can’t be verified or confirmed, it can’t be fixed. Sure, a scanner is likely going to be needed and used, but not at the outset of the diagnostic.
Before we dig into the checklist, I want to share a quality that I find common among the best automotive diagnostic technicians: they rarely get stuck in a pre-diagnostic train of thought. They will attack each diagnosis with a completely clean slate.
What is pre-diagnosis? It’s the process of guessing what the issue is, or what the fix is going to be, before even looking at the vehicle. Technicians can often be heard saying to one another, “It sounds like a bad injector. I just had one last week.” Or, “It’s a bad PCM” because it has no trouble codes. The skilled diagnostic technician will go into each repair open minded, thinking about how the system works and how best to duplicate the customer’s concern, not guessing what parts need to be replaced.
So what is the best methodical diagnostic strategy to follow?
There is no one fixed approach that will lead to a miraculous fast repair every time, but there is a common list of steps and details that make up an effective diagnostic strategy that we can adapt and use in our shops.
We will all have our differences and ideas on how we approach a diagnostic, but these are the most common diagnostic steps I have found that work the best.
1. Interview the customer — Ask lots of questions
2. Verify the concern — Road test
3. Inspect the system
a. Basics and visual inspection first
b. Check customer history, earlier repairs
c. Understand how the system is to properly function
4. Begin the diagnostics and system analysis
a. Symptoms, full system scans for DTCs
b. Follow the manufacturer’s system verification or self-tests
c. Check for bulletins, recalls
5. Follow the DTC or symptom diagnostics charts
6. Find the issue or cause of the concern and repair it
7. Validate that the repair is complete and successful
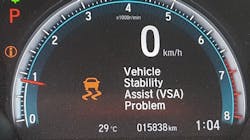
Using the scanner and checking for codes should be done, but it shouldn’t always be the first thing that is done during a diagnostic. This shows the scanner results of a Nissan with issues. Always perform a full module scan and record all the codes.
We need to start off by gathering as much information as possible. And that gathering of information will start with the customer interview. This is not often an easy thing to do, especially when a vehicle is left at the shop overnight with a small note about the issue.
Questions should be asked about when the issue happens, how often it happens, and what the driver was doing when it happened. For example, are they passing? Accelerating from a stop? The questions can be many, but the answers may point in a specific direction that could be a clue. Was the service engine soon (SES) light flashing? These all can be clues to an issue.
The second step in a diagnostic is to verify and understand the customer’s concern. This is a fundamental step, but it is important and can’t be neglected. We need to remember that if we cannot verify or duplicate the concern, we cannot possibly evaluate, repair or diagnose what’s wrong.
Drivability problems should involve a road test, even if it is brief, to verify the issue the customer is experiencing. When performing that road test you need to ensure that you are driving the vehicle the same way that the customer does, and this is an important, often overlooked step.
A good visual inspection can often reveal the issue, just by opening the hood and looking. This Ford Mustang no-start was customer induced. Checking the basics found the issue.
I once took a young technician for a road test after he was unable to duplicate a hesitation in a car. He had driven the car and the issue wasn’t obvious, but the car had returned for the complaint once already. He wanted help, so I agreed and when I drove the car, like the grandmother that owned it did, the issue was real, and the car hesitated badly. Duplicating the customer’s driving conditions is often a key to a good drivability technician and their diagnostic strategy.
Basics must be checked. This cannot be stressed enough when it comes to following the diagnostic checklist. There are so many simple things that can cause an issue and they are often overlooked right at the start of a diagnostic. Not checking the basics can often lead to false or inaccurate diagnostics, conceal the actual issue, or make the diagnostic harder than it needs to be. The battery voltage and the charging system function are critical. Low or poor battery voltage can affect so many things, especially on today’s heavily networked and electrically loaded vehicles. Other basics often overlooked are the type and amount of engine oil and low cooling systems. Low or improper engine oil can easily translate into variable valve timing issues, DTCs and drivability concerns. Low coolant levels can cause indicator lights on the dash, air conditioning issues, overheating and DTC issues, even though the expansion tank is full.
Another area that we need to pay particular attention to at the start of a diagnostic is the inspection for aftermarket components and earlier repairs. Aftermarket components and systems can cause issues, from no-starts, battery draws and drivability problems to systems that won’t communicate. Checking the basics at the start of the diagnostic can save a lot of time and frustration and often expose the cause of many concerns.
Getting all the information from the customer the first time is imperative. Here is an example. The customer’s concern on their 2016 Ford F-150 pickup is that the air conditioning stops blowing cold at times. The technician is following their diagnostic checklist and trying to verify the concern. The technician performs the visual and basic inspection, with no issues found. The air conditioning works fine on startup, and it continues to function properly on the road test. Returning to the shop, the scanner is installed and shows no related codes. The air conditioning gauge set is installed, and the pressures and functionality are confirmed and ok.
The issue can’t be duplicated, so the technician heads to the office to discuss the findings: the system is working properly.
The customer is contacted, and more information is gathered about the issue. The customer explains that the issue only happens when towing a large travel trailer up a steep grade.
This information would have been far more useful at the beginning because what the customer is experiencing is normal. The truck’s engine management will shut off the air conditioning compressor to supply more power to climb the grade. A better customer interview would have saved the technician a lot of time looking at something that is fully functional
The issue is verified, but there are no trouble codes. A 2019 GMC Sierra pickup is dropped off, this time with a detailed note indicating the climate control display in the vehicle will show the message “Climate Off,” but the climate control system in the truck still is fully functional. The message will go away if they change a climate setting.
The customer even included a photo from their phone that shows this error message. The technician assigned to the truck sees the message displayed on the center stack during a road test, and it goes away when the fan speed is changed; the issue has been verified.
Returning to the shop, a scanner is installed, but there are no codes displayed as current or history in any modules that pertain to the condition that will aid in the diagnostic of this climate control issue.
But the technician has confirmed the issue does exist, since the error message was displayed. So the technician moves along in the diagnostic strategy and investigates if there are any technical service bulletins (TSBs), manufacturer bulletins, or recalls that could cause or relate to the issue.
Logging into the shop’s information system, the technician discovers the TSB No. 19-NA-189, which says the following: “Radio displays CLIMATE OFF message or HVAC popup displays different settings.” Reading the TSB, the information says that the customer complaint may be that the center stack will display the message “Climate Off,” but still be functional and that message will disappear when a climate setting is changed. The noted repair procedure is to reprogram the radio module (A11) and the serial data gateway module (K56) to fix a software anomaly.
This TSB is addressing the situation that this truck is experiencing. The customer was advised that a module reprogramming update would be needed to repair the issue. The customer agreed to the update, the procedure was performed, and the concern was no longer present. The diagnostic was successful, and the vehicle was repaired.
The goal of any successful diagnostic procedure or checklist is to use an established plan of attack, which will guide us through each phase of the diagnostic situation, from verification to repair.
Yes, there will be different diagnostic patterns that we will follow for different situations. Diagnosing a grinding transfer case will have different steps from diagnosing a coolant leak or a flashing check engine light. But the steps will be similar in each case. The first step in all diagnostics is verifying the concern. And the last step should always be to verify that the repair has fixed the issue. How we get from verifying to repairing will be different, but the use of a methodical step-by-step approach, while paying particular attention to basics and not pre-diagnosing, is the best method.
About the Author

Jeff Taylor
Jeff Taylor is a seasoned professional at CARS Inc. in Oshawa with 40 years in the automotive industry. As a skilled technical writer and training developer, he holds licenses in both automotive and heavy-duty vehicle repair. Jeff excels in TAC support, technical training, troubleshooting, and shaping the future of automotive expertise.