Moving from R-134a to R-1234yf
Content brought to you by PTEN. To subscribe, click here.
Warmer months are fast approaching, bringing with them a myriad of air conditioning services and repair opportunities. Early usage of R-134a began in 1992, with full-scale adoption by the 1995 model year. Shops, technicians, and customers have had over 25 years of experience with this refrigerant. As with all things, though, changes come, and the industry has been transitioning over to R-1234yf. More shops are beginning to see these new refrigerant systems coming through their bays and realizing that they may not be adequately trained or equipped to evaluate and service them properly. Let’s start with a quick primer on the main differences and then delve into equipment selection and an examination of best practices to ensure you can provide the best service to your customers.
R-1234yf and R-134a systems are very similar, though one needs to consider slight design differences when servicing, diagnosing, and repairing systems. R-1234yf has a reduced cooling capacity compared to R-134a systems, generally between five percent to 25 percent lower. Combining this reduced cooling ability with more minor charges in a system means less leeway when it comes to system health. Small leaks, dirty condensers, or evaporators will reduce cooling and lead to customer complaints much sooner than a conventional R-134a system. This leads to more service opportunities and dictates a new level of system analysis to ensure a proper first-time repair.
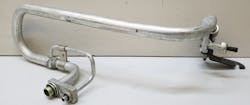
The significant difference in an R-1234yf system is the addition of a component known as an inline heat exchanger (IHX). The heat exchanger is located within the accumulator within most orifice tube systems. Expansion valve systems generally bundle the IHX into a separate part which is easily identifiable due to the dual inlet and outlet fittings on each end. The heat exchanger is simply two tubes, so replacement is not needed during regular service or repair unless there has been some damage.
The IHX operates under the same principles as any other heat exchanger, such as a radiator or intercooler. Liquid refrigerant leaves the condenser; it passes through the inside chamber of this exchanger, while the cooler refrigerant gas flows out of the evaporator and through the outer chamber of the IHX on its way to the compressor. This creates a sub-cooling effect and helps counteract the reduced cooling capacity of R-1234yf.
Choosing a recovery/recycling/recharging system
Now that we have a solid knowledge base to work from let’s start with the machine. There are a few options for machines beginning with the overall unit design. There are both single units and combination units. Single units are generally available at a lower price point and have a smaller footprint, ideal for shops where storage and working space are at a premium. The combination units are essentially two machines in one, allowing for the service of R-134a or R-1234yf on a single platform at a substantially higher price. The downside to utilizing a combination machine is the length of time to switch from one refrigerant to another, the process usually taking between 10-15 minutes depending on the machine purchased.
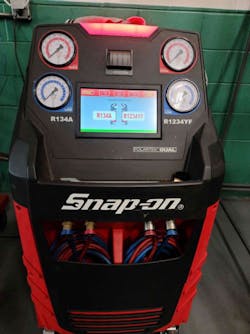
The newest machines, at least those that are SAE J2843 compliant, operate a bit differently than the standard R-134a machines of the past and require more time and patience when performing a service. The significant points are:
- Specialized couplers and fittings for R-1234yf.
- The internal filter drier will need to be replaced after recovering 150 lbs of refrigerant; otherwise, the machine will prevent further operation until filter replacement.
- The unit must have an internal refrigerant identifier or a USB port to connect a separate unit.
- It will not allow recovery of contaminated refrigerant.
- It will not recharge the system if it detects a leak.
The machines are essentially fully automatic, with a few caveats referenced above. The first is contaminated refrigerant. The machine begins recovery by performing a refrigerant identification. Suppose the contents of the system are less than 98 percent pure R-1234yf. In that case, a separate recovery tank/machine will need to be connected to the designated service port on your machine to continue the evacuation of the system. This is an essential requirement to consider when purchasing a machine, as there will be additional costs.
The second significant difference is that the machines will not charge a system if it fails a vacuum decay leak test. When preparing to charge the system, the machine pulls a vacuum and monitors vacuum decay, the presence of which indicates a leak. If no leak is detected, the machine performs a partial system charge. A series of prompts then guide the tech through an evaporator leak test. The test begins by turning the blower on low with only the floor vents selected. The leak detector probe is then inserted into the center floor duct as far as possible. If no leak is found, the tech hits the appropriate button and will be asked if an auxiliary evaporator is present; if so, an additional leak test is performed. Once all leak tests are passed, the machine performs a full system charge and prints a slip indicating the amount of refrigerant recovered and charged.
Case Study: Gradual loss of A/C
Each shop will experience different types of A/C complaints and failures depending on their customer demographic and geographic location. Shops located in hot climates will be performing service year-round and likely see higher failure rates of specific components or systems due to the high-stress environment they operate in, while more northern shops may experience service of systems that are ignored for all but the hottest few months of the year. I would categorize system leaks as the primary repair, followed by compressor failures in my corner of the country.
This Silverado came in after frustration at needing refrigerant recharges yearly, sometimes more often. Based on the complaint and the previous work described by the customer, it was clear that we were likely looking for a leak. A complete system scan was performed using a Snap-on Versus Edge while monitoring vent temperatures in park with the Power Probe Dual Zone Digital Wireless Thermometer. This gives the tech a chance to feel the system’s cooling capabilities in a relatively static environment, which can then be compared to operation on the road. No DTCs were found, and temperature sensor readings corresponded with a lack of cooling ability.
A glance at the data PID for the pressure sensor on the high side hose indicated a pressure of 150 psi, about 100 psi lower than expected at a 90 degrees F ambient temperature. This further confirmed an undercharged system. Now that I had enough data, our Snap-on EEAC334B recovery/recycle machine was hooked up, and recovery began. The system was found to be approximately 0.60 lbs undercharged. Before recharging, a vacuum test was performed and passed. The system was recharged with R-134a containing UV dye. The Actron 900 refrigerant sniffer was used to attempt to pinpoint a leak location quickly, but no precise results were achieved.

After approximately an hour of running, the system was checked thoroughly with a Mastercool UV light, and the leak was located in the condenser. The sniffer was then placed in the location but showed no signs of leakage. This truck was a perfect example of a leak small enough to be hard to detect but large enough to cause a severe drop in A/C performance. It was a quick and straightforward diagnosis that proves no one test fits all when it comes to leaks, and as such, a passed vacuum test or sniffer failing to pick up a leak doesn’t guarantee that a leak isn’t present.
Scroll compressor
One of my favorite things to do when teaching is to use examples of how a solid understanding of the basics empowers a technician to handle almost any job that comes their way. This short case study focuses on our shop’s scroll compressor, which was too hot to continue working. This wouldn’t be unusual as it is located in a sea box behind the shop, but I installed a box fan to remedy that particular situation. It was remarkable to shut down on high head pressure on a 14 degrees F day. Not one who especially enjoys cold weather and having a shop full of techs waiting on air pressure to continue working, a quick diagnosis needed to be reached.

A quick examination of the compressor and some rudimentary temperature checks using my hand to determine “hot” or “not” showed that my discharge line was quite hot, and the outlet of the intercooler was excessively hot as well. I grabbed my Milwaukee thermal imager to verify my quick test as well as to prove that there was less than 10 degrees F of temperature differential across the exchanger. This pointed to a lack of cooling through the heat exchanger. I grabbed a can of EVAP Foam evaporator core cleaner (one of the tricks I picked up during my short time in commercial HVAC repair), immediately dropped the discharge temperature to an acceptable level, and all was right with the world as the shop continued with its work. What does this have to do with automotive A/C systems? Well, a heat exchanger is a heat exchanger, be it an evaporator, condenser, IHX, or air-to-air cooler. By understanding base principles, we can pinpoint the effects of a clogged exchanger in a car, truck, dozer, or air compressor.
Automotive technology and systems are constantly changing, and we need to learn and adapt to stay at the top of our game. This entails investment in proper tooling and education. Once we make those investments, we can consistently perform at a high level. This leads to improved mastery of our trade and satisfied customers. That seems like a pretty good motivation to continue investing in ourselves as technological and system advancements require knowledgeable and dedicated technicians to keep them in peak operating condition.
Tools Used:
Snap-on VERUS Edge
Snap-on Polartek Dual Machine, No. EEAC334B
Power Probe Dual Zone Digital Wireless Thermometer, No. TEMPKIT
Snap-on Refrigerant Leak Detector, No. ACT900
Mastercool 50W/12V UV Light, No. 53312
Milwaukee Tool M12 Thermal Imager, No. 2260-21
Nu-Calgon Evap Foam No Rinse Cleaner, No. 4171-75
About the Author

Christopher Groff
Chris Groff is a technician with Lykon Automotive in Pennsylvania and runs the Science of Diagnostics channel on YouTube. Groff began in the industry 15 years ago with an independent repair shop before attending the Pennsylvania College of Technology for Caterpillar diesel. After working with heavy duty trucks and John Deere equipment, he was drawn back to the automotive repair segment by ADAS and the continued advancement of technology.