Wheel fasteners: Understanding the nuts and bolts of wheel clamping
The threaded fasteners that secure the wheels to the chassis are perhaps the most critical components on any vehicle, yet they’re often the most overlooked and under-appreciated. Improperly sized threads or seat styles or improperly installed wheel fasteners can result in loss of a wheel and tire package (wheel separation from the vehicle) during vehicle operation. With that in mind, we need to pay more attention to these vital fasteners.
While it may initially seem simplistic to devote an entire article to this subject, its importance and the need to educate beginning or apprentice technicians cannot be overemphasized.
Here, we’ll provide a basic overview of the often overlooked threaded wheel fastener — how to identify it and how to handle it. This includes information dealing with fastener thread size, seat styles and torque values.
Our goal is to provide clear and accurate explanations of various wheel fastening systems that will help to train new technicians (as well as imparting this knowledge to your customers).
NOTE: The common method of attaching a wheel to a hub involves a group of individual threaded wheel fasteners (wheel nuts or wheel bolts), involving a pattern of four, five, six or eight fasteners per wheel. Another type of wheel clamping system involves attaching the wheel to the hub with a single spindle nut. This is most commonly referred to as a knock-off or pin-drive system. Since it’s rare that your shop will encounter a pin-drive system, we’ll focus on multiple threaded fastener designs.
Clarifying misunderstandings
While it’s difficult to break with the use of traditional terms (i.e. “lug nuts”), the term “wheel fasteners” is more appropriate.
Remember that not all automotive wheels are secured with studs and nuts. For example, many German vehicles use wheel bolts instead, which engage into threaded holes in the hub face. So, constantly calling all wheel fasteners “lug nuts” simply isn’t accurate.
The basic factors to consider when selecting wheel fasteners includes:
• Thread diameter
• Thread pitch
• Thread length/thread engagement
• Fastener seat style
• Installed torque (clamping load)
[PAGEBREAK]
Thread size (diameter and pitch)
Thread sizing is not difficult to understand. The problem is that most people won’t take the time to learn this very basic theory. Whether the format involves fractional inch or metric, we need to know the diameter, the thread pitch and the thread length.
For example, when dealing in an inch format, a nut identified as a 1/2 x 20 x 1 indicates that the thread diameter (the diameter of the stud it will accept) is 1/2-inch. The number “20” indicates thread pitch. In the inch format, pitch refers to the number of threads that exist per inch of length. In this case, the thread count, or “pitch” is 20 threads-per-inch. The final number refers to the length of the thread engagement. The number “1” means that the nut features 1 inch of internal thread engagement length.
If the fastener is metric, diameter is represented in millimeters. Metric pitch represents the distance from one thread to the next thread, and thread or shank length is represented in millimeters. For example, a 14 x 1.5 x 70 wheel bolt would indicate a 14 mm diameter, a 1.5 thread pitch and a thread or shank length of 70 mm.
In terms of thread pitch, it’s really very simple: with inch-format, the larger the number, the “finer” the threads (20 threads per inch would mean more threads within a given area than, say, 16 threads per inch). If the format is metric, the larger the number, the more “coarse” the threads would be (a distance of 1 mm between threads would result in a greater number of threads in the same area as, say a distance of 1.75 mm between threads). So, in inch format, smaller pitch numbers indicate “coarse” threads, while larger numbers indicate “finer” threads. In metric format, small numbers indicate finer threads, while larger numbers indicate a more “coarse” thread. Many people tend to make this issue more confusing than it really is. Simply think about what the number means (number of threads per inch if the fastener is inch-type; or distance between threads, if the fastener is metric type).
If we were referring to a bolt, both diameter and pitch are determined the same way. Length would then refer to the shank length (the length of the bolt under the head, or in the case of wheel bolts, the length of the bolt from the bottom of the seat to the tip of the threaded end.
Depending on specific models, the bolt’s overall length may be required as well. Overall length would, as the term implies, represent the distance from the top of the head to the tip of the threaded end.
In order to accurately identify the thread diameter, pitch and length of any wheel fastener, you can handle this by obtaining a total of three readily available tools: a combination bolt/nut sizing card (these are hard plastic and are available to cover both inch and metric sizes) and two thread pitch gauges (one inch and one metric). That’s all you need to quickly and accurately read any wheel bolt or nut without any guesswork.
[PAGEBREAK]
Thread length/engagement
Aside from selecting the proper seat style for the wheels at hand, another consideration is thread engagement. In other words, how far the nut travels over the stud, or how far the wheel bolt travels inside the hub’s threaded hole.
The rule of thumb whenever discussing threaded fastener engagement is to achieve a minimum engagement length that is equal to the diameter of the fastener’s threads. For instance, if the stud or bolt shank is 1/2 inch in diameter, the nut (or bolt) must engage its threads by at least 1/2 inch. This provides the minimal theoretical engagement for proper clamping load. However, the industry usually takes advantage of greater thread engagement depth, for added safety (the deeper the threads engage, the longer it takes to actually lose the fastener; and in some cases, longer studs are used simply to aid in wheel installation onto the hub).
All wheel nut and wheel bolt styles are available in a wide variety of lengths, in terms of drive area or thread engagement area. Drive area height may be dictated by the thickness of the wheel’s center hub, or by the design of the wheel (maybe the nut or bolt head needs to project out further for easier wrench access).
The necessary thread engagement area will affect length as well, involving either inboard thread reach or outboard projection based on stud length. Often with lugcentric wheels, a tapered (conical) seat style nut may be used that also features a short straight shank.
The shank may both increase thread engagement length as well as aid wheel centering on the hub.
Seat styles
The “seat” refers to the contact area between the base of the fastener head and the wheel’s fastener pocket. Although variations exist, three basic seat styles are in common use today. These are conical, radius and flat-seat types.
Conical wheel nuts (or wheel bolts) feature a straight taper at the seat area. Conical fasteners are also called “tapered” or “cone” types.
All three names refer to the same style. As viewed from the side, you can see that the seat is “chamfered” on each side of the view.
This type of taper is created most commonly in a 60-degree angle, although some light truck applications use a 90-degree angle. The angle indicates the degree of separation between the two walls, not the true vertical of the fastener.
Radius seats are also called “ball” or “rounded” seats. As the name implies, the seat features a radiused “ball” shape that nestles into a ball-shaped pocket in the wheel. Many European vehicles such as Porsche and Mercedes-Benz use radius seat styles, in either nut or bolt applications.
The flat seat style is most often called a “mag” style (the term “mag” doesn’t imply anything in terms of geometric shape; it’s simply a slang carryover from the early days of the American performance scene when race wheels were cast magnesium, and commonly used a flat seat because it was easier and cheaper to produce a round hole in a flat hub center area.
[PAGEBREAK]
As we all know, the unfortunate misnomer “mag” has stuck with us as a catch-all to denote any custom wheel, whether it’s made of magnesium, aluminum or other alloys. Mag style (flat seat) nuts generally feature a smooth shank extension under the head, used to center the wheel and to provide needed thread engagement depth.
The term “acorn” nut is a classic example of a term that’s widely misused and misleading.
If we refer to a wheel fastener’s seat style, the term “acorn” would translate into a reference of a ball-type or radius-type seat.
After all, take a look at an acorn. When viewed from the side, the belly of the acorn is somewhat radiused, which makes the term sensible when referring to a ball-type or radiused seat style. However, some folks use the term “acorn” to refer to the head portion of a nut that features a ball-type rounded dome-head design. Yet others use the term to refer to a short-bodied nut that features a conical (straight taper) seat.
So, when you hear the word “acorn” in reference to wheels, don’t assume anything. In order to make sure that both you and the salesclerk are on the same page, clarify the term by pointing to a photo, diagram or better yet, showing him/her an actual sample to make sure that you’re both talking about the same item.
The only proper use of the term “acorn” is when referring to a nut with a rounded top dome. Just remember that the dome shape has nothing to do with the seat style.
The golden rule, when discussing seat styles, is extremely simple: Never mix them! If a wheel is designed for conical 60-degree seats, the only fastener seat style that can be used is a 60-degree conical type. The same rule applies for radius and flat seat styles.
Only use the correct seat style of fastener for the seat style of the given wheel. Using the incorrect seat style can, and likely will, result in fastener loosening, wheel damage and potential tragedy due to loss of vehicle control when the wheel wobbles or separates from the vehicle. It’s simply impossible to overemphasize this point. The wheel fasteners are the only connection between the vehicle and the wheels. Without proper fastening, you’re flirting with disaster.
Wheel fastener tightening
Never use an impact gun to remove or install threaded fasteners when dealing with custom alloy wheels. The reason to avoid using an impact gun during removal is simply to avoid scratching the fastener pockets of the wheel.
If you insist on removal with a gun, use only a clean thinwall socket and run the gun at a slower speed. It’s easy to scratch the pockets with the socket or the exiting nut or bolt, even while trying to maintain control of the gun.
The reason to avoid using an impact gun to install the fasteners is even more simple: It is just plain wrong.
Whether we’re dealing with a bargain-basement, impurity-riddled aluminum casting or the finest and strongest billet, forged or investment-cast alloy wheel, proper clamping force is critical for both wheel care and performance. For one thing, over-tightening can gall or deform the wheel’s fastener pocket seats.
Over-tightening, in its extreme, can create a fracture in the alloy, which can lead to an eventual wheel failure. Excessive over- or unequal tightening can distort both the wheel center section and the hub. Considering the lightweight rotor hats featured on many of today’s vehicles, that’s an open invitation to disc brake warping and brake pedal bounce.
If the fasteners are under-tightened, they can loosen during operation. If over-tightened, the fasteners can become fatigued and can deform the material in the wheel’s female seat pocket, which can result in fastener loosening. The shape of a radiused seat reduces the effect of over-tightening since contact pressure is more evenly distributed than with a taper seat style.
[PAGEBREAK]
Over-tightening a flat-seat nut can deform the wheel, causing the aluminum under the washer to extrude, which displaces the aluminum, causing the nut to loosen.
Over-tightening can also stretch the wheel studs or wheel bolt shanks beyond their elastic range. All bolts or studs are designed to stretch a miniscule amount when optimal clamping load is achieved. This elasticity of the stud or bolt is what helps to secure the wheel on the hub. When torqued to specification, this is referred to as achieving the proper “clamping load.” If the stud or bolt is excessively over-tightened, it’s possible that it will stretch beyond its yield point, losing its “rubber band” effect.
If stretched beyond the yield point, the stud or bolt becomes so weak that it cannot provide the clamping load needed. The result: The fastener loosens or the stud or bolt shank breaks.
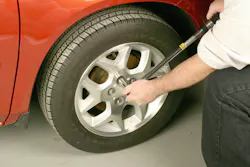
Always follow the torque specifications listed by either the vehicle manufacturer or by the wheel maker.
Don’t guess. Actually take the time to pick up a calibrated torque wrench and tighten all of the wheel’s fasteners, in the proper sequence, in several steps to achieve final (and equal) torque values.
As far as thread preparation is concerned, make sure the threads are clean and free of dirt, grease, grit, etc. As far as wheel fastening is concerned, specifications are generally listed based on dry (no lubricant) threads.
Applying oil, grease or moly to the threads will result in inaccurate torque values (you’ll end up over-tightening). Simply make sure the threads are clean and dry. Aluminum wheel nuts (found on some higher-priced imports) are typically made from a very dense, strong 7075 alloy, and will function properly if handled correctly.
And especially when dealing with alloy wheels, it’s important to re-check and re-torque all fasteners after about the first 50 to 100 miles of operation. Due to metal compression/elongation and thermal stresses, the clamping loads may change during initial use.
[PAGEBREAK]
Head/drive styles
The “head” of a wheel bolt or nut features a specific drive design and appearance approach.
The most conventional drive style involves a hex (six sided) that requires the use of a six-point wrench. However, other styles do exist, although not as commonly encountered. These include female hex drive “tuner” nuts which feature a relatively small and smooth outer body diameter (to fit into small-diameter fastener holes in some wheels). Instead of an external (male) hex head, a female hex drive hole is featured instead.
Yet another drive style is the splined head which features a symmetric pattern of straight-cut external splines instead of hex walls. Naturally, the tuner hex drive nuts require the use of a hex bit as a driver; and the splined fasteners require a dedicated female spline socket.
In terms of appearance, nuts may be either open (the threaded hole runs all the way through the nut) or closed (threads terminate inside the nut). Closed-head styles are varied, and include flush tops, raised conical domes, raised flat-top domes, extended hex walls (for easier reach and handling and greater wrench contact area), radiused domes (these look like acorn bellies, featuring a nicely rounded, ball-type dome.
Hubcentric vs. lugcentric
These two terms are common and proper labels that indicate how the wheel centers onto the hub. The wheel must be centered to the axle hub as precisely as possible to avoid runout.
If the wheel centers onto the hub via the fastener locations only, we refer to this as a “lugcentric” method. This means that the location of the wheel studs (or the hub’s bolt holes) must be accurately placed on the hub as well as on the wheel during manufacturing.
If the wheel is centered by means of its center opening fit to the hub’s raised center flange, this is a “hubcentric” design. This means that the centering approach relies on the center hole of the wheel to the center locating dowel flange of the hub.
The “bolt circle” refers to the spacing of the wheel’s fastener holes, using a diameter, or circle, as the measurement. If we draw a circular line that runs through the center of all of the bolt holes, this circular diameter measurement indicates the bolt circle. For instance, if a 4.5-inch circle can be positioned at the center of the bolt hole group, this is a “4.5-inch bolt circle.” If the circle measures 100 mm, it’s a 100 mm bolt circle, etc.
The bolt pattern refers to both the number of fastener locations and the diameter of the hole pattern.
A 5 x 100 bolt pattern refers to a wheel that features five fastener holes, laid out in a 100 mm diameter path. A 5 x 4.75 pattern designation refers to a pattern with five holes running along a 4.75-inch diameter. In the “old” days, we could generically refer to a 5 x 4.5-inch pattern as a “Ford” or “Mopar” pattern; or a 5 x 4.75-inch as a “Chevy” pattern. Aside from dealing with vintage domestics, those days are gone.
In order to measure a bolt circle using a ruler, remember that we’re simply trying to find the diameter of an imaginary circle that runs through the center of each fastener hole.
If the wheel or hub features directly-opposing holes (as found on a four-bolt, six-bolt or eight-bolt wheel or hub), simply measure from the center of one hole to the center of the hole directly across the pattern (or from the outside of one hole to the inside of the opposite hole).
If the wheel or hub features a five-bolt pattern, measure from the center of one hole to the outside edge of the hole furthest away.
If you don’t wish to be bothered by measuring with a ruler, tape measure or dial caliper, you can cheat by using a specialty measuring device. Round plastic bolt circle template discs are available that feature multiple hole patterns (with each hole identified for bolt circle).
Simply place the disc against a wheel hub face or onto the vehicle hub until all holes align. The holes that align to your wheel or hub indicate the bolt circle (again, the holes are labeled). ●
About the Author

Mike Mavrigian
Motor Age Editor
Mike Mavrigian has written thousands of automotive technical magazine articles involving a variety of specialties, from engine building to wheel alignment, and has authored more than a dozen books that crisscross the automotive spectrum. Mike operates Birchwood Automotive, an Ohio shop that builds custom engines and performs vintage vehicle restorations. The shop also features a professional photo studio to document projects and to create images for articles and books.