Photos by Mike Mavrigian
Weber, president of Virginia-based Write Stuff Communications Inc., is an award-winning freelance automotive and technical writer with over three decades of journalism experience. He is an ASE-certified Master Automobile Technician, and has worked on automobiles, trucks and small engines. He is a member of the Society of Automotive Engineers (SAE) and numerous other automotive trade associations. He has worked as an auto mechanic, a shop manager and a regional manager for an automotive service franchise operation.
Brake complaints fall into three general categories: stopping issues, noise issues and vibration issues. While rotor problems can contribute to all three, vibration is the main culprit. Pulsation is due to either thickness variation or lateral runout.
Although there are a variety of causes for runout, one common cause is due to variations between the rotor and the hub to which it is mounted. That is why it is essential that you index the rotor to the hub. To facilitate this, use chalk or a grease pencil to mark the position of the rotor relative to the hub. Most often you need to simply mark one of the lug studs and the corresponding hole in the rotor.
Sometimes the vehicle comes in with a vibration problem following some wheel service. It is not uncommon to find the previous service person did not properly index the rotor. In many cases, moving the rotor forward or back one hole solves the problem. Sometimes, you may have to re-index the rotor nearly 180 degrees from the original position.
Runout should be checked with the rotors on the vehicle, not on a brake lathe. Remove the wheel and tire then reinstall the lug nuts to hold the rotor in place. Turn the nuts over so the flat (non-tapered) side contacts the rotor. Be sure to torque them evenly to avoid uneven clamping force.
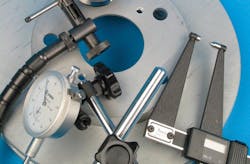
Use a dial indicator to check the rotor. Attach the tool to a rigid location such as the steering knuckle; place the indicator lightly in contact with the rotor surface (approximately one inch inboard from the outer edge, and preload the dial indicator by about 0.050-inch, then zero the indicator). Doing so about one inch from the outer edge will show the greatest runout. Then, turn the rotor slowly by hand while watching the dial indicator needle. Generally speaking, if the total indicator reading for lateral runout is 0.002-inch or less, there’s no problem. Of course, it’s best to check your service specs for proper limits, since some automakers may specify a tighter tolerance range.
It’s not a bad idea to check new rotors before buttoning up the job and returning the vehicle to the customer after your test drive. Correcting runout may be as simple as reindexing the rotor, even when dealing with a new out-of-the-box rotor. You do test drive, don’t you? It is especially important after installing new pads or rotors that the brakes are properly burnished before handing the keys over to the customer.
Thickness variation is also known as parallelism. Both sides of the rotor must be parallel to prevent pedal pulsations. Use a caliper to check rotor thickness in at lease four places (preferably as many as 12 places) around the rotor’s circumference.
Thickness should generally not vary more the 0.0005-inch anywhere on the rotor, but check the vehicle’s service specifications to be sure.
In their quest to reduce weight and increase fuel economy, carmakers have been installing the lightest rotors possible. It has gotten to the point that most of them are akin to Bic lighters: You just toss them out after use. The rotor is used up by the time the car is due for its first brake job. Rotors that are at or below the minimum thickness often lead to high pedal effort or long pedal travel.
If you wish to salvage a rotor, you may be able to machine it, preferably on the vehicle. If so, there are three measurements you need to keep in mind: nominal thickness, machine-to thickness and discard thickness. Nominal is the thickness of a new rotor. The machine-to thickness is the limit that will provide safe braking with new pads. Once it reaches the discard thickness, recycle it as scrap. Many vehicle manufacturers do not suggest machining rotors unless any scoring is 0.060-inch or deeper. Leave minor scoring alone. Use a dime as a go-no go gauge. Insert the edge and if the top of Roosevelt’s head goes below the surface the groove is deeper than 0.060-inch.
[PAGEBREAK]
A major cause of brake noise is a poor rotor finish. A surface finish of less that 40 RMS (root mean squared) is usually alright — before creating the non-directional finish. Although there are comparison gauges to check the finish, you can get relatively close with a pen and paper. If you can draw a smooth line across the face of the rotor, it is probably OK. A dotted line is not.
Most lathes have provisions for creating the non-directional finish. In an emergency pinch, you can use a 180 grit sandpaper disk on a drill (allowing the rotor to rotate as the disc rotates). Avoid dwelling on any isolated area, since you’ll end up creating thickness variations. Use a fresh sanding disk for each side.
Finally, wash the rotor using hot soapy water and a clean bristle brush. Rinse thoroughly with hot water. Brake cleaner solvents may be used, but be sure that no residue remains. Even if you clean the rotor with a solvent, it’s a good idea to follow this with a hot soapy water wash and rinse. A good choice of soap is Dawn dishwashing liquid, which cuts grease and loosens particles exceptionally well.
One of the leading causes of rotor runout is unevenly torqued lug nuts. This can happen any time the tires are rotated or replaced, the brakes are inspected or when the spare has been used. Seldom does the customer make the link between these actions or services and the pedal pulsation. Especially considering today’s thin-hat rotors, as little as a 5-ft.lb. difference can cause problems. Never lube the threads or the torque reading will be erroneous. And, be sure to follow the proper criss-cross tightening pattern to evenly distribute the clamping load.
Always use a properly calibrated torque wrench or torque-limiters or torque limiting sockets to tighten lug nuts. Using an impact wrench is an invitation to trouble.
We mentioned burnishing earlier. New, or newly machined, rotors benefit from burnishing by 15 to 20 aggressive stops from about 40 to 50 mph. Allow time for the brakes to cool a bit between stops. Burnishing can remove surface rust from rotors that have been sitting in a humid environment. It also helps break in new pads. Some of the brakes’ friction material is transferred to the rotor surfaces during burnishing and improves stopping performance.
Leaving this step out often results in the customer returning and complaining that the brakes don’t work well enough.
A hand-held digital infrared pyrometer is a useful diagnostic tool that allows quick and easy measurement of rotor heat, following a test drive. For instance, if the vehicle tends to pull (right or left) during braking, or if you suspect a brake drag during non-braking, taking a heat measurement of the right and left rotors provides a comparison.
For instance, if the left rotor temperature measures, say, 180 degrees F and the right rotor measures 400 degrees after a series of hard braking stops, this may indicate a weak braking action on the left rotor (caliper piston or sliding caliper sticking, etc.).
About brake noises
Some brake noise is normal and can be affected by weather and driving habits. Groaning, for instance, is common during partial release of the brakes after a stop or occasionally when coming to a stop.
Grinding noises often occur from light surface rust that may develop overnight. It usually goes away after a few brake applications.
Squeaking or squealing is common with semi-metallic brakes at medium speeds with light application (sometimes the result of normal pad vibrations as they begin to kiss the rotors).
Other noises, like all sounds, are created by vibrations. Remember to install any shims with new pads. Always use a high-temperature silicone grease on sliding surfaces and any metal-to-metal contact points such as pad backing plates and calipers. An anti-squeal compound applied the backs of the pads helps, too.
Au revoir rusty rotors
General Motors is helping to make rusty brake rotors history by changing the chemical makeup of the components using a process that could double the life of rotors.
GM engineers developed an exclusive corrosion protection process that super heats the rotors at 560 degrees Celsius (1,040 degrees Fahrenheit) for a day in an oven the size of a bus. Inside the nitrogen-rich atmosphere, nitrogen atoms bond to the surface of the steel rotor, hardening and strengthening the rotor.
The name for the technology is Ferritic Nitro-Carburizing, or FNC, and it has most often been used to treat powertrain parts.
Since its introduction on brake rotors in 2008, FNC has helped reduce warranty claims on brakes by 70%, according to a GM study. The same study showed brake components at the top of the list of customer concerns.
More than 80% of U.S. vehicles are exposed to one or more environmental corrosion creators, such as acid rain, intense sunlight, snow and ice, and road salt. GM brake rotor technical expert Jim Webster and his team were confident that slowing the oxidation brought on by the environment was a problem material science could solve.
Incorporating a unique surface treatment equivalent to one-tenth the width of a human hair, FNC creates sufficient friction and allows for effective braking performance while providing corrosion protection.
With FNC, GM vehicles are reportedly free of brake pedal or steering wheel shudder caused by an uneven buildup of rust on the rotor that occurs over time. FNC rotors create less brake dust than non-FNC rotors.
FNC rotor technology is featured on the Buick Lacrosse and Regal as well as on the Chevrolet Malibu, Impala and Volt in North America. It will be featured on more than 80 percent of GM’s U.S. vehicles by model year 2016.
GM is the only company that has found a way to effectively treat brake rotors with the FNC process and has several patents pending on the technology.


