Obviously, engine valve timing is critical. This requires that the manner in which the camshaft(s) is driven by the crankshaft is able to maintain accurate valve timing. Over the decades, the crank-to-cam connection has evolved from gear drive (where the crank gear and cam gear mesh together) to single-cam sprocket to crank sprocket chain drive, to toothed belt drive and/or more complex chain drives for OHC/DOHC engine designs. In this article, we’ll discuss the operation and wear/failure aspects of both today’s chain and belt systems.
TIMING CHAINS
Why does it appear that more OEMs are going to timing chains vs belts today? According to Cale Risinger at Melling, “I can only speculate, but one thought would be the complexity of many of the newer primarily V style engines. Most are DOHC, many have an idler sprocket that transfers the crankshaft rotation to the two chains that drive the cams. I cannot imagine the amount of packaging space required to do this with belts. I’m not sure if the carbon footprint might also come into play, either in belt production or the waste of throwing the belts away every 50,000 miles. I would also think a vehicle that does not require an expensive service such as the timing belt replacement every 50,000 miles would be more appealing to customers.”
Timing chain systems offer some advantages as compared to timing belt systems. In most cases, if the engine is properly maintained, service intervals would be the main advantage to a chain over a belt. The chain is also, for lack of a better term, more durable. Thinking back to the days of timing belts, if the front crank seal leaked on an engine to the point of coating the belt, you would most likely find the belt nearly shredded when inspecting it, due to the oil saturation. On a chain-driven timing set, you simply change the crank seal, clean up the mess from the oil leak and move on.
What are the most common failure points of today’s timing systems?
The most common failure point relative to timing chain systems seems to be chain stretch. Risinger notes that “I believe that this stretch is ultimately the result of lack of proper lubrication to the chain. This lack of lubrication directly correlates to proper vehicle maintenance. Extended oil change intervals are not timing chain friendly. I think most drivers, including myself, got very used to changing their oil every 3,000 to 5,000 miles.
Most sound engines will use little to no oil in that mileage interval which, in turn, got us out of the habit of regularly checking our oil level. Now, with the oil life monitoring system pushing service intervals out to 7,000 to 10,000 miles, combined with very light oil viscosities, we see engines using more oil during that interval, but we as drivers are still not checking our engine’s oil level. I had a customer bring in a vehicle a few years back, complaining of rattling noise when making hard left-hand parking lot maneuver type turns.
While test driving, I noticed this noise sounded like timing chain noise. We found that the 6-quart capacity oil system had only about a quart and a half of oil, so as the driver made their parking lot maneuver, the oil ran away from the pickup, causing oil pressure to drop, which allowed the tensioners to lose tension, and the chains to go slack, which in turn caused the rattle noise. I would like to point out that this engine only had about 40,000 miles on it, and the oil life monitor still showed 20% engine oil life.”
Engine oil (type and condition) is very important regarding the life and durability of timing chain components, especially in OHC/DOHC systems that feature variable valve timing (VVT). Most, if not all, VVT actuators are controlled by oil that is fed through the camshaft to the actuator, which brings up a couple of thoughts regarding oil. Lack of maintenance can lead to engine wear, which can increase cam-to-journal clearances. This wear can, in turn, reduce the amount of oil volume supplied to the actuators. With many of the newer engines having direct injection (that we know causes increased soot; or turbos that add more heat to the oil), more frequent oil changes are a must. The lubrication paths to the actuators and the oil passages in the actuators are fairly small. The dirty, deteriorated oil can cause these passages to plug and may also lead to internal actuator damage.
TIMING CHAIN TYPES
As noted by Cloyes’ Cody Smith, commonly either roller chains or link-belt chains are in use. Roller chains feature rollers that engage with sprocket teeth that reduce/eliminate friction/drag. Roller chains are identified by pitch, a number of roller links and roller diameter size. Typical pitches for roller chains include 3/8-inch, half-inch, 7mm and 8mm. The number of links is easily obtained by counting the links around the chain including both inner and outer links (or just count the outer links and multiply by two). Typical roller diameters are .250-inch, .335-inch, 4mm and 55.65mm.
Link-belt chains, also called inverted toothed chains or silent chains, are made by lacing a series of links connected by pins. This design has proven to be a durable option by some automakers to reduce noise and vibration.
Timing chains in some applications feature marked links that align to sprocket timing marks to ease installation.
TRANSITION OF CAM DRIVES
Early on, camshafts were routinely driven by gears: the crank gear meshed directly with a cam gear. Then the system transitioned to chain drive, with a cam sprocket engaged to a crank sprocket via a linked chain. With the advent of overhead cam systems, toothed timing belts became the norm, with tensioners applying pressure to the belt between the toothed crank sprocket and the cam sprockets to control belt flex/wobble. In the past 20 years or so, many OEMs have returned to timing chains for OHC/DOHC drives, incorporating plastic chain guides and tensioners.
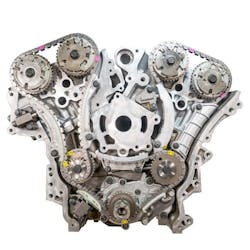
According to Cloyes, today, more than 80% of vehicles feature chain drives. Cam drive systems have become more complex, featuring an increase in the number of components involved in the systems. As but one example, 2003 Ford Explorer engines feature 16 pieces involved in the drive system, as compared to 2000 Ford Explorer engines that featured only five pieces (sprockets, chain and tensioner guides). Obviously, we’ve come a long way from the use of a three-piece chain system in OHV pushrod engines to DOHC engines that feature separate camshafts dedicated to intake and exhaust function.
The use of VVT (variable valve timing) or VCT (variable cam timing) increases the complexity. This technology allows a camshaft to advance or retard its timing relative to the crankshaft position, varying timing across the engine’s RPM range. VVT systems use a cam phase or actuator, which is a two-piece sprocket design on the camshaft nose instead of a standard one-piece cam sprocket. Using the engine’s oil pressure through oil porting, controlled by a solenoid and the engine’s management system, the phaser can advance or retard cam timing. This allows automakers to tune engines for fuel economy and emissions requirements while maintaining horsepower and torque demands. With the increased complexity of VVT systems, a high potential for misdiagnosis is created. A lack of oil feed to the phasers due to worn cam journals, poor oiling system health, clogged oil passages, or component failure can cause timing chain system instability.
HOW DO TIMING CHAINS FAIL?
Timing chains fail due to either fatigue or outright damage. Fatigue failure occurs when the chain has simply met its maximum number of cycles at a given cyclic load and stretches beyond system stability. Ultimate failure occurs when the chain has met its ultimate breaking strength caused by an engine’s mechanical failure/force, such as a thrown connecting rod, valve failure, valve seat dislocation, etc. The majority of chain failures occur due to a combination of fatigue and mechanical failures. Chain whipping (due to stretch) accelerates the fatigue, and if not caught in time, the chain will ultimately break. Engine misfire and VVT system malfunction can create the same accelerated fatigue failure that will lead to rattle and eventual failure.
TIMING BELTS
A timing belt features teeth that engage to drive sprockets to synchronize the rotation of the crankshaft and camshaft(s) ensuring proper timing. The operation of the belt(s) is critical in preventing the pistons from striking the valves in an interference-type engine. It’s important to note that a timing belt should be changed at the OEM’s recommended replacement mileage. When replacing the timing belt, it’s important that the tensioner, idler pulleys and water pump are inspected, as the timing components wear at a similar rate. It’s highly recommended to replace all timing components (including the water pump) when replacing the timing belt.
An interference engine allows for a higher compression ratio. Within an interference engine, the pistons and the valves share the same space in the cylinder but move at different times. One or more valves may open into an area where the pistons travel. In a non-interference engine, an open valve never enters into an area where the piston travels towards the top dead center.
Timing belts break most often at startup and shutdown of the engine where the maximum amount of tension is placed on the belt. Again, always follow the automaker’s recommendation for belt replacement intervals.
If an aftermarket belt is found during an inspection, the belt has likely been replaced. However, just because the belt appears to have been replaced, do not assume that other timing-related components have been changed at the same time. If timing components are not replaced at the same time as the belt, the life of the new belt can be reduced by 50%.
According to Dayco, more than 80% of all belt failures and replacements occur after the vehicle passes 85,000 miles. In reality, peak belt replacements occur between 90,000 to 100,000 miles.
Timing belts may feature one or more arrows on the smooth/no-tooth side. These arrows are used to establish the direction of belt travel. This is to ensure that once a direction has been established, the belt should always rotate in the same direction after any system maintenance is performed wherein the belt is to be reused. Timing belts, by design, are neutral tracking by dual spinning belt cords in opposite directions (one cord is wound in one direction and the adjacent cord is wound in the opposite direction. As the belt “seasons/breaks in,’’ the belt (if removed and reinstalled) must operate in the same direction as originally installed.
BELT TENSIONER INSPECTION
If the application features a hydraulic timing belt tensioner, be sure to inspect the tensioner for oil leakage, specifically at the pushrod seal area. While an extremely faint trace of oil may be acceptable, if leakage is noted, the tensioner must be replaced.
While holding the tensioner upright with both hands (pushrod facing up), place the pushrod against a solid object and push, in an attempt to move the pushrod. If the pushrod moves using only hand pressure, replace the tensioner. Note: never hold the tensioner with its pushrod facing down.
Next, referring to the automaker’s service manual for tensioner specifications, measure the pushrod protrusion, from the tip of the pushrod to the end of the housing. Using a Toyota Solara as an example, the specification is 0.394–0.425 in. (10.0–10.8mm). If the protrusion measures less or greater than the specification range, replace the tensioner.
THE BELT IS ONLY PART OF THE SYSTEM
Be sure to examine all of the system components. Inspect the camshaft and/or crankshaft seal. Leaking or worn seals will contaminate the timing belt, causing premature belt failure.
Tensioner and idler pulleys. One of the most common causes of timing belt failures involves worn tensioners or idler pulleys.
As noted earlier, inspect the hydraulic timing belt tensioner. Hydraulic timing belt tensioners help set or maintain constant tension on the system. Installing a new belt with a weak tensioner will result in belt damage and can compromise valve timing.
Water pumps driven by a timing belt should be replaced whenever a belt is replaced. During belt service, the water pump is easily accessible, so it doesn’t make sense to rely on an old pump at this point. Besides, a leaking water pump can contaminate and destroy a new belt.
SIGNS OF BELT WEAR/FAILURE
Tensile (cord) failure
Belt crimped
Foreign body in the drive
Excessive tension
Moisture or antifreeze on the belt and invading the cord
Loose teeth
Low working belt tension
Loss of belt tension
Penetration of foreign debris
Worn belt teeth
Irregular tension
Pulleys with worn teeth
Incompatibility with pulley
Worn/cracked belt
Operating at excessively high or low temperatures
Locking of a transmission force (seized idler, etc.)
Worn pulleys
Side wear
Misalignment of the tensioner or one of the force
transmission components
Contamination
Timing belt cover or seal damage or improper installation
Water, fuel or oil line leaks
Rubber deposits from wobbling belts or misalignment
Noisy timing belt
About the Author

Mike Mavrigian
Motor Age Editor
Mike Mavrigian has written thousands of automotive technical magazine articles involving a variety of specialties, from engine building to wheel alignment, and has authored more than a dozen books that crisscross the automotive spectrum. Mike operates Birchwood Automotive, an Ohio shop that builds custom engines and performs vintage vehicle restorations. The shop also features a professional photo studio to document projects and to create images for articles and books.