Silencing a squeaky Mazda
Some vehicles (2001-2006, 2008-2010 Tribute; 2008-2010 Tribute Hybrid) may exhibit an underbody creak or squeak when accelerating from a stop or when braking to a stop. The noise may appear to come from the front or rear underbody or suspension area.
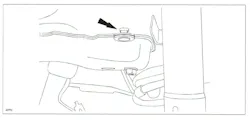
CREAK/SQUEAK FROM FRONT
1. Attach chassis ears to the areas indicated in the illustration (rear of subframe mount areas). Determine if the noise can be isolated to one or both of these locations.
2. If the noise is not found in these areas, proceed to Mazda’s MS3 online or Workshop manual (section 02-01 Symptom Troubleshooting Chart – Noise, Vibration and Harshness (NVH).
3. If the noise is traced to these subframe areas, suspect that the subframe locating pins are contacting the locating holes of the vehicle body. Loosen the two front subframe nuts and the two front subframe attachment bolts. DO NOT ALLOW THE FRONT SUBFRAME REAR BOLTS TO COME OUT OF THE LOWER CONTROL ARM BUSHINGS.
4. Reposition the subframe to center the locating pins, so that there is no longer contact with any edge of the locating holes. NOTE: The pins are more likely to contact the rearward side of the holes. Therefore, the subframe assembly will most likely need to be moved forward.
5. Tighten the front subframe nuts. When installing the front subframe’s rear bolts, ensure that both front subframe rear bolts are fully engaged in their cage nuts before tightening to specifications.
6. Tighten the front subframe rear attachment bolts.
7. Adjust front caster, camber and toe angles.
CREAK/SQUEAK NOISE FROM REAR
1. Attach chassis ears to the areas indicated. Determine of the noise can be isolated to one or both of these locations. If not, proceed to MS3 online or Workshop Manual (section 02-01 SYMPTOM TROUBLESHOOTING CHART – Noise, Vibration and Harshness (NVH).
2. If the noise is determined to be isolated to one or both of these areas, suspect that the subframe locating pins are contacting the locating holes of the vehicle body.
3. Loosen the four rear subframe bolts.
4. Reposition the subframe to center the locating pins so that there is no longer contact with any edge of the locating holes. Note: The pins are more likely to contact the rearward side of the holes. Therefore, the subframe assembly will most likely need to be moved forward.
5. Tighten the rear subframe’s bolts.
6. Adjust rear toe angle.