CUSTOMER CONCERN:
Vehicle does not start, has a P0299 DTC.
VEHICLE APPLICATIONS:
2009 VW Jetta 2.0L TDI
Tests/Procedures for P0299 DTCs provided by TSB 11-08:
- Look for vacuum and exhaust leaks to and from the turbocharger.
- Check turbo alignment and turbo vacuum diaphragm condition.
- Test the Charge Air Pressure and Charge Pressure Actuation Position Sensors.
- Check software for updates.
TOOLS USED:
- Multimeter
- Scan tool
- Smoke machine
- Information system
- Vacuum pump
Diesels are tough vehicles to diagnose if a technician does not specialize in them. However, due to increasingly stringent fuel economy regulations, more of these vehicles are being produced and will be rolling into service bays.
The new VW turbo diesels appear to be less robust than previous models and it is quite common to see these vehicles radically under performing, if not failing to start altogether. When this occurs concurrently with the PCM storing a P0299 Turbocharger Underboost Condition DTC, it is time to suspect that a turbo failure is at hand.
Getting Started
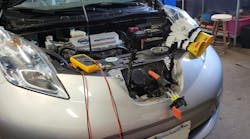
After scanning for DTCs it is wise to start checking OEM TSBs (technical service bulletins) to see if the failure is common and if there are specific ways to address it. Thankfully for technicians, VW is forthcoming about what causes the P0299 DTC in TSB 11-08. (See Fig. 1.)
When looking at TSB 11-08, it is going to have the technician look for vacuum leaks to and from the turbo, as seen in Figs. 2 and 3. Apparently during the construction of these vehicles, many hoses were kinked or not connected properly. The plastic boost pipe that runs from the intake side of the turbocharger to the intercooler also tends to crack, and even if this pipe is undamaged, it is good to replace it if the turbo ends up being replaced, as they have a high failure rate.
Using a smoke machine to find intake and exhaust leaks is absolutely critical for turbo diesel driveability problems. Small vacuum and exhaust leaks can render a vehicle unable to start. Regular smoke machines operate at a maximum of 0.5 psi or so. Quite often, 0.5 psi is not enough to find a leak that can cause a driveability problem on these vehicles. A turbo-specific smoke machine that operates as high as 40 psi is the best way to get the job done.
The best spot to smoke a turbo on the exhaust side is at the tailpipe, provided that the vehicle is cold, as seen in Fig 4. If it is hot, smoke test the turbo itself, looking for an access point on the engine side of the cat.
To do a full boost pressure test on the intake side, the fresh air intake on the turbocharger is a good spot to test from if the technician can reach it. Smoking the intake from other spots can work, but at such high pressures, new leaks can be created.
Dye can help find leaks on turbos because at the higher pressures these smoke machines operate at, because the smoke might not be easily visible. Oftentimes, where there is no smoke, dye can be found at the point of leakage. Unique to turbocharged engines are performance robbing boost leaks at cracked or broken hoses, connections or components which can be hidden from detection without the use of dye.
New technology that creates proportionately higher smoke content when increasing air pressure already exists, but it is not out to market yet (check out www.VehicleServicePros.com/11223346 for more information on the Vacutec WV711.) Even with improved smoke machines, there can be internal leaks and spots that do not lend themselves to visual inspect where components will have to be taken apart. Being that these components cannot be tested once taken apart, dye in these instances may be the only way of finding the leak.
After checking for leaks, the TSB has the technician check the turbo's alignment. Generally, if the turbo is misaligned (and the TSB details specifically what it would look like if this were the case), the TSB recommends replacing it.
If the turbo passes all the checks, the TSB asks the technician to take a vacuum pump, such as one that is used to test an EGR valve, and disconnect the hose to the turbo charger vacuum diaphragm. A vacuum of about 600 mbar should be created and if the vacuum decays, this reveals that the diaphragm in the turbo has been compromised.
If the vacuum drops, the TSB recommends replacing the charge pressure actuation position sensor with the diaphragm. This should fix the problem.
If the vacuum holds and the DTC is a P0299, it is time to find out if there are any PCM updates to the vehicle. However, if the vehicle is towed in and not starting, it is unlikely that software is the problem at this point.
Now, if the vehicle passed all the previous tests, it would be wise to check the charge air pressure sensor (it might be called an "IAT" on some scan tools) and the charge pressure actuation position sensor parameter identifications (PIDs) to see if they show any signs of being active. A sensor dead-in-the-water can cause dramatic driveability problems, as modern turbos' driveability are heavily regulated by sensor feedback.
To be even more conscientious (replacing the turbo after all takes at least a solid six hours), check the sensors' wiring and internal resistance with a multimeter. For the charge pressure actuation position sensor specifically, the resistance between terminals 1 and 2 should be 6.30 Kilo-ohms (+/- 300 ohms) and terminals 2 and 3 177 ohms (+/- 60 ohms). (See Fig. 5.)
For the charge air pressure sensor, check key on engine off (KOEO) voltage between terminals 1 and 3, and 1 and 4. They should be 5V and 4.4V respectively. If not, double check resistance in the wires running from the sensor to the PCM. If the wires have 1.5 ohms of resistance and have power KOEO, the sensor should be replaced. If the wiring is fine and there is a deficient amount of voltage, then there is a good chance that the PCM is at fault.
If the vehicle runs, but just not well, keep in mind that these 2.0L CBEA turbo diesels tend to have clogged EGR valves that create an air restriction to the turbo. Look for an excessively dirty EGR and replace it if necessary before looking to replace the turbo itself.
Even though chances are at this point if nothing else is defective, the turbo is to blame, do a couple of final checks. For one, see if there is excessive exhaust backpressure using an applicable exhaust backpressure gauge. Keep in mind that if the driveability of the vehicle radically improves with the EGR removed with a known-good EGR, this definitively proves that there is a massive exhaust restriction (usually in the turbo itself.) The exhaust turbines in the turbos tend to seize.
A good final check is to remove the lower intercooler hose and see if a lot of oil pours out. An excessive amount of oil reflects a compromised turbo turbine seal. Also look for signs of condensation, as an excessive amount of water can hydrolock the engine. (See Figs. 6 and 7.)
One last tip: being that this job could cost thousands of dollars (the turbo alone is close to $2,000 on most models), take special precautions. When ordering parts from the dealer, be sure to get any new clamps that might be applicable and warn the customer that they might loosen up and need to be readjusted in a week or so. Otherwise, new vacuum leaks form and cause the same turbo-low power issue. (See Fig. 8.)