CUSTOMER CONCERN:
"The A/C doesn't work!"
VEHICLE APPLICATIONS:
2001 Buick Century 3.1L, 1997 Toyota 4Runner and 2005 Dodge Grand Caravan
Tests/Procedures:
Summarized diagnostic steps provided from TSB 73–12–12A courtesy of Autodata.
- Put the A/C on the maximum cold position and run the vehicle.
- Listen or watch for A/C compressor clutch engagement.
- If the compressor clutch engages and stays engaged at idle, low side refrigerant pressure is sufficient to check for a leak. Add dye to vehicle.
- Start and run the engine at 1,500 rpm for five minutes with the A/C system in the maximum cold position. If the system is 20 degrees F colder than ambient temperature, the system is "good."
- Extremely small leaks may be pressure-, temperature- or vibration-sensitive and may not be active during the 5-minute test above. In this case, it may be necessary to request the vehicle be returned for further testing in three to five days.
TOOLS USED:
- Information system
- Flash dye
- A/C machine
- Black light
- Smoke machine
- Power Probe
Air conditioning is not the most difficult field of repair, but it often requires patience and the right tools.
Most A/C problems roll into the shop coupled with the same exact customer complaint: "The air conditioning doesn't work!" Generally, there are two reasons: the refrigerant is low (either because of a tiny, long-term leak, or a leak that needs to be repaired) or the system itself is not operating properly. In this case, a bad compressor, internal restriction or something of the like may be the cause.
In Fig. 1, we can see a fairly standard plan of attack for the first five minutes of any A/C diagnosis. Even though it is a GM TSB, it would be good for pretty much any vehicle, but with a couple additions that are covered below.
Foolproof Approach to A/C
First, an A/C system always needs to be full on refrigerant. If for whatever reason it is low, this will complicate diagnosis because the compressor itself often will automatically be shut off, which will throw low, side-gauge pressures high. Furthermore, dye will often not properly circulate and find its way out of the leak point without proper system pressure acting to force it out.
So, in plain English, every vehicle should be sold on a recharge and dye injection for the sake of a better diagnosis. (See Figs. 2, 3, 4 and 5) The customer should be informed there may be a big or small leak, and the only way to find it is to charge the vehicle up and let the vehicle run with refrigerant in it. Most A/C machines when they do a leak test will only find a gross leak. It is not uncommon for an A/C system to pass a leak test, get charged with refrigerant and then have no A/C again only a day or two later.
With a full charge, at 70 degrees F ambient temperature pressures should be about 35 to 40 psi on the low side and 145 to 160 psi on the high side. For every 5 degrees F it is warmer out, pressures should be 5 psi higher and vice versa.
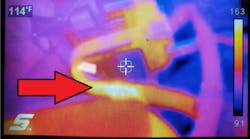
If low side pressures are low and high side pressures high, there might be an internal restriction in the A/C system. Expansion valves and receiver driers are the common culprits, due to water vapor in the system that freezes and blocks the flow of refrigerant. However, system contamination, such as sealant, can also cause blockages in strange places. Oftentimes the blockage causes an extreme temperature difference on an A/C component, such as in Fig. 6.
If low side pressures are high and high side pressures low, the compressor is not running. The quick way to see if it works is to command the compressor on with a Power Probe or jumping its relay if it has one. (See Fig. 7) If the compressor still does not turn on, the vehicle needs one.
But how about more complicated issues?
Atypical A/C Problems
On a 2001 Buick Century 3.1L, the A/C blew cold on one side and warm on the other. These vehicles are known to have blend door problems, but before we presume, we are doing an electrical diagnostic instead of an A/C diagnostic. A quick search on Identifix shows us that a common problem is the system will do this when low on refrigerant. (See Fig. 8) Otherwise, with a multimeter we can test if the blend door actuator is getting 5V, but is not moving. If this is the case, a system reset can be done by removing its fuse for a minute. A recalibration will take place in many cases, but if it does not, the actuator needs to be replaced.
Some customers might come to you "knowing" their vehicle has an A/C leak, such as this 1997 Toyota 4Runner. If they don't want to wait for the refrigerant to leak out, or if the price of refrigerant skyrockets again and we don't want to lose the stuff to the atmosphere, you can try using "flash dye." Cliplight's Flash High Resolution Dye, No. 980, injects dye as an aerosol into the A/C system when it is running, as seen in Fig. 9. This allows the dye to instantly circulate in the system. Here, dye was found on an A/C line before the vehicle was sent out (See Figs. 10 and 11).
Lastly, always remember to use the tools you were born with, such as your ears. This 2005 Dodge Grand Caravan had a gross A/C leak, but it was not anywhere in the front or below the vehicle where all the A/C components are located. Don't give up, keep looking! This vehicle made a whistling sound in its trunk because it has an auxiliary evaporator. (See Fig. 12) The leak test with the A/C machine helped make the sucking noise and a smoke machine localized the leak, as seen in Figs. 13 and 14.