The series covers when technicians may still want to prime when using DTM products to prevent corrosion and when they can forge ahead and apply directly to the metal. Repairers will understand what DTM products are and how to use them properly to perform the “perfect repair.” Part one explains which process to use and what technicians should know.
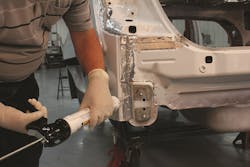
In collision repair, a seam sealer is the tough, flexible material that bonds metal surfaces together while providing a robust level of corrosion protection. Seam sealers are used for duplicating factory appearance on automobile repair and industrial heavy-duty truck, bus and trailer repair. Some of the typical applications include trunks, truck bed seams, tooled door skin seams, floor pan seams and core support seams.
There are two processes currently in use in the industry. Repair shops can use Direct-to-Metal (DTM) seam sealers or a two-component primer followed by a seam sealer. DTM seam sealers, as the name implies, are applied directly to the metal surface without the need to use a primer beforehand. There are some questions within the industry as to which method to use. Many repair shops follow the two-component primer method as it does provide a better repair. Since a primer is not necessary for DTM sealers, they are often used when highest corrosion protection is not needed.
The reasoning behind this involves the paint application. After the seam sealer has been applied, the paint refinishing is next and there is a possibility that the paint would not be able to be applied to the tight interface at edge of the seam sealer – this is just due to physics and applying with an atomized paint system. Because of the panel angles around the seam and the way the spray gun is held, it’s not always possible to make a perfect application.
Using a primer needs to be factored into the overall repair time. It may not take any more time if it is planned as part of the process. Technicians can quickly apply the primer and let it dry. Then apply the seam sealer.
DTM seam sealers have been tested for their ability to stick very tight and protect the underlying steel or aluminum. Testing is done using a corrosive chamber, which simulates a salt spray environment. The seam sealers are tested with and without paint systems applied over them as well. Many of the DTM products are very robust and help with corrosion forming underneath an automobile. The majority of the DTM seam sealers both grab and hold the metal as well as provide a high level of protection.
History vs. today
Years ago, seam sealers actually dried, meaning they had a solvent in them that evaporated. Those products were notorious for shrinking and cracking as they gave up the liquid they contained. As the volume would shrink a little bit, the seam sealer might crack and start pulling away from the surface. Fortunately, today’s seam sealers are different.
The whole theory behind DTM really started eight to ten years ago as a logical method to save time in the repair process. The older two-component products were not direct to metal, but always over primer, and with reformulations the chemistry was changed to really bond to the metal and protect it. Along with two-component sealer improvements changes were made to one-component sealers as well and we now see the majority of products being DTM.
Higher quality repair shops have standard operating procedures (SOPs) for every task within the repair process. In those situations, individual shops may still sometimes deviate from the standard rulebook and use the repair process they prefer. So, even with procedures and recommendations, it’s best to leave it up to the individual shop as to how they want to perform their own repairs. They're the ones that are responsible and have to warrant their repairs.
In collision repair, we're trying to restore the vehicle to as-built condition. In the OEM world, many sealers are in fact, DTM. But that whole build process is different from a collision repair. During the build, the manufacturer uses an e-coating processes, which is the big variable. They dip a whole vehicle versus spraying it. After it's dipped in a rinse, it is dipped into the primer and then baked at 400 °F. Baking in an oven changes everything because of the level of heat being used. The chemistry involved with an OEM seam sealer, along with the high heat bake, causes the sealer to cure and obtain an even better bond. Dipping in the e-coat provides 100 percent coverage – a coverage that goes absolutely everywhere.
Which process to use?
On an exposed seam, a quick epoxy prime with a seam sealer is preferred. Exposed seams refer to those exposed to the environment, such as salt splash off the road. Doing a quick epoxy prime beforehand helps with any salt spray on an undercarriage.
Material manufacturers put together SOPs to set up procedures that are the most robust for the best product usage and repair. Despite what procedures a material manufacturer may recommend, in the end they defer to the OEM if the OEM has a published procedure to follow. It’s their car, they engineered and built it, they know how to fix it.
It should be noted that there’s inconsistency among manufacturers as to how much information they actually provide. For example, one manufacturer may recommend application of primer to any bare metal before sealing the seam, despite location or environment. That is their procedure. Another may be more specific and indicate primer only in certain locations. All try to create a fail-proof repair. So, the DTM capability may not be of interest if other steps are being taken to guarantee that the repairs are covered.
If a primer is not used beforehand, it can be due to time savings. DTM saves the step of applying the primer which saves a few minutes for application and dry time. In the end, the procedure used is technician- and shop-driven.
If that priming step is not done and the DTM products are used, the repair is still good. The challenge becomes the application of the paint. It’s important that it’s hermetically sealed. This is where if it’s an exposed area, it is subject to salt spray and water spray. Other areas, for example inside a trunk, are typically dry zones, and after the refinishing operations will generally have a finishing step where cavity wax is applied. Cavity wax differs from paint with its ability to wick and crawl into tight areas and provide a tight seal.
What should technicians know?
With any of these products it's critical that the technicians need to know clearly how the product is to be applied.
This includes:
-
Knowing how to tool it
-
How get the correct appearance
-
If there are any other recommendations for tricks or techniques
-
Reviewing technical data sheets and any SOPs
-
Reviewing the safety data sheet to understand what they're handling
When the technicians have all that information, then it just becomes an art form.
Getting the information on the car and making it appear just as it was before the accident is essential. It’s important that the shop is always testing off metal from the car with their own paint system, to ensure compatibility. This is especially vital when using a slower curing material.


