Bumpers made from PUR, or thermoset polyurethane, are not very common today. This was a very common material on domestic car bumpers from the ’70s through the ’90s, and there are still a few applications today, like the Dodge Challenger rear bumper. However, most plastic bumpers today are made of polypropylene (PP) blends.
Most plastics are “thermoplastic”, or meltable plastics, so technicians are more familiar with these types. Technicians are less familiar with the “thermoset” plastics, like polyurethane. These types of plastics are not meltable because they form a solid through a chemical reaction. If you try to melt the plastic, it chemically breaks it down and destroys it.
The mistake most technicians make when trying to weld a polyurethane bumper is that they try to melt the base material with the welder. This causes the base material to break down, forming a sticky liquid on the surface. The welding rod peels right off the liquid.
So, what’s the right way to do it?
1. Identify the plastic.
If the base material is yellow, you know it's a urethane (PUR). But not all urethanes are yellow. Some are light or dark gray. If you can find the ID symbol, it should say PUR or RIM. If you can't find the symbol, press a hot welding tip into the backside of the bumper. If it’s a urethane, the plastic will liquefy, bubble and smoke. After the heated area cools off, it will remain gummy or tacky. This is an indication that the heat broke down the chemicals in the plastic. Thermoset polyurethane is not a meltable plastic like most other plastics.
2. Prep the plastic for repair.
Clean the plastic, then grind a v-groove about halfway through with a cutting burr. Put a good sand scratch in the plastic with a coarse sandpaper disc, then blow so the surface is dust-free. Since thermoset PUR is not meltable, the only way to repair it is with an adhesive. You can use a two-component adhesive, but Polyvance promotes the use of a thermoplastic urethane as a hot melt adhesive as the faster and less expensive repair option.
3. Melt the urethane rod into the v-groove.
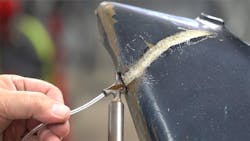
Set the airless plastic welder to the "urethane" setting. Anything higher will overheat this plastic. Holding the welder’s tip slightly off the surface of the plastic, melt the rod into the v-groove. Don’t overheat the base material, simply melt the rod onto the surface. Again, you are not trying to melt the rod and the bumper together; the bumper material is not meltable! Lay down no more than 2” of welding rod into the v-groove at a time. Remove the rod from the welder tip, and before the melted rod has time to cool down, go back over it with the hot welder tip and smooth out the well. You can touch the bumper with the welding tip, but keep the tip moving so you don’t overheat the base material.
4. V-groove and weld the opposite side.
After the first weld cools, repeat the v-groove and welding process on the opposite side.
5. Grind flush and apply flexible filler.
Using coarse sandpaper, grind the weld to a smooth contour. The urethane welding rod will not feather very well, so it will need to be covered with a flexible epoxy filler to refinish completely. Grind the weld slightly below flush so that filler can cover the welded area completely.
Information provided by Polyvance


