Today’s powertrain systems have grown quite complex and demand a certain skill set when it comes to addressing engine performance and driveability challenges. In fact, many of the skills needed to successfully resolve the wide range of issues presenting operational problems on these vehicles demand similar skills one is required to obtain in pursuit of an electrical engineering (EE) degree. Now of course the EE degree is great for the design side and most certainly dives much deeper into various subjects. However, we as diagnosticians are dealing with the real-world results of these systems and as we all know, things don’t always work out as planned. This is why we need to possess an eclectic skill set to help us better understand and conquer vehicle performance problems.
For review, here’s a list of the core areas of study for an EE:
- Circuit theory
- Digital logic
- Signal processing
- Control systems
- Electronics
- Electromagnetics
- Power systems
- Statistics and probabilities
- Microcontrollers
- Communication systems
- Calculus and differential equations
- Physics
- Programming languages
While that list is quite extensive, in my opinion, many of these areas align with the competencies today’s diagnostician needs to possess. So, the next time you hear someone refer to diagnostics as just connecting it to the “machine” feel free to remind them of the knowledge and skills needed to properly address today’s automobiles.
My recommendations are that when you’re seeking training to better yourself as a diagnostician, review the areas listed above to better understand your strengths and weaknesses. Overcoming deficiencies in certain areas can aid in performing diagnostics well into the future! Now, let’s dive in and have a look at modern vehicle performance and analysis troubleshooting.
Modern internal combustion engine (ICE) vehicles are equipped with sensor data that quite simply has made the driveability technician’s life a lot better. In fact, due to the evolution of OBD-II Parameter Identifiers (PIDs), we are blessed to have access to some very valuable information we can leverage. In this article, we’ll discuss using these PIDs to help us quickly assess engine performance operation and how to effectively gather data during a road test. We’ll also discuss how to leverage some of the OEM’s diagnostic routines that can be called up in the scan tool as well.
Tooling – Scan tools
Having a good understanding of the tool’s strengths and weaknesses is a priority. I use a variety of scan tools and my selection is dependent on the tasks ahead.
Here are a few areas of focus:
Documentation
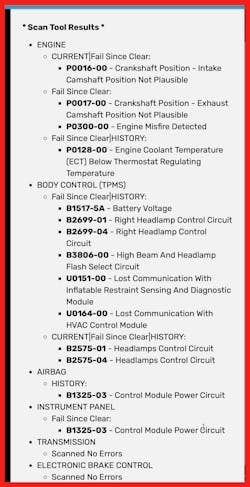
Initially, I usually like to gather all the evidence and document it before carrying out any testing. I’m sure by now you’ve heard the term “pre-scan” and it’s a great best practice. In fact, we have a tool we use that streamlines this process by performing a full vehicle scan that will then insert the results right into the work order within our SMS (Figure 1). From there, the technician may want to gather the freeze-frame data from DTCs and record them as this may provide further guidance. Secondarily, it might make sense to gather module part numbers along with their software versions. The Ford IDS does a great job of logging all this information during a diagnostic session and we’ll talk more about this later in this article.
Sample rate
When monitoring/recording vehicle performance data, you need to be aware of the update rate of the scan tool which is also dependent on the vehicle under test. Some PIDs are being broadcasted from a module at a fixed rate and some PIDs may be polled (requested) by the scan tool at a selectable rate.
PID reliability
Keep in mind that the data you see has been converted from binary serial data (Figure 2) which is highly dependent on the accuracy of the tool’s CAN database libraries and its ability to properly translate. Additionally, OBD-II regulations require that the data reported must be accurate and reflect real-time conditions of the vehicle. However, there are exceptions where there is an allowance for some modules to substitute data under specific fault conditions to prevent damage due to other systems relying on this data to perform functions and or allow limp-home modes.
Data presentation
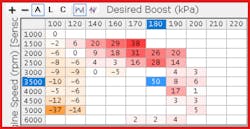
Possessing the power to display the data in certain ways can be highly beneficial to the diagnostician in navigating this complicated matrix. For example, having the ability to overlay data on one timeline with controllable Y-axes in my opinion is extremely powerful as I will demonstrate later in this article in some real-world examples. In other cases, one might benefit from being able to display a 3-dimensional graph of data when addressing certain problems as shown in Figure 3.
OBD-II monitors
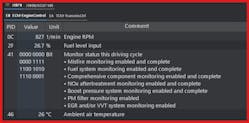
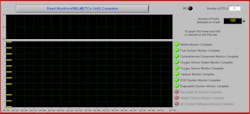
In many states, motor vehicles are subject to periodic inspection and maintenance programs (I&M) which include an OBD-II system interrogation. For the most part, the vehicle shouldn’t have any DTCs set or monitors in a non-completed state. However, there are some exceptions. Following a repair and a code clear will result in the monitors being cleared. Usually, the technician will want to execute proper drive cycles so that the vehicle will run and complete the OBD-II. However, there may be conditional prerequisites the vehicle needs to be within for a monitor to be enabled to run. I’m sure that you would agree that it is extremely important to know if the monitor you’re trying to run to is currently enabled or not. PID $41 shown in Figure 4 will let the technician know whether a particular monitor is enabled for the current drive cycle. Knowing where to obtain that information is extremely critical. Some tools also do a good job of displaying monitor status graphically such as the eScan from Automotive Test Solutions (Figure 5).
Mode $06
As you’re likely aware, the data reported here can be useful if clearly understood. For example, test IDs (TID) will display the MIN/MAX and test results for tests the system performs. Now it’s likely that you’ve heard that test results that are near the maximum are an indication of a pending failure. This is what I was led to believe until I attended the 2022 SAE OBD-II symposium in Anaheim, California. At this event I also attended an all-day training session titled “Emissions-Related OBD Systems: A Design Overview.” Now while this session was designed for calibration engineers, I learned a lot and gained a higher level of respect for the operations these on-board systems are running on the very machines we are tasked with diagnosing and maintaining. I learned two significant terms that the engineers focus a great deal of attention on. Best performing unacceptable (BPU) and worst performing acceptable (WPA). These are the two targets (slopes) the engineering teams work with to design their OBD systems which in turn, drive the quality of the parts equipped on the vehicle and the software running these systems. Anyhow, later that week, I attended a General Motors presentation on exhaust gas monitoring which is slated for the future where NOx and other gasses are planned for future direct on-board monitoring. The presentation started off with talking about Mode$06 and how it has been found to be misused in service. Specifically, the presenter went on to state that technicians were performing service part replacements based on Mode $06 test results that were landing near the maximum limits. The facts are that if you see certain test results near the maximum limits, it doesn’t necessarily mean that there is a failure. However, there are certain Mode $06 TIDs that can be helpful such as misfire. For a vehicle that arrives with a P0300, the technician can scan the Mode $06 data and look to see which cylinder is showing the most misfire activity.
Mode $09
The data reported in this area is known as in-use performance monitoring (IUPM) and can be very useful for discovering how often monitoring conditions are met and how often they have been completed. This information can be leveraged in cases where you’re trying to understand why a monitor is difficult to complete. If you’re unfamiliar with this area, you may want to begin gathering data from this area as it can be quite revealing, especially with new propulsion systems since the California Air Resources Board has mandated certain propulsion performance statistics be reported here as they pertain to hybrid and battery electric vehicles.
Data PIDs
After collecting DTCs, freeze frame, and Mode $06/$09 you will likely move to Mode $01 which of course is live data. Whether you’re looking at generic or manufacturer-specific information, as mentioned earlier, you need to know how to leverage such data.
Case Studies
Case Study #1: Poor Performing Ford Edge
Recently one of my technicians asked me for a second opinion on a 2019 Ford Edge 2.0L he was addressing for a complaint about poor performance. This was a new client and they stated that the vehicle seemed to be misfiring and lacked smooth acceleration. My tech stated that the only DTC stored in the vehicle was related to the front shutters which he didn’t think were related to the performance problem. He also stated that there was no misfire history statistical data reported in Mode $06. So, I decided to grab one of my go-to devices and record some data while performing a road test. Sure enough, I felt the condition and it sure felt as if the engine was misfiring under light load conditions. During the road test and while I was recording, I proceeded to perform a wide-open throttle (WOT) sweep up through a shift point. I normally do this for most driveability analysis events so I can gauge the performance of certain systems. What I noticed is that during the WOT event, the vehicle performed properly with great acceleration.
When I returned to the shop, I proceeded to perform a data review. The first thing I noticed was that the normal data metrics such as fuel trim, spark advance, and temperatures, looked very normal and that I could see a distinctive change in engine speed during the light load misfire symptom. While reviewing the recorded data, I decided to match up the vehicle speed sensor (VSS) signal with the engine speed (RPM) by adjusting the MIN/MAX ranges of their respective axes to see if I could visualize what I suspected.
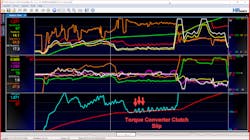
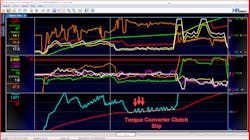
As you can see in Figure 6, the RPM trace is unsteady as opposed to the VSS signal which is indicative of torque converter clutch slippage since the RPM signal isn’t dropping significantly below the vehicle speed slope.
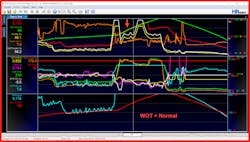
Looking further, you can see in the recording, that during the first and second gear operation, each RPM slope was smooth. When I entered the third and fourth gear, the vehicle exhibited the symptoms the client was complaining about. Looking at Figure 7, you can see in the top row (green and red traces), that I adjusted the RPM and VSS Y-axes so that the WOT segments paralleled each other demonstrating the lack of torque converter slippage.
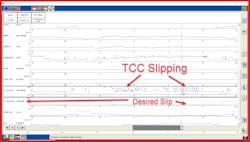
Since I was preparing for this article, I decided to connect the Ford factory tool (IDS) to have a look at what their scan tool offered to confirm my suspicions that the torque converter clutch (TCC) was slipping. Figure 8 shows us that indeed the TCC is slipping.
In conclusion, the Ford Edge with only 44,000 miles will be visiting the dealer for warranty work. The scan tool provided us enough information with generic data to conclude that the engine performance was nominal, and the symptoms were caused by a slipping torque converter clutch. Additionally, if you look at the middle traces in Figure 7, you can see the wide band sensor is reporting lambda (Wide Band Bank 1) closely following the equivalence ratio command (EQ) during a WOT event in power enrichment (PE) mode. These numbers are indicative of a healthy system and validate that several systems are operating properly such as:
- Low-pressure fuel delivery
- High-pressure gasoline direct injection
- Turbo operation
- Proper cylinder air flow estimation (airmass)
Case Study #2: Comeback - 2006 Toyota Tacoma V6 – P0171 P0174
We recently had a vehicle come in for multiple misfire DTC which ended up needing coils and plugs to rectify. The technician performed a road test and found that the vehicle's performance was nominal. The problem is that a proper road test with data analysis was not performed. The vehicle returned a week or so later with a complaint that the MIL was on and that there was some “pinging” that could be heard coming from the engine under light load operation. However, the client did state that the vehicle was no longer misfiring.
I proceeded to acquire some of the key performance data parameters I typically record during a road test after seeing that DTCs P0171 and P0174 were set. During my road test, I observed light detonation occurring while driving. Then as part of my normal road test procedure, I performed a WOT pull making sure that I was able to sweep from 3,000 to 5,000 RPM noting that this engine produces maximum torque at approximately 4,000 RPM. The significance of this RPM point is that this is where the engine will achieve maximum volumetric efficiency.
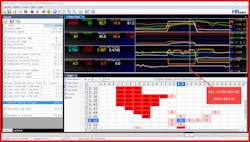
After returning to the shop, it was time again to analyze the data. The data displayed in Figure 9 is very telling.
At 4,038 RPM, you can see the absolute load is at 60.4 percent which isn’t good in my book. Additionally, since this engine is equipped with two wide-band sensors, they are reporting a lean condition across the entire WOT pull. Looking at the MAF data along with my MAF Cyl Air6 math PID, I can conclude that the air mass numbers are underreporting. See my article titled “Solve driveability issues, emissions-related failures with fuel trim diagnostics” from 2021 for more information (VehicleServicePros.com/21241453).
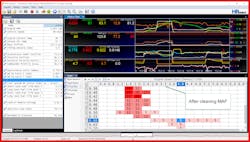
The next step was to inspect the air flow tract to see if there was anything that could be upsetting the MAF signal. Seeing that there was none, we removed the sensor for inspection. We could see clearly that the sensor was quite dirty, so we attempted to clean it which on this vehicle isn’t very feasible. After our attempt, we took the vehicle back out on the road for a repeat test and Figure 10 shows our results.
As you can see, the numbers have greatly improved. The absolute load is now at 77.2 percent which aligns with our quick math on the cylinder air equation. We sold a new MAF sensor, cleared all adaptive memory, and placed the vehicle back into service where it is currently operating properly. What we learned here is that although you may have a gross error (multiple defective coils), a diagnostic technician should always remain curious and perform a final road test evaluation while recording the proper key performance indicators. Now if we had good airflow numbers with a lean exhaust, then we would proceed to investigate the fuel supply side of the vehicle.
Looking back on my two images (Figures 9 & 10) you can see the 3-dimensional graph in the lower right of the screen. This graph is configured to show an averaged value of long-term fuel trim (LTFT) over an RPM/cylinder airmass table. Some scan tools allow you to configure tables like this which can be useful for visualizing data. In fact, looking back on Figure 3, this table was used to monitor boost on a turbocharged vehicle that was suspected of having an intermittent leaking wastegate valve. This chart takes advantage of a math PID that automatically finds the difference between actual and desired boost.
Conclusion
Modern driveability diagnosticians not only rely heavily on scan tools and OBD-II data to troubleshoot performance issues effectively, but they must also possess the inquisitiveness necessary to properly analyze and diagnose these systems. They also need to have a heightened level of situational awareness of the tools and equipment available to take on these demanding tasks.
