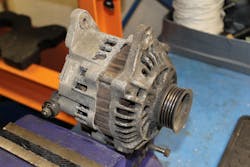
Alternators serve two distinct purposes on any vehicle, the first is to provide power to meet all of the electrical needs while the engine is running (electrical system, lights, interior accessories, etc). The second is to charge the battery, so it will have enough power to prime the fuel pump, crank the engine and start the vehicle.
There are many things that go wrong with the electrical systems on a vehicle, and typically it will boil down to something other than a major component. Corrosion, grounding issues, and open circuits are the three main culprits when you are trying to find a problem. So, rather than “throwing parts at it,” first you will need to try and pinpoint what is actually wrong.
Q: The customer complains that the car won't start in the morning without a jump, and the battery/charging light stays on while driving. Doesn't that mean the alternator is having a problem?
A: Not necessarily. There are a few things right off the bat that you need to check before replacing parts, because many times this can be something as simple as a loose or corroded battery connection.
Pop the hood and look at the battery terminals/connections. Grab the positive connection and wiggle it…. if no movement, repeat with the negative side. If either can move at all, either tighten them to prevent movement or replace the connectors to ensure a tight fit.
If you see any corrosion, you need to remove the terminals, clean the corrosion off of the battery posts and the terminals, then reinstall. You can use battery terminal cleaner such as CRC Battery Cleaner, or you can use plain Coca-Cola to completely eat away the corrosion and douse with water prior to using a wire battery terminal brush to clean everything up.
You should check the battery to ensure that it is in good condition and holding a charge correctly. If batteries are deeply discharged, overcharged, damaged or simply old, they can and will fail. The first step you should do is use a multimeter such as the Milwaukee 221620 Digital Multimeter, and verify the voltage level as being between 12.4V and 12.6V . If the voltage is below 12.4V , you will need to charge the battery first and repeat the test.
Assuming that the voltage is now reading between 12.4V and 12.6V, you should now complete a “load test.” This is done very easily and quickly by using a battery load tester such as the OTC 3181 Load Tester . You hook the positive cable first and then the negative, then press the rocker switch on for 10-15 seconds. The load tester will heat up coils inside (creating a load) and you can watch the dial to see if it stays in the “good," "weak" or "replace” range. The problem that many people have when testing a battery is the fact that they are testing it with no load applied and it will read the correct voltage, and that will hide the fact of “bad cells” inside. By placing a load on the battery, you are mimicking the power draw needed by the starter to turn the engine over.
Q: Okay, so the battery connections are tight, there is no terminal/post corrosion, and the battery is charged & load tested fine… that means the alternator is bad, right?
A: Not necessarily. The next step is to verify that the drive belt that turns the alternator is properly tensioned. A belt that is “too tight” or “too loose” will cause charging issues that in turn will cause the problems your customer describes. Perhaps they had another shop change the motor mount two weeks ago, and the tech didn't remember to tighten the tension bolt enough, causing the belt to be too loose. It would have started fine a few times (especially if it is in mild weather, and not much night-time driving, just by using the battery power). Now the battery could have dropped to a point that there is a noticeable problem such as a no-start situation. Always verify belt tension prior to replacing parts.
The next step will be to check the wires going from the battery to the alternator and the grounding cables. If there is corrosion, damaged wires, or loose connections at any one point with those, you will have the same issues that the customer complained about. Remember, corrosion, grounding issues and open circuits are the three major reasons for electrical problems.
Q: I verified the belt is correctly tensioned, and there are no loose connections or corrosion. Is it time to swap out the alternator?
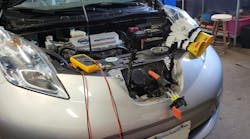
A: Not yet. Next you will want to verify the voltage that the alternator is producing when the engine is running with and without additional power draws. First, using your multimeter such as the Milwaukee 221620 Digital Multimeter, take a reading of the battery voltage with the vehicle off. It should read between 12.4V and 12.6V. If the volts are too low, charge the battery. If the volts are too high, turn the headlights on for a minute, turn them off and re-read the voltage. Continue doing this until the volts read between 12.4V and 12.6V.
Next, you will need to start the vehicle & with no additional accessories running (lights, radio, fan, etc), take a reading at the battery terminals. You will need to see a reading at minimum 0.5V higher than the battery voltage when the vehicle is off.
With the vehicle still running, turn on all the accessories you can (high beams, radio, a/c or heat, defroster, etc). Take another reading at the battery terminals. You should see at minimum 0.5V higher than the battery voltage when the vehicle is off.
Q: I took the readings and the voltage is less than 0.5V above battery voltage. What does this mean and what do I do?
A: Normally this is where you would replace the alternator. However, there are a couple other factors that you need to take into consideration and think about prior to buying parts.
- Does the vehicle have aftermarket addons? I.e Stereo, subwoofer, sound system, alarm, additional exterior lighting, etc. These things can add a large power draw onto a vehicles stock electrical system, and can cause many issues. If they require more power than a stock alternator can produce, then swapping it out with an OEM replacement will not solve the issues. You will need to have the customer remove the aftermarket accessories OR you will need to install an alternator with a higher AMP rating than the one you are removing.
- Some people have heard that rebuilt alternators and new alternators are not the same quality. They think that buying an OEM one ensures they are getting a “good one." The problem is that all companies occasionally have manufacturer defects with products. You should always have the “new” or “rebuilt” alternator bench tested at your local autoparts store prior to installing. This will ensure it is producing the correct voltage, and that the diodes & voltage regulator inside the unit are functioning correctly.
- Some vehicles have external voltage regulators. This controls the voltage that the alternator produces. So even if the alternator is not producing the correct amount of power, it may be the external voltage regulator causing the issue. Many alternators however, have an internal voltage regulator, so you need to swap out the whole thing to fix the issue.
- Lastly, some vehicles have issues with the ECU failing, which can cause the voltage regulator to fail/work incorrectly. If that is failing, it may require an ECU swap to resolve your issue.
Final Thoughts: Unlike most vehicle repairs, where diagnosing the issue can be as simple as seeing a broken bolt, electrical issues are rarely that easy. Many shops/techs simply do not have the time, experience, or tools they need to correctly identify and fix the issues that their customers are having. Sadly, many of them have the attitude of “throw parts at it” and it ends up costing the customer (in the short term….with a high repair bill) and the shop (in the long term…..with loss of an unhappy customer), when the repairs they complete end up doing nothing to fix the problem.
Take the time to diagnose the issue. Starting at the most basic (battery corrosion) and work your way up to the alternator. Many times something very simple is causing a big problem.


