Customer concern: Blown head gasket.
Vehicle: 2005 Honda Civic 1.7L
Tools Used:
- Snap-on Modis Ultra scan tool
- General Technologies TA500 C.O.P. Ignition Tester
- Blue Point GA111D Mechanics Stethoscope
- Matco AC560000 Combustion Leak Tester
- OTC 5606 Compression Tester
- Snap-on EEPV309A Leak Down Tester
- OTC 3880X Automotive Inspection Camera
Steps to diagnosis:
- Pull the codes
- "Smart" checks - basic overview of vehicle
- Combustion basics: check the spark, fuel and compression
- Cylinder leakdown test
There are many ways to test for a blown head gasket. There are also many things that can trick you into thinking it’s a blown head gasket, so taking extra steps to double-check your conclusion is always imperative. Selling a customer a head gasket job or a new motor is quite a large bill, so you need to be 100-percent confident.
In this case, we have a 2005 Honda Civic 1.7L with 200K miles on it. Customer complaint is the vehicle runs terrible all the time and the "check engine" light is flashing. It also has hard starting after sitting. It started a while ago and progressively got worse.
Step 1: Pull the codes
Running terribly and having a flashing MIL can only mean one thing: Damaging misfire. The first step is to figure out which cylinders are misfiring. We will be using the Snap On Modis Ultra for its user-friendly interface to pull the codes, but any scan tool will work. There is no need for factory-level software at this time.
The scan tool pulled the following codes: P0302 - Cylinder 2 Misfire, and P0303 - Cylinder 3 Misfire.
Step 2: Smart Checks
Basics, basics, basics! I say it every time to save you time. The smart checks are those simple checks that can save you time. Are there any TSBs? Is there anything noticeable from a visual inspection under the hood that stands out and says, “Hey, look at me! I am out of place!” In our case, nothing popped up to us to indicate anything obvious. Looks like we have to dig in.
Step 3: Combustion Basics
Well, we all know what we need for combustion: spark, fuel and compression.
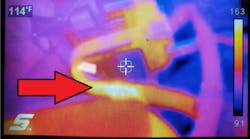
First we will test spark using the General Technologies TA500 C.O.P. Ignition Tester. This tool is very efficient because it does not require the technician to pull the C.O.P. ignition coil, hook up the inline spark tester, look at the spark, and then try to figure out if it’s good or weak, if it is there. You simply put the TA500 probe up to the ignition coil, and the screen shows you everything you need to know about that coil, including Kv, and burn-time. It cuts testing time way down. Every coil on this vehicle was firing, therefore it’s time to move on to the next step.
With cylinders 1 and 4 firing, its safe to assume there is fuel pressure, since Honda’s take time to hook up a fuel pressure gauge. If further testing reveals everything else to be in working order, then it is OK to come back later and check pressure. So we will listen to make sure the injectors are actually opening and closing, and that nothing is plugging them, or if they are not doing anything at all.
We use the Blue Point GA111D Mechanics Stethoscope and listen to each injector. You should be able to hear an audible tapping from the injector, indicating that its opening and closing. In our case, we heard it loud and clear. Even comparing to known good cylinders, its sounded exactly the same. So it’s safe to say the injectors are working.
Before tearing things apart for a compression check, it’s sometimes good to just run a combustion leak test on the vehicle to give an idea of how the head gasket is doing, since it is quick and easy. The block test is simple. Suck air out of the cooling system, if there is exhaust gases in the cooling system, the fluid changes color. We use the Matco AC560000 Combustion Leak Tester. The AC560000 has two separate chambers for coolant, which is good because it makes the test more accurate so that you can tell if the fluid is actually changing colors, and not coolant being sucked in.
Our block test fluid changed colors, indicating a blown head gasket. Now, we know it’s possible the misfire is coming from a blown head gasket, but we need to go further to see if that's the cause. Especially with Honda, many times you can have a head gasket start to leak, but the vehicle will still run great. So we continue on to our compression check.
We use the OTC 5606 Compression Tester. It is a very durable and accurate tester. Our findings on the compression test are Cylinder 1 has 150 psi, Cylinder 2 has 250 psi, Cylinder 3 has 250 psi, and Cylinder 4 has 150 psi. The minimum spec is 125 psi. So how is that possible? Better compression on Cylinders 3 and 4? Simple: You cannot compress coolant like you can fuel and air. Therefore, there are times when compression will actually go up with a severely blown head gasket, since coolant seeps into the cylinders.
Step 4: Confirmation
Being that the customer has 200K miles on the vehicle, doing a head gasket replacement is not an option. It leaves too much risk for other potential problems. The Civic needs a new motor. This is a huge expense for the customer, therefore we need 100-percent confirmation that the head gasket is causing it.
So, the best test for this is a cylinder leak down tester. The plugs are already out and the fuel injectors are already disconnected, all we need to do is set Cylinder 2 on TDC (top dead center). After doing that, we get our Snap-on EEPV309A Leak Down Tester, and set it up. Sure enough, it reads 70-percent leak down. We can hear air escaping through Cylinder 3 as well, and the coolant in the radiator is bubbling. This is definitely a serious indication that Cylinders 2 and 3 are gone.
The last step, which builds good customer trust, the borescope. Not only will all the documentation of testing you did show them that its definitely the head gasket, the OTC 3880X Automotive Inspection Camera (also known as a borescope), is perfect. First, we put the inspection camera into Cylinder 1 and record it to show what the vehicles cylinders at that mileage look like normally. Then into Cylinder 2 and record it. Cylinder 1 is completely black and built up with carbon from the combustion process. Cylinder 2 is extremely clean and looks almost new. This is because it’s basically been steam cleaned of its carbon deposits.
With the test results, footage of the cylinders, and a good explanation of what is happening, we now have a customer who may be a bit down that they need a motor, but they are glad they understand exactly why and how it’s happening, all while having full confidence that our diagnosis is 100-percent accurate.