has the option of either WiFi or wired communication, to streamline smog checks. The unit also features a convenient steering wheel hanger. For product details, visit: VehicleServicePros.com/11590550")
Customer Concern: Customer comes in for a smog check that fails.
Vehicle: 2008 Audi A6 Quattro
Tools Used:
- W.E.P. OIS 7500 Data Acquisition Device (DAD)
- Associated Equipment Intellamatic Pro Series Charger ESS6007B
- Scan Tool
- Launch J-Box
- Mitchell 1 ProDemand
- erWin website-TSB for ECM update cold start misfire
Steps to diagnosis:
- Smog check
- "Smart" checks - basic overview of vehicle
- Pull and analyze freeze frame data using a scan tool
- Reflash the vehicle
- Stabilize the power supply
- Access OE service information
In the State of California, many changes have been occurring for the state Smog Check Program, and all for the better. The Bureau of Automotive Repair (B.A.R.), who has the task of running our I/M testing program, has been working hard to make it a more effective program, as well as easier on the technicians involved. This is a big change from the B.A.R. of the past, who seemed to only hand out citations and attack shops. This is good news for licensed smog technicians and the people of California.
One of the changes happening is the switch to OBD II testing on 2000 model year vehicles and newer. Smog checks on vehicles newer than MY 2000 do not require dynamometer and tailpipe tests.
Why is this a good thing? One reason is the calibration tolerances of the five-gas analyzers leave way too much room for error; especially considering how precise the emissions cut points for a vehicle today are suppose to be.
Another reason, a snapshot on an analyzer is just that; a snapshot. We are measuring in percentages and parts per million (PPM) off a quick shot on a dynamometer. This will not produce the same results as the way OBD II and the California Air Resources Board (CARB) tests for emissions, which is at grams per mile. This is why occasionally we see a vehicle fail a smog check without an illuminated 'check engine' light. Therefore, OBD II is a more accurate test than a tailpipe test on vehicles with such low emissions.
The best part about OBD II testing? Well, the test is quick and painless, which improves the customer experience.
Step 1: The Smog Check
In our situation, we had an Audi A6 Quattro come in for its first smog check.
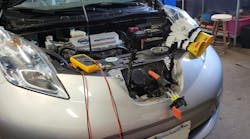
Being a 2008, we'll test the vehicle with a Data Acquisition Device (DAD) unit. The unit we are using is the OIS 7500 Data Acquisition Device made by Worldwide Environmental Products (WEP).
Almost all I/M test equipment is the same, as it all has to meet strict requirements set by the State of California. We chose the WEP DAD unit, however, not only because it meets the requirements of the state, but it is also created to be user-friendly, and has the concept of efficiency in mind. The OIS 7500 DAD has the option of either WiFi communication or wired communication. This streamlines your smog checks, especially when your shop is full of cars or the vehicle won't fit in the bay.
You just disconnect the DAD and take it to the vehicle, instead of bringing the vehicle to it. It also has a built in verification tool and charger, so you can easily make sure your unit is properly charged and communicating. No more unforeseen equipment failures halfway through your test like the old days. So, you can see that Worldwide Environmental Products knows how to make a tool that will not only meet or exceed standards to test vehicles, but also to be a smooth running tool, which is profitable to the shop owners and technicians using the equipment.
The OIS 7500 DAD comes with a convenient steering wheel hanger, so we hang our DAD unit from the steering wheel and run the test. Unfortunately, this Audi has a Malfunction Indicator Lamp (MIL) and codes stored in the system, which subsequently is a failure of the smog check.
According to the failure sheet, the codes stored were P0300, P0301, P0302, and P0305. So right off the bat, we can see it has misfire codes in the system. But right now, we cannot feel that the vehicle is misfiring. It is running smooth. We now explain to the customer that the vehicle failed due to codes stored in the system.
Service Writer Tip: When explaining a failed I/M test to a customer due to the MIL being illuminated, many times its better to explain it as “failing for codes stored in the computer," since many customers will get mad that you performed the test while knowing the entire time that the vehicle was going to fail for the MIL lamp being on.
Step 2: The Smart Checks
After the customer gives the go-ahead to diagnose and fix the car, it's time to start with the most important part, which I like to call the "smart checks." These are your important basics.
First, the visual portion. We did the visual inspection during the smog check, which turned up nothing out of place. So, we are going to check it again to be sure. Under the hood, we find a direct injection system and a lot of plastic pieces, but nothing standing out. Also, the vehicle is still running smooth.
Next check those Technical Service Bulletins (TSBs). Using Mitchell ProDemand, we find a TSB for a cold start misfire. According to the TSB, if there are misfires and the freezeframe shows the occur at a cold start, then there is a flash update to correct the problem. So, considering we do not feel a misfire under normal operating conditions, the next step would be to see if its under cold conditions.
Step 3: Pull freeze frame data using a scan tool
For pulling freeze frame data, we can use any scan tool, as this is a generic function that all tools can perform. The data we found was the engine coolant temperature was 75 degrees F and the intake air temperature was about 72 degrees F. This definitely shows a cold start misfire, as it is under 100 degrees F and is within 10 degrees F of the outside air.
Deciphering freezeframe data is a huge tool to use in diagnosis and repair. Especially since 2010 and newer vehicles have permanent diagnostic trouble codes (DTCs). These are codes which are written into the computer and can only be cleared by the vehicles monitors seeing a fixed vehicle, which means we can not just clear the code and let it go anymore. We have to let it self-clear.
Technicians will be forced to reproduce the failing conditions and verify that they did the repair right. How do we know what the conditions were that it failed in? By deciphering the freezeframe data.
Step 4: Reflash
In the aftermarket, we do not have access to EVERY factory scan tool and software, as it would cost a small fortune. What we use is called a J2534 Pass Thru Device. “J2534” refers to the SAE International (formerly Society of Automotive Engineers) recommended practice on reprogramming equipment. It was created as a result to the California Air Resources Board and the U.S. Environmental Protection Agency's requirements that reprogramming of control modules that effect emissions need to be readily available to aftermarket sources. If you are interested in the recommended practice document, you can purchase it at SAE.org.
To the younger generation, doing a reflash is not much different than downloading a new computer game. Chances are, you are going to have to navigate through and figure out how to adjust everything so it works right. There seems to be a huge fear of reflashing, but the reality is, it's not as difficult as you may think. Just take the necessary precautions.
Compare it to taking off the lock ring on a GM fuel pump. How many people use a screwdriver and mallet to bang it loose? Is it unsafe and possible to create a spark that lights off the fuel tank? Absolutely! That's why we use a rag between the ring and screwdriver. Does it even cross our minds anymore with the rag there that we could possibly create a spark and ignite a fuel tank? No, it doesn't.
It's the same type of thing with reflash. Yes, as with everything we do, there's a possibility for catastrophic failure. However, if we just follow necessary precautions, we have nothing to fear and should be totally fine with doing it.
The most important step is picking the right J2534 pass thru device. We will be using the Launch J-Box, which is a version of the Drew Technologies J2534 pass thru device.
The next thing you need is a dedicated laptop. Preferably one that will not have any pop-up blockers, anti-virus software, firewalls or other items that will pop up and interfere with the flash. This is one of the biggest problems with reflash. The pass thru program operating on the computer can look just like a virus to all your protection software. It sets off red flags with protection software you may not have even known you had on your computer. This is why its best to make sure virus protection programs are turned off before beginning a reflash, or you have a dedicated computer to just reflash that doesn't require virus protection.
Step 5: Stabilze the power supply during reflash
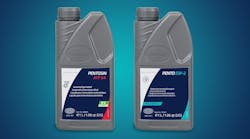
Last of the hardware devices, is a battery charger / maintainer. One which will keep a steady charge on the battery without any fluctuations. These fluctuations are capable of toasting your vehicle ECM, which means you just ruined everything. Don't be afraid of reflashing because of this, though. It is rare that it actually happens. For keeping a proper charge, we will be using a charger from the ESS6007B Intellamatic Pro Series by Associated Equipment.
This charger has a system that keeps a stable power supply that does not fluctuate, and therefore keeps a steady 13.7V DC output. This is perfect for reflashes and without the fluctuation, the chances of roasting a module are nil. The chargers in the Intellamatic Pro Series are also designed for a steady and smooth charge of all types of batteries, including absorbed glassmat (AGM), gel cell, sealed and standard flooded. The chargers also have diagnostics to indicate weak batteries.
With the charger hooked up, we then hook up our laptop to the J-Box, and the J-Box to the car. The J-Box is basically a gateway from our laptop to the car's computer. There should be a green indicator on the side showing that we are good to go.
Step 6: Access OE service information
Now we need to go to the Audi service website. The best link to reflash websites, is the National Automotive Service Task Force (NASTF) website: www.nastf.org. Once on this website, you pick from the menu, “OEM Service Websites.” This gives you a list of all the factory service websites for purchasing OEM service, diagnostic and reflash information.
Audi's website is erwin.audiusa.com. Once on the first page, we are going to log in. Next, on the right we are going to click “search.” There will be a menu in front of you with “Guided Search.” The tab next to it will be “Manual Search.” From the "Manual Search" menu, select "Model Year 2008,” then "Model: A6 / S6 / quattro / Avant [4F] (>2005)." Then from Category 1, select “Bulletins & Recalls."
(See a step-by-step screenshots of this Audi cold-start misfire diagnoses, with the Launch Tech J-Box.)
As we scroll down the list, we come across the title “2024632/3 Powertrain/ Vibration/ Engine area- while vehicle is moving 01 MIL on, cold start misfire (Misfire DTCs P0300-P0306 in ECM)." This is the document to purchase. After purchasing the document, be sure you have the most updated version of Adobe Flash Player, as this will not work without it. Follow the prompts from the website to reflash to the current calibration file. VW/Audi vehicles generally reflash pretty quickly when done off TSB files.
Once finished, we start the vehicle and test drive it to make sure everything works properly and there were no “quirks” that occurred from the reflash.
Its good to check everything after a reflash, including door locks, lights, windows, run DTC scans on all systems, etc. When a vehicle communicates on a CAN bus, any glitch in the communication process can create issues in any system. For this reason it is important to double check. It should also be a habit to check for any issues prior to the reflash, therefore you are not wondering if you caused the glitch or not. Once we were done checking for issues and find it to be good, we leave the vehicle overnight to get cold.
Verification
First thing in the morning, we fired it up and went for a test drive, and not a single misfire was registered or recorded by the ECM.
We matched the conditions set in the freeze frame data perfectly and still felt it run smooth. With the OBD II-based testing, its best to run the monitors multiple times to show that its truly been driven, and this can be seen in the Mode $09 "In Use Performance Tracking." The more times the monitors have ran after a repair and have not produced another code, the better it looks on the technician who repaired it. Consider it a virtual pat on the back for doing your job right.