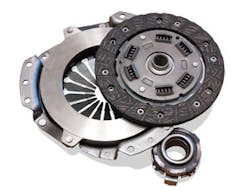
Proper diagnosis is the key first step with clutch problems
Although roughly 70 percent of today's cars come equipped with automatic transmissions, there are still plenty of models that use a manual transmission and clutch. As such, you need an awareness of how a clutch should perform when it's right — and what to do when it's not.
CHAT..CHAT..CHAT..CHATTER
Clutch chatter will be one of the most frequent complaints you'll encounter. You'll have to be careful analyzing chatter complaints, though, because they're often caused by other factors that make a chattering clutch a symptom, not the problem.
When inspecting a clutch with a chatter complaint, look for oil contamination, a poor flywheel surface, damaged release levers, a sprung clutch disc hub and improper alignment between the engine and transmission.
Clutch slippage is another common complaint that can be caused by a variety of factors, such as a damaged pressure plate, worn, binding or misadjusted linkage, incorrect clutch components and even normal wear.
Clutch drag comes last on our complaint list and is just the opposite of slippage. Drag occurs when the clutch doesn't release at all, or releases only partially. Clutch drag is usually caused by a worn, binding or misadjusted clutch linkage. Drag can also be caused by air in the hydraulic clutch linkage, damaged pressure-plate fingers and binding of the clutch disc on the input shaft.
CHECKING BORE RUNOUT
Now it's time to check bell housing bore runout. Install a dial indicator using a special holding fixture to the hub of the clutch disc. Have an assistant turn the crankshaft one complete revolution while you note the reading on the indicator. You should see less than 0.010” variation as the crankshaft is turned. If the reading you see is higher, make sure the bell housing is located properly on the back of the engine.
CHECKING FACE RUNOUT
Using the dial indicator once more, check the bell housing face runout. Change the position of the dial indicator so the plunger contacts the face of the bell housing. Again, zero the indicator and turn the crankshaft one complete revolution. Here, too, you should see no more than 0.010” variation. If the reading you get exceeds this, look for dirt or grease between the bell housing and the engine or possibly something pinched between the two.
INSTALLMENT PLAN
Once you've determined the cause of the clutch failure, and only then, are you ready to install the new clutch assembly.
Remove the old pilot bearing and compare it with the new one. If the old bearing has an eccentric opening, it's an indication that the transmission was moving around. Make sure that all the transmission bolts are installed and torqued to specifications when you put the gearbox back in. Install the new pilot bearing and lightly lubricate it with some high-temperature grease.
Next, clean the surface of the flywheel to remove any traces of oil. If the surface has scoring and heat cracks, resurface the flywheel before proceeding.
Using a clutch aligning tool, center the clutch disc between the flywheel and pressure plate. Install the bolts to mount the pressure plate to the flywheel, tightening them in an alternating pattern. When the bolts are all snug, torque them to specifications.
Position the bell housing with its throw-out bearing fork, then mount the housing to the engine. Apply a light coating of high-temperature grease to the fingers of the fork, and install the throw-out bearing.
TRANS MISSION
With your measurements and preliminary installation complete, it's time to install the trans back in its proper resting place. Make sure that all annoyances close by, like wiring harnesses and linkages, are tucked safely away to prevent damage and aggravation.
Line the transmission up as close as possible before entering the input shaft into the clutch splines. Take your time. The better you have the transmission aligned, the better your chances of quick and successful installation.
When you're satisfied with the alignment, ease the transmission ahead to engage the input shaft with the clutch splines. To "feel" where the two are at, sometimes it's helpful to leave the trans in gear so you can turn the input shaft by turning the output yoke. With a little practice, you'll get the feel of the splines engaging in no time.
Once the splines are engaged, move the trans ahead keeping it aligned at all times. You'll be amazed how easy the gearbox will slide in when everything's right.
When the transmission is back in place, install the mounting bolts and torque them to specifications. Connect the shift linkage and any necessary wiring.
FINISH UP
Connect the clutch linkage (if it's hydraulic, bleed the system to ensure proper slave cylinder action). Top off the clutch master cylinder when you're through.
Check a shop manual for the clutch free-play specification that applies to that specific model. Never leave a car go without checking and then rechecking the free-play adjustment. If there's too little free play, the throwout bearing may wear out prematurely and the clutch may slip. Too much free play can result in a dragging clutch and gear clash when changing speeds. Although some of today's cars use self-adjusting clutches that appear to leave little felt free play, there is a preliminary adjustment to make sure the self-adjuster works correctly from there.
Finally, road test the car to make sure that the clutch problem is gone.
By following these simple guidelines, you can keep clutch repairs — and customers — from slipping away.
